Nov 8, 2015 | ccna, Cisco router, csico, Image, Learn and Teach, minimum password
How to configure a minimum password length in a Cisco Routers
source here
As we all know by default there are no limitations on the size of password length in a Cisco router. Sometimes this may leads to a security risk. You can also configure a password with a single character in a Cisco Router.

Cisco Systems introduced a command to force the minimum length of password starting with an IOS version 12.3 (1). By default the length should be 6 characters, but you can change the default length.
To configure the minimum password length in your Cisco Router, use the following commands.
ITKERouter01#configure terminal
ITKERouter01 (config)#security passwords min-length 8
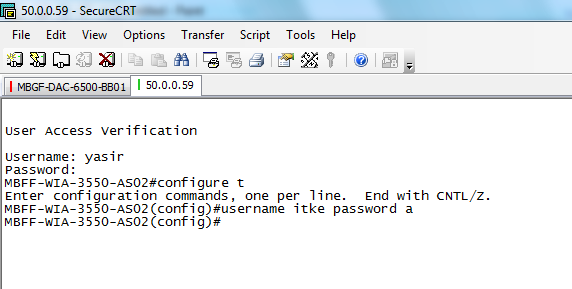
After entering the above command if you try to configure the enable secret to itke as shown the below, following error message will be displayed in your Cisco Router
ITKERouter01 (config)#enable secret itke
% Password too short – must be at least 8 characters. Password configuration failed
ITKERouter01 (config)#
Even if you try to configure the local username and password you find the same error.
ITKERouter01 (config)#username yasir secret cisco
% Password too short – must be at least 8 characters. Password configuration failed
ITKERouter01 (config)#
I would recommed you to enable this feautre in your Cisco Router for better security.
How to configure a minimum password length in a Cisco Routers
Nov 5, 2015 | Application, Image, ios resources, ipad, iPhone, Learn and Teach, Mac, mirror, Projector Screen, Show Your iPad on a Projector Screen, Technology
10 Ways to Show Your iPad on a Projector Screen Projecting your iPad on a large screen is great for demonstrations, simulations, explanations, and showing examples. There are several ways this can be done in the classroom. Scroll to the end of this post for a comparison chart.

Install software on your projector-connected computer and use device’s AirPlay feature to mirror the screen.Download Mirroring360.

Install software on your projector-connected computer and use device’s AirPlay feature to mirror the screen. Get X-Mirage.

Install software on your projector-connected computer and attach device using its USB cable and choose Live Desktop. Windows only.

Update to OS X Yosemite on your projector-connected Mac and attach device using its Lightning cable. Open QuckTime & choose iPad as the camera source.
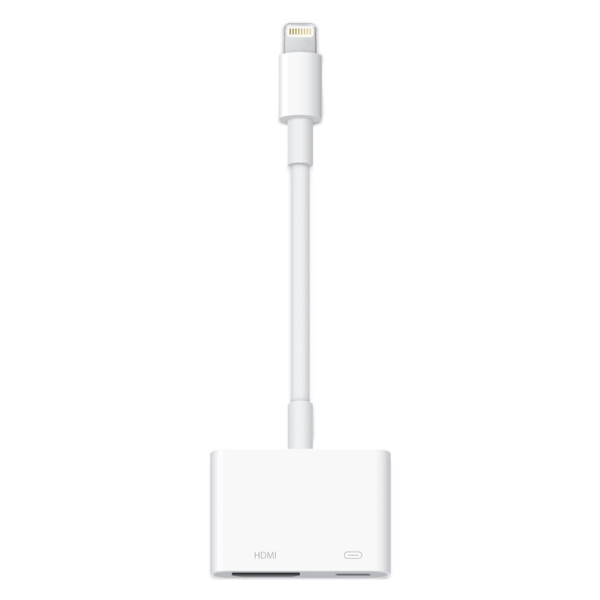
If you don’t mind keeping your iPad in one spot, then a VGA adapter (for 30-pin Dock connector or for Lightning connector). Apple has made four types of adapters – determine which one you need. Or, a document or USB camera might work for you.
If you want to wirelessly transmit your device’s screen and audio so that you or your students can walk around the room, then it gets more complicated. You’ll tap into Apple’s AirPlay feature that is built into all iPad 2s and newer, including iPad mini. AirPlay works over Wi-Fi and requires all devices using it to be on the same network (unless you’re using the newest Apple TV and iOS 8–then you can use a peer-to-peer connection or if you’re using Mirroring360).
Apple TV is a small black box that can connect to a projector. iPad can mirror wirelessly to Apple TV using AirPlay. Apple TV only outputs HDMI. Your projector might not have HDMI input. If that’s the case, you’ll need an HDMI to VGA adapter like the Kanex ATVPRO. Read more about Apple TV in classrooms.
If you already have a computer connected to your projector, you should look into using software to turn that Mac or Windows PC into an AirPlay receiver. You can download and try for free AirServer, Annotate Mirror Client, iTools, Mirroring360, Reflector 2, or X-Mirage. The software runs on your computer and allows devices to mirror iPad to the computer screen. Since the computer is connected to a projector, then the iPad shows on the projector. I’ve written lots more about both AirServer and Reflector.
In my visits to various schools, I’d say that Apple TV, AirServer, Reflector, and X-Mirage work about 50% of the time. That’s because AirPlay requires the device and the computer or Apple TV to be on the same network (unless you’re using the newest Apple TV and iOS 8). Often schools have different networks for mobile devices and for PCs so AirPlay won’t work. Also, AirPlay requires specific ports to be open on the network for Bonjour (and frequently they are not configured to be open).
Mirroring360 has a feature called Mirroring Assist. It can work without the need to open ports for Bonjour. That means Mirroring360 can work on your school’s network, even when other AirPlay solutions do not. Another feature of Mirroring Assist is the option to turn off the broadcasting of your computer on AirPlay. Instead, devices can be paired with your Mac or PC via a QR code. This is a very welcome feature in schools with long lists of computers under the AirPlay menu.
Even if your network allows for AirPlay connections, it also needs to be reliable. Many teachers experience slow and dropped AirPlay connections, which can make mirroring a frustrating experience. It’s a good thing there are free trials of each of the software mirroring solutions so you can test your school’s setup before purchasing.
If your Wi-Fi network won’t cooperate with AirPlay, you should check out iTools. It’s free software for Windows PCs that will mirror to a computer using your device’s charge/sync cable. iTools Live Desktop feature is buggy and might not work on your computer, and there is no help documentation.
After upgrading to to OS X 10.10 Yosemite, Mac users can mirror their iPad’s screen using a Lightning cable. iPad will show up as a camera source in QuickTime.
When you mirror your screen, it’s a great opportunity to use your iPad as a document camera! You’ll want to buy or rig up some sort of stand to use iPad as a visualizer. I wrote about the Justand v2 and other options in this post, including apps that let you draw and annotate over the image.
I maintain a chart that compares the methods of displaying iPad’s screen on a projector. Click the image below to download the PDF.
Disclosure: Links to Amazon and ProComputing are affiliate links and Learning in Hand may get paid a commission if you make a purchase.
Oct 27, 2015 | apple configurator, configurator, Image, ipsw, Learn and Teach, Mac, store
stored in:
[notification type=”notification_info” ]~/Library/Group Containers/K36BKF7T3D.group.com.apple.configurator/Library/Caches/Firmware[/notification]
Where does Apple Configurator store ipsw downloads
HERE ARE THE LINKS CAN HELP YOU TO KNOW MORE ABOUT APPLE CONFIGURATOR
-
About Apple Configurator 1.7.2
-
Open the Mac App Store to buy and download apps. Apple Configurator makes it easy for anyone to mass configure and deploy iPhone, iPad, and iPod touch in a school, business, or institution.
-
You can use Apple Configurator to quickly configure large numbers of devices with the settings, apps, and data you specify for your students, employees, or customers
-
Learn how to back up your Apple Configurator data.
-
You can deploy Mac and iOS devices in education and business environments using Apple Configurator or the Apple Deployment Programs. This article helps you decide which to use.
Redemption Codes
-
Learn how to use Apple Configurator 1.x to deploy copies of paid apps using redemption codes purchased from the Volume Purchase Program (VPP).
-
When trying to deploy an app purchased using the Volume Purchase Program (VPP), Apple Configurator may state “Unable to redeem code”. The detailed message includes “Please enter your …
Profiles
-
Learn how to import Enrollment Profiles created in Profile Manager into Apple Configurator, then install the profiles onto devices.
-
You can use Apple Configurator on OS X to install configuration profiles on your Apple TV.
Oct 26, 2015 | ccna, Image, Learn and Teach, network, static route
Configuration Example Static Routes
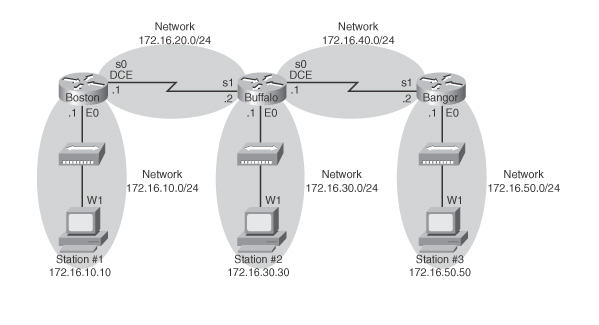
Figure 6-1 shows the network topology for the configuration that follows, which shows how to configure static routes using the commands covered in this chapter.

Figure 6-1 Network Topology for Static Route Configuration
NOTE
The host name, password, and interfaces have all been configured as per the configuration in the Chapter 3 configuration example.
Boston Router
| Boston>en |
|
| Boston#config t |
|
| Boston(config)#ip route 172.16.30.0 255.255.255.0 172.16.20.2 |
Configures a static route using the next-hop address |
| Boston(config)#ip route 172.16.40.0 255.255.255.0 172.16.20.2 |
|
| Boston(config)#ip route 172.16.50.0 255.255.255.0 172.16.20.2 |
|
| Boston(config)#exit |
|
| Boston#copy run start |
|
Buffalo Router
| Buffalo>en |
|
| Buffalo#config t |
|
| Buffalo(config)#ip route 172.16.10.0 255.255.255.0 s1 |
Configures a static route using the exit interface |
| Buffalo(config)#ip route 172.16.50.0 255.255.255.0 s0 |
|
| Boston(config)#exit |
|
| Boston#copy run start |
|
Bangor Router
| Bangor>en |
|
| Bangor#config t |
|
| Bangor(config)#ip route 0.0.0.0 0.0.0.0 s1 |
Configures a static route using the default route |
| Bangor(config)#exit |
|
| Bangor#copy run start |
Oct 26, 2015 | autoCAD, AutoCAD error, AutoCAD error Softlock license manager, error, Image, Learn and Teach, windows
Licensing: The security system (Softlock license manager) is not functioning or is improperly installed
AutoCAD error Softlock license manager
you have corrupted installation of an Autodesk program or if you have tweaked the registry to change the license method
You might see the following error when starting the Autodesk program.
“The security system (Softlock license manager) is not functioning or is improperly installed”
Reason for the error could be a corrupted installation of an Autodesk program or a registry tweak to change the license method from Network to Standalone.
Most cases clean uninstall and reinstall of the Autodesk Program should fix the issue.
If it doesn’t fix please delete the license file and re-activate the software.
License files are located here.
On Vista or Windows 7:
C:ProgramDataFLEXnetadskflex_00691b00_tsf.data
C:ProgramDataFLEXnetadskflex_00691b00_tsf.data.backup
On Windows XP:
C:Documents and SettingsAll UsersApplication DataFLEXnetadskflex_00691b00_tsf.data
C:Documents and SettingsAll UsersApplication DataFLEXnetadskflex_00691b00_tsf.data.backup
If the issue persists it could be related to the user permission, so please try to install and run the software as a local administrator account.
for the users that cannot see the folder C:ProgramData
they must enable showing the hidden files and folder to be able to see it in the C: or the HDD main directory
Oct 26, 2015 | how to, Image, Information Center, mail merge, mailmerge
How to Mail Merge PDF Documents
A step-by-step guide to creating personalized documents
Table of Contents
What is a mail merge?
What do I need to start?
Step 1: How to create a PDF document?
Step 2: How to add fields to a PDF document?
Step 3: How to prepare data?
Step 4: How to put data into form?
Advanced Topic: How to create multiline address labels
What is a mail merge?
Mail merge is a computer term describing the production of multiple (and potentially large numbers of) documents from a single template form and a structured data source. This technique is used to create personalized letters, documents, bills and pre-addressed envelopes or mailing labels for mass mailings (or document creation) from a database of names and addresses.
What do I need to start?
You need a PDF form (a PDF document with fillable fields) and a data file that contains records with information that needs to be placed into the form. You can use Microsoft Excel spreadsheets, Microsoft Access database or simply a plain text file. Let’s start from scratch and create a PDF form and a data file.
Step 1: How to create a PDF document?
PDF form is a special kind of PDF document that contains interactive fields where text information can be entered or check boxes may be selected. You can create a PDF form from any PDF, word processor, image file or paper document. You only need to add fields to the PDF document using tools provided by Adobe Acrobat. Fields are interactive elements where user can either type text or make a selection.
download Attached PDF for more information HowToAutoMailMerge