Feb 7, 2016 | ccna, cisco, EIGRP, Image, Learn and Teach, Quiz, redistribute questions
Here you will find answers to Redistribute Questions – Part 3
Question 1
Given the accompanying output, which additional command is needed to redistribute IGRP into EIGRP?
Router eigrp 123
Network 10.10.10.0
No auto-summary
!
Router igrp 123
Network 172.16.0.0
Network 172.17.0.0 |
A. Under the router igrp mode add redistribute eigrp 123
B. Under the router eigrp mode add redistribute igrp 123
C. Under the router eigrp mode add redistribute igrp 123 subnets
D. None, EIGRP and IGRP are automatically redistributed in this instance.
Answer: D
Explanation
If IGRP and EIGRP use the same Autonomous System (AS) then redistribution occurs automatically. In this case both IGRP & EIGRP use the same AS 123 so they are automatically redistributed.
If IGRP and EIGRP use different AS numbers then redistribution must be done manually.
Question 2
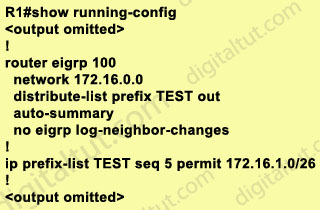
Study the exhibit carefully. Router R1 is connected to networks 172.16.1.0/26 and 172.16.1.64/27. Based on the partial output in the exhibit, which description is correct?

A. Router R1 should be reconfigured with an ACL instead of an ip prefix-list command.
B. Router R1 will advertise both routes.
C. Router R1 will deny the 172.16.1.0/27 route while permitting the 172.16.1.0/26 route to be advertised.
D. Router R1 will deny the 172.16.1.0/26 route while permitting the 172.16.1.64/27 route to be advertised.
Answer: C
Explanation
Prefix lists are configured with permit or deny keywords to either permit or deny the prefix based on the matching condition. A prefix list consists of an IP address and a bit mask. The IP address can be a classful network, a subnet, or a single host route. The bit mask is entered as a number from 1 to 32.
Prefix lists are configured to match an exact prefix length or a prefix range. The ge and le keywords are used to specify a range of the prefix lengths to match, providing more flexible configuration than can be configured with just the network/length argument. The prefix list is processed using an exact match when neither ge nor le keyword is entered.
Therefore in this case the exact 172.16.1.0/26 network is permitted while other networks are denied.
(Reference: http://www.cisco.com/en/US/docs/ios/12_3t/ip_route/command/reference/ip2_i2gt.html)
Question 3
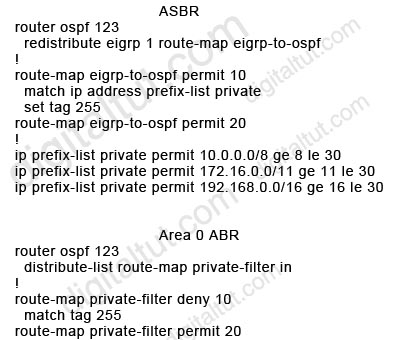
Refer to the exhibit. The partial configuration for an OSPF ASBR and an Area 0 ABR is shown. Assume the OSPF configurations throughout the network are operable. Which statement about these configurations is true?
A. The ASBR route-maps are basically useless, because there are no deny prefix-lists.
B. LSA Type 5s will not be received by the ABR from the ASBR.
C. The OSPF backbone will not learn any RFC 1918 addresses.
D. The matched prefix-list addresses will be given a metric of 255, which is essentially unreachable.
Answer: C
Explanation
The ASBR accepts RFC 1918 addresses and set these networks to “tag 255” but when advertising into Area 0, the ABR Area 0 filters out these networks because they match “tag 255” so the OSPF backbone will not learn any RFC 1918 addresses.
Note that if you use an ACL in a route-map deny clause, routes that are permitted by the ACL are not redistributed.
All the networks with “tag 255” are blocked by the clause 10 while all other networks are permitted by the clause 20 of the route-map (if a match command is not present, all routes match the clause).
Note:
RFC 1918 addresses include:
+ Class A: 10.0.0.0 – 10.255.255.255 (10/8 prefix)
+ Class B: 172.16.0.0 – 172.31.255.255 (172.16/12 prefix)
+ Class C: 192.168.0.0 – 192.168.255.255 (192.168/16 prefix)
Question 4
A network administrator is troubleshooting a redistribution of RIP routes into OSPF. Given the exhibited configuration commands, which statement is true?
rooter rip
network 10.0.0.0
!
router ospf 5
network 172.10.0.0 0.0.255.255 area 0
redistribute rip |
A. Redistributed routes will be tagged as external type 1 (E1) with a metric of 30.
B. Redistributed routes will be tagged as external type 2 (E2) with a metric of 20.
C. Redistributed routes will maintain their original RIP routing metric.
D. Redistributed routes will have a default metric of 0 and will be treated as unreachable and not advertised.
E. Redistributed routes will have a default metric of 0 but will not be treated as reachable and will be advertised.
Answer: B
Explanation
By default, all routes redistributed into OSPF will be tagged as external type 2 (E2) with a metric of 20, except for BGP routes (with a metric of 1).
Note: The cost of a type 2 route is always the external cost, irrespective of the interior cost to reach that route. A type 1 cost is the addition of the external cost and the internal cost used to reach that route.
Question 5
Refer to the exhibit. On the basis of the partial configuration, which two statements are correct? (Choose two)
|
A. Only routes matching 10.0.1.0/24 will be advertised out Ethernet 0.
B. Only routes 10.0.1.0/24 will be sent out all interfaces.
C. Only routes 10.0.1.0/24 will be allowed in the routing table.
D. Only routes matching 10.0.0.0/8 will be advertised out Ethernet 0.
E. Only routes matching 10.0.0.0/8 will be advertised out interfaces other than Ethernet 0.
F. All routes will be advertised out interfaces other than Ethernet 0.
Answer: A E
Explanation
In this case, the following algorithm is used when multiple distribute-lists are used:
1. First check which interface is being sent out. If it is Ethernet 0, distribute-list 2 is applied first. If the network is denied then no further checking is done for this network. But if distribute-list 2 permits that network then distribute-list 1 is also checked. If both distribute-lists allow that network then it will be sent out.
2. If the interface is not Ethernet 0 then only distribute-list 1 is applied.
Now let’s take some examples.
+ If the advertised network is 10.0.1.0/24, it will be sent out all interfaces, including Ethernet 0.
+ If the advertised network is 10.0.2.0/24, it will be sent out all interfaces, excepting Ethernet 0.
+ If the advertised network is 11.0.0.0/8, it will be dropped.
Note: It is possible to define one interface-specific distribute-list per interface and one protocol-specific distribute-list for each process/autonomous-system.
(For more information, please read: http://www.cisco.com/en/US/tech/tk365/technologies_tech_note09186a0080208748.shtml)
Question 6
Refer to the exhibit. Examine the partial configuration and the routing table excerpt. Which routes would be redistributed into OSPF area 1?
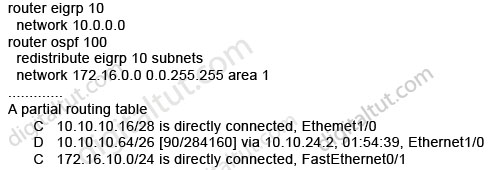
A. 10.10.10.16/28 only
B. 10.10.10.16/28 and 10.10.10.64/26
C. 10.10.10.16/28, 10.10.10.64/26, and 172.16.10.0/24
D. 10.10.10.64/26 only
Answer: B (but in the exam you should choose D)
Explanation
The network 172.16.10.0/24 belongs to OSPF (we know from the “network 172.16.0.0 0.0.255.255 area 1” command) so it will not be redistributed.
When using the “subnets” keyword, all the connected networks will be redistributed so 10.10.10.16/28 & 10.10.10.64/26 will be redistributed, too. You can read my GNS3 lab about this topic here: http://www.digitaltut.com/redistribute-eigrp-and-ospf-gns3-lab.
Therefore the correct answer should be B but in the exam you should choose D. Maybe it is a mistake of Cisco.
Question 7
Refer to the exhibit. A partial routing configuration is shown. Complete the configuration so that only the default-network is redistributed from EIGRP 190 into EIGRP 212. Which ACL statement completes the configuration correctly?
router eigrp 190
redistribute eigrp 212
network 192.0.0.0 0.0.0.3
!
router eigrp 212
redistribute eigrp 190 route-map default_route
network 212.50.185.96 0.0.0.31
!
route-map defau1t_route permit 10
match ip address 100 |
A. access-list 100 permit ip 0.0.0.0 0.0.0.0 0.0.0.0 0.0.0.0
B. access-list 100 permit ip host 0.0.0.0 any
C. access-list 100 permit ip any host 0.0.0.0
D. A default-network cannot be redistributed between routing processes.
Answer: C
Explanation
The command “access-list 100 permit ip any host 0.0.0.0” means permit any source address with the destination of 0.0.0.0/0, which is the default route
Note:
any equals 0.0.0.0 255.255.255.255
host 0.0.0.0 equals 0.0.0.0 0.0.0.0
Question 8
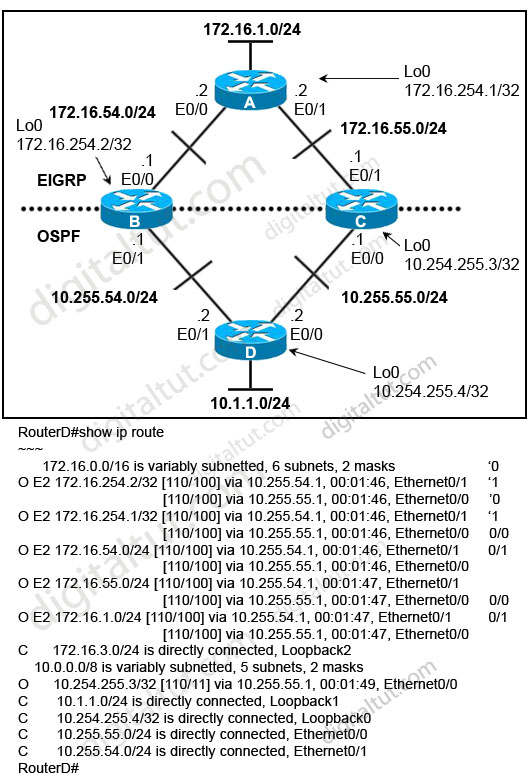
Refer to the exhibit. Router B and router C are performing mutual redistribution between OSPF and EIGRP, and their default metrics are configured the same. Router D has equal cost paths to networks where both paths are not really equal cost. For example, network 172.16.54.0 shows equal cost through both router B and router C, though in reality the cost is greater using router C. Other routers, though not shown, are connected to the 172.16.54.0 and 172.16.55.0 networks, and the same issues exist to those routers and the networks connected to them.
What can be done so that data will be routed along the most optimal path in the network?
A. Redistribute connected interfaces on router B and router C.
B. Set the maximum number of equal cost paths to 1 in all routers.
C. When redistributing EIGRP into OSPF, set the external metric type to type E1.
D. Adjust the default metrics in router B and router C so that the values are different in each router.
E. None of these solutions will fix the problem. Migrate to a single dynamic routing protocol.
Answer: E
Explanation
Let’s discuss about answers C & D first.
From the output, we learn that all the External OSPF routes have metrics of 100 (the second parameters in [110/100]). This is not the default metric of OSPF Type 2 External route (the default value is 20) so the metrics of redistributed routes have been modified. Maybe when redistributing into OSPF, the “metric” in the “redistribute” command or the “default-metric” command was used on router B & C to assign the metric of these routes. Something like this:
router ospf 1
redistribute eigrp 1 metric 100 subnets |
or
router ospf 1
…..
default-metric 100 |
Therefore even if we use the metric type E1 the problem still exists because the link B-D & C-D seems to have the same metric -> the total metrics remains the same -> C is not correct.
We can use route-map and set different metrics for each networks but some unshown networks will have the same issues -> D is not a good choice
So the best answer should be E.
Question 9
Refer to the exhibit. A new TAC engineer comes to you for advice. The engineer wants to configure RIPv2-OSPF two-way redistribution while avoiding routing loops. Which two additions to the router B1 configuration should the engineer make? (Choose two)

A. access-list 40 deny 172.16.1.0 0.0.0.255
access-list 40 permit any
router rip
redistribute ospf 100 metric 5
distribute-list 40 out ospf 100
B. ip prefix-list rip_routes permit 172.16.1.16/25 ge 26 le 28
route-map redis-ospf deny 10
match ip address prefix-list rip_routes
router rip
redistribute ospf 10 route-map redis-ospf subnets
C. ip prefix-list rip-to-ospf permit 10.1.1.8/25 ge 26 le 28
route-map redis-rip deny 20
match ip address prefix-list rip-to-ospf
router ospf 100
redistribute rip route-map redis-rip subnets
D. access-list 15 deny 10.1.1.0 0.0.0.63
access-list 15 permit any
route-map redis-rip deny 10
match ip address 15
route-map redis-rip permit 20
router ospf 100
redistribute rip route-map redis-rip subnets
Answer: A D
Explanation
B1 is not the only router that redistributes between RIP & OSPF. The “small” router below B1 can be configured for this task too so B1 can try to redistribute networks advertised by that “small” router again. Therefore it is necessary to filter out networks that have been advertised by the “small” router. For example, we need to prevent network 172.16.1.0/24 from advertised back into RIPv2 or network 10.1.1.0/26 from advertised back into OSPF. Notice that all networks in OSPF domain (including 10.1.1.8/30, 10.1.1.12/30, 10.1.1.48/28, 10.1.1.32/28) can be summarized as 10.1.1.0/26 and all networks in RIP domain (including 172.16.1.24/30, 172.16.1.20/30, 172.16.1.32/28, 172.16.1.48/28) can be summarized as 172.16.1.0/24 -> answers A & D are correct.
In answer B, the command “ip prefix-list rip_routes permit 172.16.1.16/25 ge 26 le 28” means:
+ First check the first 25 bits of the address -> this will allow addresses from 172.16.1.0 to 172.16.1.127

+ If those match then check the subnet mask, which in this case can be GREATER THAN or EQUAL to 26 bits & LESS THAN or EQUAL to 28 bits -> meaning that /26, /27, /28 subnet masks would match.
For example, networks 172.16.1.0/26; 172.16.1.16/28 would match (but notice networks 172.16.1.0/25; 172.16.1.128/26 wouldn’t).
In the “ip prefix-list rip_routes permit 172.16.1.16/25 ge 26 le 28”, the prefix-list “rip_routes” only covers networks 172.16.1.32/28 & 172.16.1.48/28 but can’t cover networks 172.16.1.24/30 & 172.16.1.20/30. Also, the OSPF process in the “redistribute” command should be 100, not 10 -> B is not correct.
Same problem as answer B, the prefix-list in answer C can’t cover networks 10.1.1.8/30 & 10.1.1.12/30 -> C is not correct.
Question 10
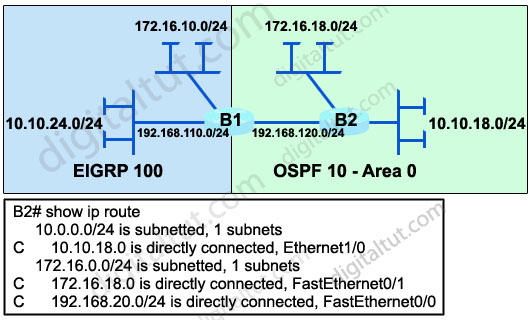
Refer to the exhibit. The network administrator is trying to configure mutual redistribution between EIGRP and OSPF. Autosummarization in EIGRP 100 AS is disabled. After adding OSPF configuration to router E31, the network administrator checked the routing table of router B2, but none of the EIGRP routes appeared there.
To redistribute the EIGRP AS 100 routes into OSPF, which command should be added, or edited, on router B1 under router ospf 10?
A. redistribute eigrp 100 metric-type 1
B. redistribute eigrp 100 subnets
C. no auto-summary 10.0.0.0 255.0.0.0
D. area 0 range 10.10.0.0 255.255.0.0
Answer: B
Explanation
When redistributing into OSPF without keyword “subnets”, only classful networks will be redistributed. Classful networks here mean networks with the default major subnet masks (for example 10.0.0.0/8; 180.1.0.0/16; 200.200.200.0/24…).
In fact, the routing table on the exhibit above is not totally correct. The network 192.168.110.0/24 will be redistributed and shown in the routing table of B2 even if the keyword “subnets” is not used because it belongs to class C with the default subnet mask of class C.
To make all the networks, including subnets appear in the routing table of B2 we must use keyword “subnets” when redistributing into OSPF. This is also an important thing to remember when redistributing into OSPF.
Please read my Redistribute EIGRP and OSPF – GNS3 Lab if you are still not sure about this.
Question 11
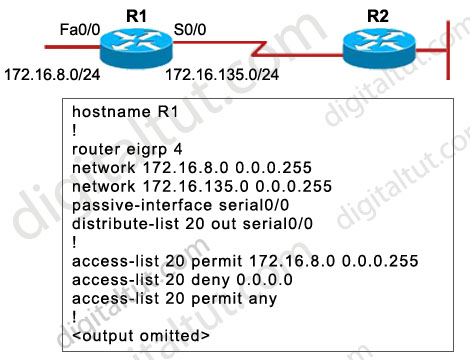
Refer to the exhibit. Routers R1 and R2 are running EIGRP and have converged. On the basis of the information that is presented, which statement is true?
A. All outgoing routing updates from router R1 to router R2 will be suppressed, but the inbound updates will continue to be received.
B. All incoming routing updates from R2 will be suppressed, but the outgoing updates will continue to be sent.
C. Both outgoing and incoming routing updates on R1 will be stopped because of the passive-interface Serial0/0 configuration statement.
D. Both outgoing and incoming routing updates on R1 will be permitted because the distribute-list 20 out Serial0/0 command cannot be used with association with the outgoing interface.
Answer: C
Explanation
In EIGRP (and OSPF) the passive-interface command stops sending outgoing hello packets, hence the router can not form any neighbor relationship via the passive interface. This behavior stops both outgoing and incoming routing updates -> the distribute-list has no use here.
Feb 3, 2016 | command, Image, Learn and Teach, Linux, Mac, terminal, vi command, vi editor
To create a shell script:
- Use a text editor such as vi. Write required Linux commands and logic in the file.
- Save and close the file (exit from vi).
- Make the script executable.
- You should then of course test the script, and once satisfied with the output, move it to the production environment.
- The simplest program in Bash consists of a line that tells the computer a command. Start up your favorite text editor (such as vi):
Essential Vi Commands
vi filename
press ESC and type I
press ESC
press ESC and type :w fileName
press ESC and type :wq
OR
press ESC and type :x
press ESC and type :the line number
Press ESC and type /wordToSearch
Press ESC and type :q
Save the following into a file called hello.sh:
#!/bin/bash
echo "Hello, World!"
echo "Knowledge is power."
Save and close the file. You can run the script as follows:
Sample outputs:
bash: ./hello.sh: Permission denied
Saving and Running Your Script
The command ./hello.sh displayed an error message on the screen. It will not run script since you’ve not set execute permission for your script hello.sh. To execute this program, type the following command:
chmod +x hello.sh
./hello.sh
Sample Outputs:
Hello, World!
Knowledge is power.
Feb 3, 2016 | connect, ftp, Image, Learn and Teach, Linux, Mac, SFTP, SSH
connect through SSH and SFTP in mac
Using SSH and SFTP in Mac OS X
SSH and SFTP are command line applications available from the Terminal (located at /Applications/Utilities/Terminal).
SSH
SSH client is a program for logging into a remote machine and for executing commands on a remote machine.
Connecting
To connect using ssh type at the terminal:
ssh username@host_server
Username is your network account username and host_server is the remote server to which you’re connecting.
SFTP
SFTP is an interactive file transfer program, similar to ftp, which performs all operations over an encrypted ssh transport.
Connecting
To connect using sftp type at the terminal:
sftp username@host_server
Username is your network account username and host_server is the remote server to which you’re connecting.
Commands
The commands available in SFTP are:
| Command |
Description |
pwd
|
Print working directory of remote host |
lpwd
|
Print working directory of local client |
cd
|
Change directory on the remote host |
lcd
|
Change directory on the local client |
ls
|
List director on the remote host |
lls
|
List directory on the local client |
mkdir
|
Make directory on remote host |
lmkdir
|
Make directory on local client |
get
|
Receive file from remote host to local client |
put
|
Send file from local client to remote host |
help
|
Display help text |
Jan 25, 2016 | ccna, cnna, EIGRP, EIGRP 101, Image, Learn and Teach
1. Starting the routing process
R(config)# router eigrp AS-NUMBER
! AS Number mast match between neighbors
R(config-router)# network NETWORK-ADDR [WILDCARD]
!If no wildcard is specified, the network is considered classful
|
- EIGRP will advertise routes learned by the EIGRP process and all routes that appear directly connected on the interfaces that are matched by the network command. These include static routes that point to an interface and that are matched by a network command. These routes are considered directly connected and are redistributed as internal routes.
- secondary IP addresses are not advertised when using the network command. They can only be redistributed into EIGRP
- With Split Horizon enabled(default), it will not advertise a route back on the outgoing interface of that route.
- Routes that don’t make it into the routing table are not advertised
To see the interfaces that run EIGRP use:
R3#sh ip eigrp interfaces
IP-EIGRP interfaces for process 345
Xmit Queue Mean Pacing Time Multicast Pending
Interface Peers Un/Reliable SRTT Un/Reliable Flow Timer Routes
Fa0/0 1 0/0 71 0/2 384 0
Se1/0.301 0 0/0 0 0/1 0 0
Lo0 0 0/0 0 0/1 0 0
|
1.1 Split Horizon
When Split Horizon is enabled on an interface, Update and Query packets are not sent for destinations which have this interface as outgoing. This could be a problem in Hub and Spoke Frame Relay topologies. Use this command to disable Split Horizon:
R(config-if)# no ip split-horizon eigrp AS-NUMBER
|
Make sure you know the difference between the RIP and the EIGRP command that disables Split Horizon:
! EIGRP:
R(config-if)# no ip split-horizon eigrp AS-NUMBER
! RIP:
R(config-if)# no ip split-horizon
|
Some IOS implementations disable split-horizon on interface where “encapsulation frame-relay” is configured.
1.2 Passive interfaces
When defining a passive interface, the EIGRP process will advertise the network but will not send or accept EIGRP messages on the interface.
R(config-router)# passive-interface INTERFACE
|
This behavior is different than RIP’s, where a passive interface would still accept RIP advertisements.
You can also enable passive interfaces by default and then disable it on the interfaces where EIGRP should run:
R(config-router)# passive-interface default
R(config-router)# no passive-interface INTERFACE
|
2. Neighbors
When a router running EIGRP receives valid HELLOs from another router, it adds it to the neighbor list. To see the neighbors list use:
R# show ip eigrp neighbors [detail]
|
A HELLO message contains the AS number and the K values of the router sending the message. In order to become neighbors, two routers must share the following values:
- K values
- AS number
- Primary subnet
- Authentication
By default, when valid HELLOs are not received for an entire HOLD-TIME period, the router considers the neighbor to be down. See Timers section below.
2.1 Static Neighbors
When a neighbor is defined, all communication with it is done using unicast packets:
R(config-router)# neighbor NEIGH-ADDR OUT-INTERFACE
|
Unlike RIP, this will disable multicast EIGRP on the interface, so no dynamic neighbors will be discovered.
This config should be used on Frame Relay Hub & Spoke networks when two spokes should become neighbors.
2.2 Authentication
EIGRP supports only MD5 authentication of EIGRP messages:
- Define the key chain
(config)# key chain KEY-CHAIN
R(config-keychain)# key KEY-NUMBER
R(config-keychain-key)# key-string KEY-NAME
! Optionally, define the an accept-lifetime
R(config-keychain-key)# accept-lifetime start-time {infinte|END-TIME|duration SEC}
! Optionally, define the an send-lifetime
R(config-keychain-key)# send-lifetime start-time {infinte|END-TIME|duration SEC}
|
- Apply it on the interface
R(config-if)# ip authentication mode eigrp AS-NUMBER md5
! sets the authentication to MD5
R(config-if)# ip authentication key-chain eigrp AS-NUMBER KEY-CHAIN
|
When sending EIGRP messages, the router uses the lowest key number among all current valid keys. When receiving EIGRP messages, the router checks the MD5 digest using all current valid keys. Both the key ID and the Key-string must match in order to form an adjacency.
3. Timers
3.1 Hello interval
It specifies how often a router sends EIGRP HELLO packates. The default timer is:
- 5 seconds for almost all interfaces
- 60 seconds for Frame Relay physical interfaces or multipoint subinterfaces with a bandwidth lower than T1(1544kbps)
The default value can be changed using:
R(config-if)# ip hello-interval eigrp AS-NUMBER SEC
|
To verify, use:
R# show ip eigrp interface INTERFACE detail
IP-EIGRP interfaces for process 145
Xmit Queue Mean Pacing Time Multicast Pending
Interface Peers Un/Reliable SRTT Un/Reliable Flow Timer Routes
Fa0/0 1 0/0 48 0/2 240 0
Hello interval is 5 sec
Next xmit serial <none>
Un/reliable mcasts: 0/1 Un/reliable ucasts: 2/4
Mcast exceptions: 1 CR packets: 1 ACKs suppressed: 0
Retransmissions sent: 1 Out-of-sequence rcvd: 0
Authentication mode is not set
Use multicast
|
3.2 Hold Time
If a router does not receive Hello Messages for an entire Hold Time, the router considers the neighbor to have failed. The default timer is 3xHELLO-INTERVAL:
- 15 seconds for almost all interfaces
- 180 seconds for Frame Relay physical interfaces or multipoint subinterfaces with a bandwidth lower than T1(1544kbps)
The default value can be changed using:
R(config-if)# ip hold-time eigrp AS-NUMBER SEC
|
3.3 Active Timer
When the router sends a Query, it will wait the time specified in the active timer for a replies from its neighbors. If no reply is received in the specified interval, the route is declared dead:
R(config-router)# timers active-time {ACTIVE-TIME|disabled}
! Default: 180 sec
|
See Going Active for details.
4. Packets
EGIRP uses IP protocol 88 (RTP=Reliable Transport Protocol). EIGRP uses both unicast and mulitcast packets. Except for HELLO and ACK packets, the other packets require ACK from the neighbors. A router would retry 16 times to send a packet before neighbor relationship is reset. All packets are sourced from the primary IP address of the interface.
HELLO packets are sent every HELLO-INTERVAL as multicasts to 224.0.0.10 or as unicasts to each static neighbor. They contain the K values used by the router as well as the HOLD-TIME – how much time to wait for a HELLO, before resetting adjacency. EIGRP packets are sourced from the primary address of each interface.
UPDATE packets are sent as unicast when neighbors are discovered initially and as multicasts whne updates are genertated by network changes. For each route, a packet contains the prefix, prefix length, hop count, and components of the advertised metric (Bandwidth, Load, Delay, Reliability, MTU). These packets are sent only when changes occur and only to the routers that need the update. EIGRP doesn’t use periodic updates. Update packets need to be acknowledged.
QUERY packets are used when “going active” – see below. QUERY packets are sent as multicast and need to be ACKed.
REPLY packets are used to reply to QUERY packets. They are sent as unicasts and need to be ACKed.
ACK packets are sent as an acknowledgement to Query and Reply messages. ACK are always unicasts, and EIGRP expectes one ACK from each neighbor.
GOODBYE packets are sent when the EIGRP process is shut down or restarted to inform the neighbors.
If there are many changes in the network, EIGRP messages can overwhelm a link. Use this command to limit the bandwidth used by EIGRP Updates per interface:
R(config-if)#ip bandwidth-percent eigrp AS-NUMBER BW-PERCENT
!default: BW-PERCENT = 50
|
5. EIGRP metric
See here for information about EIGRP metric and offset lists.
6. EIGRP Administrative Distance
By default, EIGRP AD is 90 for internal routes, 170 for external routes and 5 for summary routes. The default can be changed using:
R(config-router)# distance eigrp INTERNAL-AD EXTERNAL-AD
|
The AD can be changed per routing source and destination using:
R(config-router)# distance AD DESTINATION-IP WILDCARD-MASK [ACL]
|
7. Load Balancing
In addition to Equal Cost Load Balancing, EIGRP can perform Unequal cost load balancing. To enable this, the variance command must be used.
When setting variance, all routes that have a metric lower then the FD * VARIANCE are added to the routing table and traffic can be load balanced between them.
R(config-router)# variance VAR
|
8. Distribute Lists
Used to filter updates going out or coming into the EIGRP process
! Using ACLs
R(config-router)# distribute-list ACL {in|out} [INTERFACE]
! Using Prefix-list
R(config-rotuer)# distribute-list prefix PREFIX-LIST {in|out} [INTERFACE]
! Using gateway - filter based on the source of the update:
R(config-router)# distribute-list gateway PREFIX-LIST1 [prefix PREFIX-LIST2] {in|out} [INTERFACE]
! Using route maps:
R(config-router)# distribute-list route-map ROUTE-MAP {in|out} [INTERFACE]
|
9. Summarization
9.1 Auto Summarization
By default, EIGRP performs an auto-summarization each time it crosses a border between two different major networks. To disable this behaviour and to advertise the component routes, use:
R(config-router)# no auto-summary
|
The auto-summary routes appear as internal routes and the metric of the summary route is the best metric from among the summarized routes. On the router doing the summarization, a route to Null0 is added for the summarized address, so that traffic that is destined for other destinations than the component routes, but inside the same major network, is discared.
EIGRP will not auto-summarize external routes unless there is a component of the same major network that is an internal route
9.2 Manual Summarization
Manual sumamrization can be done on an interface, with no limitation of the bit boundary, using:
R(config-if)# ip summary-address eigrp AS-NUMBER NETWORK-ADDR NETWORK-MASK [AD] [leak-map LEAK-MAP]
|
The router will advertise the summary address instead of any component, as long as there is one component in the routing table.
By default, manual summary routes have an AD of 5 and point to Null0. Due to the low AD value, they can override other learned routes with the same prefix (like a default route). Use the concept of a floating summary route to change the default AD when defining the manual summary. Use a value of 255 to stop the summary route from getting into the routing table
Leak maps enable sending routing information for specific routes defined by a route-map, and the summary route for all other.
10. Default routes
10.1 Redistribute Static Route to 0.0.0.0 into EIGRP
R(config)# ip route 0.0.0.0 0.0.0.0 NEXT-HOP
R(config)# router eigrp AS-NUMBER
R(config-router)# redistribute static
|
10.2 Define a default network
By default 0.0.0.0/0 is considered the default route, but EIGRP can advertise another route as the default route as long as it is marked as the default-network
R(config)# ip default-network NETWORK-ADDR
! NETWORK-ADDR is classless
|
If we have the NETWORK-ADDR with its default class (A/B/C) in our routing table, then the next step is to advertise it into EIGRP. This can be done via redistribution (of connected/static routes) or the network command (provided the matched interfaces will bring the specific prefix into the EIGRP topology).
Things get ugly when the default-network is not int our routing table with the default class. Let’s take an example:
If we have a loopack address with the network 5.5.5.5/24 and we want it to become the default network, then we will have to run the following commands:
R(config)# ip default-network 5.0.0.0
R(config)# ip default-network 5.5.5.5
|
The second command will generate a static route in the config, that will be deleted only when the default-network is removed from the config:
R(config)#sh run | i ip route
ip route 5.0.0.0 255.0.0.0 5.5.5.5
|
Now we have a route pointing to the Class A network 5.0.0.0 via the next-hop 5.5.5.5. We can add the 5.0.0.0 network to EIGRP via redistribution (static) to EIGRP or add the 5.5.5.5 interface to the network list. From now on, EIGRP will advertise a route to 5.0.0.0 that is also marked as a candidate default.
10.3 Manual Summary to 0.0.0.0/0
R(config-if)# ip summary-address eigrp 0.0.0.0 0.0.0.0 [AD]
|
Use a lower AD not to override other default routes learned by the downstream routers.
Jan 24, 2016 | document, edit, Image, Learn and Teach, Mac, Office, windows, word
Simultaneously edit a document with other authors
Source
When you collaborate with other authors to create a document, you can save time by simultaneously editing the document, instead of doing this separately. To edit the document at the same time, each author opens the file from a common location on a server.
IMPORTANT You can simultaneously edit documents in the .docx file format that are located on Windows Live OneDrive or a server that has Microsoft SharePoint Server 2010 installed. To work with SharePoint in Office for Mac, you have to have Microsoft Office for Mac Home and Business 2011, Microsoft Office for Mac Academic 2011, or Microsoft Office for Mac Standard 2011.
With the document open on your computer, you can see who else is editing the document, who is editing a specific paragraph, and when updates from other authors are available on the server.
 Other author currently editing the document
 All authors currently editing the document
 Changes from other authors available on the server
When you save your changes to the server, any updates from other authors are automatically refreshed in the document. Updates from other authors are refreshed automatically only if they don’t conflict with changes that you made. If you and another author both change the same item, then a conflict may occur. If a conflict occurs when you save the document, you are prompted to review the conflict and accept or reject the change.
Do any of the following:
Save a document to a SharePoint site
When you save a document in a library on your organization’s SharePoint site, you and your colleagues have a central location for accessing the document. You can send a link instead of sending an attachment. In this manner, you maintain just a single copy of the document. If people make revisions, they do so in the same copy. You do not have to reconcile multiple versions and copies of the document.
- On the File menu, point to Share, and then click Save to SharePoint.
- To add a SharePoint site, click Add a location
 , enter the URL to the SharePoint library, and then clickAdd.NOTE By default, many SharePoint sites have a Shared Documents library. An example of a URL that links to this library is http://fabrikam/shared%documents.
- In the Save As box, enter the name of your document.
- Under Recent Locations or Saved Locations, click the SharePoint library where you want to save the document, and then click Save.TIP The last several documents that you have opened from a SharePoint site, either through Office for Mac, Document Connection for Mac, or your browser, are listed under Recent Locations.
Save a document to a Windows Live OneDrive
When you save a document to OneDrive, the document is stored in a central location that you can access from almost anywhere. Even if you’re away from your computer, you can work on your document whenever you have a connection to the Web. Saving a document to OneDrive also makes it easy to share the document with other people. You can send a link instead of sending an attachment. In this manner, you maintain just a single copy of the document. If people make revisions, they do so in the same copy. You do not have to reconcile multiple versions and copies of the document.
- On the File menu, point to Share, and then click Save to OneDrive.
- If this is the first time that you have tried to access OneDrive, enter your Window Live ID and Password, and then click Sign In.If you use Hotmail, Messenger, or Xbox Live, you already have a Windows Live ID. If you don’t have one, clickGet a Live ID to create a new Windows Live ID.
- In the Save As box, enter the name of your document.
- Under Personal Folders or Shared Folders, click the folder where you want to save the document, and then click Save.
Open a document that is located on a SharePoint site
- On the File menu, click Open URL.
- In the URL box, type the URL for the document that is located on SharePoint, such as http://fabrikam/shared%20documents/DocumentName.docx.NOTE You have to use a URL for a document in a SharePoint library. You cannot use a URL for other areas of a SharePoint site, such as a SharePoint list or top-level sites.
- Click Open.NOTES
- You can also open a document that is located on SharePoint from your browser. To open the document in Word, click Open in Word.
- If you prefer to edit the file separately instead of at the same time as other authors, you can check out the file from the SharePoint site. When you check out a file, the other authors are “locked out” and can only read the file.
Open a document that is located on a Windows Live OneDrive
- Open your browser and sign in to Windows Live OneDrive.
- Find and click the document, and then click Open in Word.
See who else is editing a document
- On the View menu, click Print Layout.
- Do one of the following:
| To |
Do this |
| See who is editing anywhere in the document |
On the status bar at the bottom of the window, click the numbered icon  . .
To send a communication to someone, click his or her name, and then click a communication method – for example, send an instant message. |
| See who is editing a specific paragraph |
In the document, click the icon next to the paragraph.

To send a communication to someone, click his or her name, and then click a communication method – for example, send an instant message. |
Save and refresh a document that has updates
When you save your changes to the server, any other authors who are editing the document are notified that updates are available. Any updates from other authors are automatically refreshed in the document at that time if they don’t conflict with your changes. You can see when other authors save changes to the server because a message that indicates that updates are available appears on the status bar at the bottom of the window.
- On the status bar at the bottom of the window, click Updates Available
 to refresh the document with updates.
- On the This document was refreshed with updates by other authors dialog box, click OK.Your changes are saved to the server, and updates that were made by the other authors appear in your document as tracked changes.
NOTES
- Updates that were made by other authors are refreshed automatically only if they don’t conflict with your changes. If any updates conflict with your changes, you will be able to review the conflicting changes before they are saved and decide which changes to accept or reject.
- You can also click Save
 on the Standard toolbar to refresh the document with updates that were made by other authors.
Review and accept changes from other authors
If you want to track the changes made by other authors, turn on Track Changes and save the document to the server. When you are ready to review the updates from other authors, you can see what has been added to or removed from the document. By using Track Changes, you can decide whether you want to accept or reject those changes.
CAUTION Before you can accept or reject another author’s changes in a blocked area, you must remove that author’s block. You should only remove a block when you know that all other authors are finished editing the document. Otherwise, you run the risk of creating conflicts. Using Undo  does not restore a block.
- Click any areas that are blocked by other authors and then click Unblock.
- Accept or reject changes as you would in any other document. For more information, see Use tracked changes.
- When you finish accepting changes, save this version of the document on the server.

Nov 12, 2015 | cmd, format, Image, Learn and Teach, reformat disk, windows, مشكلة في الفلاش
Format a hard drive with Command Prompt
source
In Windows I would normally be driven to either format a drive through the Disk Management console or by right-clicking on a drive in Windows Explorer and selecting the “Format…” option, but there can be advantages to formatting a driver through Command Prompt. For example if you are reformatting a drive which previously had an Operating System on the drive you can find there are System Partitions on the drive which can’t be seen in Windows Explorer and refuse to format in the Disk Management console.
Note this is only a quick guide for Formatting Drives from Command Line, there are many more options available at your disposal. For a detailed insight to the options available for the DiskPart tool visit Microsofts Technet. In the example I have formatted an external hard drive for use of file storage in a Windows Operating System environment.
In order to format a drive through Command Prompt firstly lets open the prompt.
Click Start > Run and type “CMD”, pressing Enter should open a new terminal.

We need to next start the Disk Part tool, type “DISK PART” into the Command Line and press Enter.

Next let’s display and identify which volume we would like to format. Type “list volume” and press Enter. You should see a list of available volumes. Identify the one which you wish to format, be careful selecting the wrong volume will spell disaster!

Type “select volume <x>” and press Enter, where <x> is the volume you wish to focus on.

Type “clean” and press Enter. This removes any and all partition or volume formatting from the disk in focus.

Type “create partition primary” and press Enter. This creates a primary partition on the current disk. After you create the partition, the focus automatically shifts to the new partition. It is possible to create multiple partitions if you like. To do this you would add the option size=<x> where <x> is the size in megabytes (MB) you would like the partition to be. If no size is specified, like in my example, the partition continues until there is no more unallocated space.

Type “format fs=ntfs quick label=test” and press Enter. This will now perform a quick format, using a ntfs file system and labelling the drive “test”. You may wish to use the file system fat32 in place of ntfs if you would like to use the drive with other operating systems.

Lastly type “assign letter <x>” and press Enter, where <x> is the letter you would like to assign the drive.

You can close the Disk Part tool and Command Prompt using the “exit” command. You should now see your freshly formatted drive in My Computer, ready to use.
Format a hard drive with Command Prompt
