Nov 8, 2015 | ccna, Cisco router, csico, Image, Learn and Teach, minimum password
How to configure a minimum password length in a Cisco Routers
source here
As we all know by default there are no limitations on the size of password length in a Cisco router. Sometimes this may leads to a security risk. You can also configure a password with a single character in a Cisco Router.

Cisco Systems introduced a command to force the minimum length of password starting with an IOS version 12.3 (1). By default the length should be 6 characters, but you can change the default length.
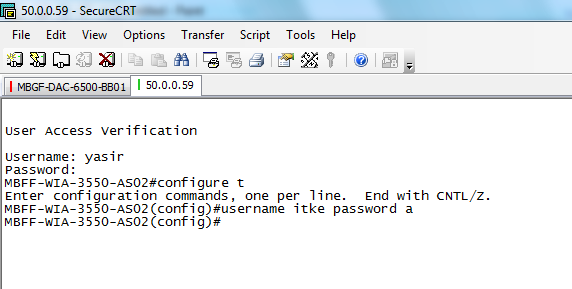
To configure the minimum password length in your Cisco Router, use the following commands.
ITKERouter01#configure terminal
ITKERouter01 (config)#security passwords min-length 8
After entering the above command if you try to configure the enable secret to itke as shown the below, following error message will be displayed in your Cisco Router
ITKERouter01 (config)#enable secret itke
% Password too short – must be at least 8 characters. Password configuration failed
ITKERouter01 (config)#
Even if you try to configure the local username and password you find the same error.
ITKERouter01 (config)#username yasir secret cisco
% Password too short – must be at least 8 characters. Password configuration failed
ITKERouter01 (config)#
I would recommed you to enable this feautre in your Cisco Router for better security.
How to configure a minimum password length in a Cisco Routers
Nov 7, 2015 | Uncategorized
How to configure a minimum password length in a Cisco Routers
source here
As we all know by default there are no limitations on the size of password length in a Cisco router. Sometimes this may leads to a security risk. You can also configure a password with a single character in a Cisco Router.
Cisco Systems introduced a command to force the minimum length of password starting with an IOS version 12.3 (1). By default the length should be 6 characters, but you can change the default length.
To configure the minimum password length in your Cisco Router, use the following commands.
ITKERouter01#configure terminal
ITKERouter01 (config)#security passwords min-length 8
After entering the above command if you try to configure the enable secret to itke as shown the below, following error message will be displayed in your Cisco Router
ITKERouter01 (config)#enable secret itke
% Password too short – must be at least 8 characters. Password configuration failed
ITKERouter01 (config)#
Even if you try to configure the local username and password you find the same error.
ITKERouter01 (config)#username yasir secret cisco
% Password too short – must be at least 8 characters. Password configuration failed
ITKERouter01 (config)#
I would recommed you to enable this feautre in your Cisco Router for better security.
How to configure a minimum password length in a Cisco Routers
Nov 5, 2015 | Application, Image, ios resources, ipad, iPhone, Learn and Teach, Mac, mirror, Projector Screen, Show Your iPad on a Projector Screen, Technology
10 Ways to Show Your iPad on a Projector Screen Projecting your iPad on a large screen is great for demonstrations, simulations, explanations, and showing examples. There are several ways this can be done in the classroom. Scroll to the end of this post for a comparison chart.

Install software on your projector-connected computer and use device’s AirPlay feature to mirror the screen.Download Mirroring360.

Install software on your projector-connected computer and use device’s AirPlay feature to mirror the screen. Get X-Mirage.

Install software on your projector-connected computer and attach device using its USB cable and choose Live Desktop. Windows only.
Update to OS X Yosemite on your projector-connected Mac and attach device using its Lightning cable. Open QuckTime & choose iPad as the camera source.
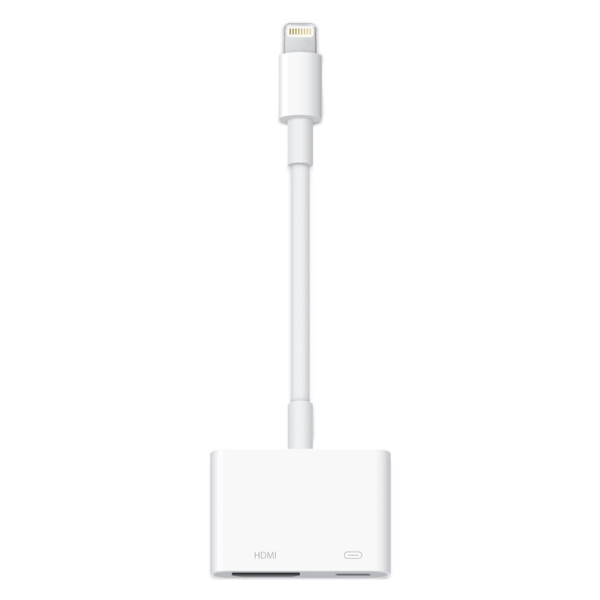
If you don’t mind keeping your iPad in one spot, then a VGA adapter (for 30-pin Dock connector or for Lightning connector). Apple has made four types of adapters – determine which one you need. Or, a document or USB camera might work for you.
If you want to wirelessly transmit your device’s screen and audio so that you or your students can walk around the room, then it gets more complicated. You’ll tap into Apple’s AirPlay feature that is built into all iPad 2s and newer, including iPad mini. AirPlay works over Wi-Fi and requires all devices using it to be on the same network (unless you’re using the newest Apple TV and iOS 8–then you can use a peer-to-peer connection or if you’re using Mirroring360).
Apple TV is a small black box that can connect to a projector. iPad can mirror wirelessly to Apple TV using AirPlay. Apple TV only outputs HDMI. Your projector might not have HDMI input. If that’s the case, you’ll need an HDMI to VGA adapter like the Kanex ATVPRO. Read more about Apple TV in classrooms.
If you already have a computer connected to your projector, you should look into using software to turn that Mac or Windows PC into an AirPlay receiver. You can download and try for free AirServer, Annotate Mirror Client, iTools, Mirroring360, Reflector 2, or X-Mirage. The software runs on your computer and allows devices to mirror iPad to the computer screen. Since the computer is connected to a projector, then the iPad shows on the projector. I’ve written lots more about both AirServer and Reflector.
In my visits to various schools, I’d say that Apple TV, AirServer, Reflector, and X-Mirage work about 50% of the time. That’s because AirPlay requires the device and the computer or Apple TV to be on the same network (unless you’re using the newest Apple TV and iOS 8). Often schools have different networks for mobile devices and for PCs so AirPlay won’t work. Also, AirPlay requires specific ports to be open on the network for Bonjour (and frequently they are not configured to be open).
Mirroring360 has a feature called Mirroring Assist. It can work without the need to open ports for Bonjour. That means Mirroring360 can work on your school’s network, even when other AirPlay solutions do not. Another feature of Mirroring Assist is the option to turn off the broadcasting of your computer on AirPlay. Instead, devices can be paired with your Mac or PC via a QR code. This is a very welcome feature in schools with long lists of computers under the AirPlay menu.
Even if your network allows for AirPlay connections, it also needs to be reliable. Many teachers experience slow and dropped AirPlay connections, which can make mirroring a frustrating experience. It’s a good thing there are free trials of each of the software mirroring solutions so you can test your school’s setup before purchasing.
If your Wi-Fi network won’t cooperate with AirPlay, you should check out iTools. It’s free software for Windows PCs that will mirror to a computer using your device’s charge/sync cable. iTools Live Desktop feature is buggy and might not work on your computer, and there is no help documentation.
After upgrading to to OS X 10.10 Yosemite, Mac users can mirror their iPad’s screen using a Lightning cable. iPad will show up as a camera source in QuickTime.
When you mirror your screen, it’s a great opportunity to use your iPad as a document camera! You’ll want to buy or rig up some sort of stand to use iPad as a visualizer. I wrote about the Justand v2 and other options in this post, including apps that let you draw and annotate over the image.
I maintain a chart that compares the methods of displaying iPad’s screen on a projector. Click the image below to download the PDF.
Disclosure: Links to Amazon and ProComputing are affiliate links and Learning in Hand may get paid a commission if you make a purchase.
Nov 5, 2015 | Uncategorized
10 Ways to Show Your iPad on a Projector Screen Projecting your iPad on a large screen is great for demonstrations, simulations, explanations, and showing examples. There are several ways this can be done in the classroom. Scroll to the end of this post for a comparison chart.
Nov 1, 2015 | ccna, configure static route, Configuring a Static Default Route, lab, Learn and Teach
Configuring a Static Default Route
[notification type=”notification_info” ]The default route, also known as the gateway of last resort is used commonly to route traffic with no longer match towards the internet. This lab will discuss and demonstrate the configuration of a default route.[/notification]
Real World Application & Core Knowledge
As you may know, Cisco routers will match traffic to a destination based on the closest match found in the routing table. With that being said; if the router has two routes in the routing table, one for 10.88.21.0/28 and one for 10.88.21.0/24 and the router receives traffic destined towards the host 10.88.21.6 then the router will choose the 10.88.21.0/28 route as its a closer match
In the previous two labs you learned about static routing and floating static routes, you are going to continue to build upon that foundation with configuring a default static route; commonly referred to as a “default route”.
As a CCNA you must understand the concept of the default route on a Cisco router and how to configure them. It is common that a router will have a floating default route in production in case the dynamic routing protocol fails for whatever reason, the floating default route would be injected into the routing table and eliminate downtime if designed and implemented properly.
In a network there are commonly two ways to get to the internet from within the network. You can have a default route on your WAN edge router pointing towards the ISP so that if any traffic destined towards a network is not found in the routing table of your WAN edge router then it would be passed onto the ISP. The other possibility is to have a WAN edge router participate in BGP (Boarder Gateway Protocol) which is the protocol that the internet is built upon. Having a full internet routing table via BGP will give you the ability to have every route on the internet on a single router. However BGP does not fall within the scope of the CCNA level material so we’ll only be focusing on a default route.
If you are interested in how the internet works and curious about BGP then you’ll have to continue your studies on to the CCNP after you’ve completed the CCNA.
Configuring a Default Route is as simple as configuring a static route. A default route is represented by 0.0.0.0/0. If you take a second and analyze the network and subnet you’ll realize that any ip address can fall in this subnet from 0.0.0.0 to 255.255.255.255.
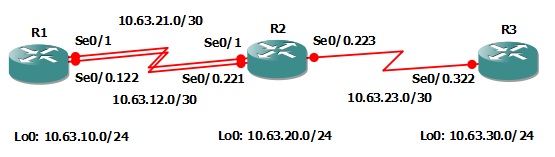
In this lab you will use the same topology that you’re worked with in the previous Lab 6-2 however the IP Addressing has been updated to reflect the lab number. You will be removing the static routes previously assigned to R3 and configuring a default route on R3 to point towards R2.
 Familiarize yourself with the following new command(s);
| Command |
Description |
| ip route 0.0.0.0 0.0.0.0 nh.nh.nh.nh # |
When specifying a static route to 0.0.0.0/0 you are effectively configuring a default route, a route that will catch all traffic if no other route exist for the traffic destination in the routing table. |
Lab Prerequisites
[star_list]
- If you are using GNS3 than load the Free CCNA Workbook GNS3 topology than start devices; R1, R2 and R3.
- Establish a console session with devices R1, R2 and R3 than load the initial configurations provided below by copying the config from the textbox and pasting it into the respected routers console.[/star_list]
Test Text
[notification type=”notification_info” ]!##################################################
!# Free CCNA Workbook Lab 6-3 R1 Initial Config #
!##################################################
!
enable
configure terminal
!
hostname R1
!
interface Loopback0
description ### SIMULATED NETWORK ###
ip address 10.63.10.1 255.255.255.0
!
interface Serial0/0
description ### PHYSICAL FRAME RELAY INTERFACE ###
no ip address
encapsulation frame-relay
serial restart-delay 0
no frame-relay inverse-arp
!
interface Serial0/0.122 point-to-point
description ### FRAME RELAY LINK TO R2 ###
ip address 10.63.12.1 255.255.255.252
frame-relay interface-dlci 122
!
interface Serial0/0
no shut
!
interface Serial0/1
description ### PPP Link TO R2 ###
ip address 10.63.21.1 255.255.255.252
encapsulation ppp
serial restart-delay 0
no shut
!
exit
!
ip route 10.63.20.0 255.255.255.0 10.63.12.2
ip route 10.63.30.0 255.255.255.0 10.63.12.2
ip route 10.63.20.0 255.255.255.0 10.63.21.2 200
ip route 10.63.30.0 255.255.255.0 10.63.21.2 200
!
end
[/notification]
[notification type=”notification_info” ]!##################################################
!# Free CCNA Workbook Lab 6-3 R2 Initial Config #
!##################################################
!
enable
configure terminal
!
hostname R2
!
interface Loopback0
description ### SIMULATED NETWORK ###
ip address 10.63.20.1 255.255.255.0
!
interface Serial0/0
description ### PHYSICAL FRAME RELAY INTERFACE ###
no ip address
encapsulation frame-relay
serial restart-delay 0
no frame-relay inverse-arp
!
interface Serial0/0.221 point-to-point
description ### FRAME RELAY LINK TO R1 ###
ip address 10.63.12.2 255.255.255.252
frame-relay interface-dlci 221
!
interface Serial0/0.223 point-to-point
description ### FRAME RELAY LINK TO R3 ###
ip address 10.63.23.1 255.255.255.252
frame-relay interface-dlci 223
!
interface Serial0/0
no shut
exit
!
interface Serial0/1
description ### PPP LINK TO R1 ###
ip address 10.63.21.2 255.255.255.252
encapsulation ppp
serial restart-delay 0
no shut
!
ip route 10.63.10.0 255.255.255.0 10.63.12.1
ip route 10.63.30.0 255.255.255.0 10.63.23.2
ip route 10.63.10.0 255.255.255.0 10.63.21.1 200
!
end
[/notification]
[notification type=”notification_info” ]!##################################################
!# Free CCNA Workbook Lab 6-3 R3 Initial Config #
!##################################################
!
enable
configure terminal
!
hostname R3
!
interface Loopback0
description ### SIMULATED NETWORK ###
ip address 10.63.30.1 255.255.255.0
!
interface Serial0/0
description ### PHYSICAL FRAME RELAY INTERFACE ###
no ip address
encapsulation frame-relay
serial restart-delay 0
no frame-relay inverse-arp
!
interface Serial0/0.322 point-to-point
description ### FRAME RELAY LINK TO R2 ###
ip address 10.63.23.2 255.255.255.252
frame-relay interface-dlci 322
!
interface Serial0/0
no shut
exit
!
ip route 10.63.10.0 255.255.255.0 10.63.23.1
ip route 10.63.20.0 255.255.255.0 10.63.23.1
!
end[/notification]
Lab Objectives
- Remove all currently configured static routes on R3 than configure a default route on R3 pointing towards R2’s Serial0/0.223 interface IP.
- Verify that you have IP reachability from R3’s 10.63.30.0/24 network to R1’s 10.63.10.0/24 network.
- Verify rather or not you can ping R1’s PPP backup interface IP address.
Lab Instruction
Objective 1. – Remove all currently configured static routes on R3 than configure a default route on R3 pointing towards R2’s Serial0/0.223 interface IP
[notification type=”notification_info” ]
R3#show run | include ip route
ip route 10.63.10.0 255.255.255.0 10.63.23.1
ip route 10.63.20.0 255.255.255.0 10.63.23.1
R3#configure terminal
Enter configuration commands, one per line.  End with CNTL/Z.
R3(config)#no ip route 10.63.10.0 255.255.255.0 10.63.23.1
R3(config)#no ip route 10.63.20.0 255.255.255.0 10.63.23.1
R3(config)#ip route 0.0.0.0 0.0.0.0 10.63.23.1
R3(config)#end
R3#
[/notification]
Objective 2. – Verify that you have IP reachability from R3’s 10.63.30.0/24 network to R1’s 10.63.10.0/24 network.
Previously the traffic would have taken the routes you just removed but now that the router has a default route it will take it as the route of last resort as shown below;
[notification type=”notification_info” ]
R3#ping 10.63.10.1 source lo0

Type escape sequence to abort.
Sending 5, 100-byte ICMP Echos to 10.63.10.1, timeout is 2 seconds:
Packet sent with a source address of 10.63.30.1
!!!!!
Success rate is 100 percent (5/5), round-trip min/avg/max = 4/82/168 ms
R3#
[/notification]
Objective 3. – Verify rather or not you can ping R1’s PPP backup interface IP address from 10.63.30.0/24.
Previously R3 had no route to get to the 10.63.21.0/30 network but now that a default route exist that points to R2 which has 10.63.21.0/3 directly connected and a route back to 10.63.30.0/24, IP reachability is feasible.
[notification type=”notification_info” ]
R3#ping 10.63.21.1 source lo0

Type escape sequence to abort.
Sending 5, 100-byte ICMP Echos to 10.63.21.1, timeout is 2 seconds:
Packet sent with a source address of 10.63.30.1
!!!!!
Success rate is 100 percent (5/5), round-trip min/avg/max = 40/81/116 ms
R3#
[/notification]


Connect directly from your device to a projector’s video cable. Click to find out which of the four possible adapters is the one you need.
Put your device under a camera connected to a projector. Glare may be a problem. Your audience can see your fingers.. Search Amazon for document cameras.
Connect an Apple TV to your projector and use your device’s AirPlay feature to mirror the screen. Apple TV is available from Amazon.com.
Install software on your projector-connected computer and use device’s AirPlay feature to mirror the screen. Get AirServer at airserver.com.
Install software on your projector-connected computer and use device’s AirPlay feature to mirror the screen.Download the Annotate Mirror Client.
Install software on your projector-connected computer and use device’s AirPlay feature to mirror the screen.Download Mirroring360.
Install software on your projector-connected computer and use device’s AirPlay feature to mirror the screen. Get Reflector at reflectorapp.com.
Install software on your projector-connected computer and use device’s AirPlay feature to mirror the screen. Get X-Mirage.
Install software on your projector-connected computer and attach device using its USB cable and choose Live Desktop. Windows only.
Update to OS X Yosemite on your projector-connected Mac and attach device using its Lightning cable. Open QuckTime & choose iPad as the camera source.
If you don’t mind keeping your iPad in one spot, then a VGA adapter (for 30-pin Dock connector or for Lightning connector). Apple has made four types of adapters – determine which one you need. Or, a document or USB camera might work for you.
If you want to wirelessly transmit your device’s screen and audio so that you or your students can walk around the room, then it gets more complicated. You’ll tap into Apple’s AirPlay feature that is built into all iPad 2s and newer, including iPad mini. AirPlay works over Wi-Fi and requires all devices using it to be on the same network (unless you’re using the newest Apple TV and iOS 8–then you can use a peer-to-peer connection or if you’re using Mirroring360).
Apple TV is a small black box that can connect to a projector. iPad can mirror wirelessly to Apple TV using AirPlay. Apple TV only outputs HDMI. Your projector might not have HDMI input. If that’s the case, you’ll need an HDMI to VGA adapter like the Kanex ATVPRO. Read more about Apple TV in classrooms.
If you already have a computer connected to your projector, you should look into using software to turn that Mac or Windows PC into an AirPlay receiver. You can download and try for free AirServer, Annotate Mirror Client, iTools, Mirroring360, Reflector 2, or X-Mirage. The software runs on your computer and allows devices to mirror iPad to the computer screen. Since the computer is connected to a projector, then the iPad shows on the projector. I’ve written lots more about both AirServer and Reflector.
In my visits to various schools, I’d say that Apple TV, AirServer, Reflector, and X-Mirage work about 50% of the time. That’s because AirPlay requires the device and the computer or Apple TV to be on the same network (unless you’re using the newest Apple TV and iOS 8). Often schools have different networks for mobile devices and for PCs so AirPlay won’t work. Also, AirPlay requires specific ports to be open on the network for Bonjour (and frequently they are not configured to be open).
Mirroring360 has a feature called Mirroring Assist. It can work without the need to open ports for Bonjour. That means Mirroring360 can work on your school’s network, even when other AirPlay solutions do not. Another feature of Mirroring Assist is the option to turn off the broadcasting of your computer on AirPlay. Instead, devices can be paired with your Mac or PC via a QR code. This is a very welcome feature in schools with long lists of computers under the AirPlay menu.
Even if your network allows for AirPlay connections, it also needs to be reliable. Many teachers experience slow and dropped AirPlay connections, which can make mirroring a frustrating experience. It’s a good thing there are free trials of each of the software mirroring solutions so you can test your school’s setup before purchasing.
If your Wi-Fi network won’t cooperate with AirPlay, you should check out iTools. It’s free software for Windows PCs that will mirror to a computer using your device’s charge/sync cable. iTools Live Desktop feature is buggy and might not work on your computer, and there is no help documentation.
After upgrading to to OS X 10.10 Yosemite, Mac users can mirror their iPad’s screen using a Lightning cable. iPad will show up as a camera source in QuickTime.
When you mirror your screen, it’s a great opportunity to use your iPad as a document camera! You’ll want to buy or rig up some sort of stand to use iPad as a visualizer. I wrote about the Justand v2 and other options in this post, including apps that let you draw and annotate over the image.
I maintain a chart that compares the methods of displaying iPad’s screen on a projector. Click the image below to download the PDF.
Disclosure: Links to Amazon and ProComputing are affiliate links and Learning in Hand may get paid a commission if you make a purchase.