The following guide is a complete walkthrough for installing a fresh version of OS X Yosemite. It requires no experience and all of the necessary installation and post-installation tools are available on tonymacx86.com.
UniBeast is a tool that creates a bootable installer out of your downloaded version of OS X. In order to start fresh, you’ll need access to a functional computer running Mac OS X Snow Leopard 10.6.8 or later. This is a requirement, as you need access to the Mac App Store to download OS X and create the installation drive. To start from scratch, booting the 10.6 Snow Leopard Retail DVD directly, check out iBoot + MultiBeast.
1. Register here at tonymacx86! If you don’t have a user account, create one! 2. Get our latest MultiBeast and UniBeast tools from the downloads section. 3. Purchase a 8GB or larger USB drive. 4. Do a full backup of your system
The following guide is meant as a fresh installation method. To perform an update from OS X Mavericks to OS X Yosemite, saving system settings, data, and apps follow this guide.
STEP 1: Download OS X Yosemite
The full operating system is a free download for anyone who has purchased Mac OS X Snow Leopard, Lion, or Mountain Lion, or a Mac preloaded with Mavericks. Download the Application from the Mac App Store using your Apple ID on any Mac or functional computer running Mac OS X 10.6.8 or later.
Open Mac App Store
Log in with your Apple ID
Download OS X Yosemite
The Application Install OS X Yosemite will appear in /Applications.
STEP 2: Create a Bootable USB Drive with UniBeastTake a deep breath and take your time- this is pretty simple, but it’s easy to miss things if you rush. Follow each step to the letter.
Insert the USB drive
Open /Applications/Utilities/Disk Utility
Highlight the USB drive in left column
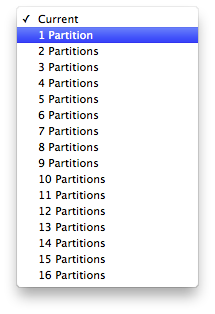
4. Click on the Partition tab 5. Click Current and choose 1 Partition
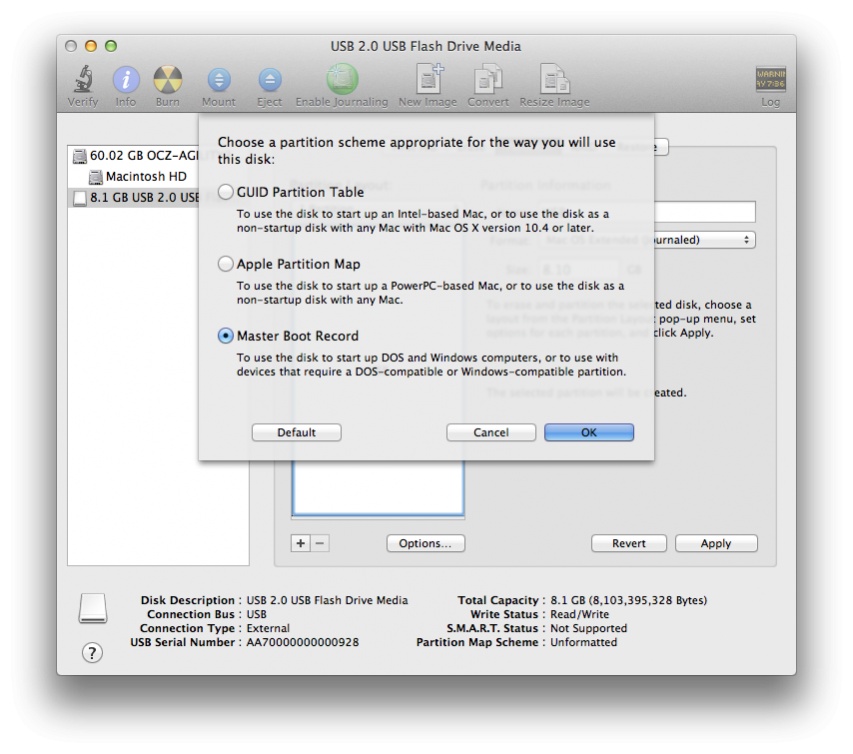
6. Click Options… 7. Choose Master Boot Record
8. Under Name: type USB (You can rename it later)
9. Under Format: choose Mac OS Extended (Journaled) 10. Click Apply then Partition
11. Download and run UniBeast 12. Click Continue, Continue, Continue, Agree
13. At Destination Select, choose USB and click Continue
14. Choose Yosemite on the Select OS Installation screen 15. Click Continue
16. If using a 5 or 6 Series system with AWARD BIOS choose Legacy USB Support 17. If using a laptop, choose Laptop Support 18. Click Continue
19. Enter password and click Install
UniBeast will now create the bootable USB drive. The process will only take about 10-15 minutes, depending on system and drive speed. Do not unplug or stop during this time.
20. Drag MultiBeast to your completed USB drive.
STEP 3: Recommended BIOS Settings
If you’re installing on a recommended CustoMac desktop with AMI UEFI BIOS, the options are simple. For other systems make sure to set your BIOS to Optimized Defaults, and your hard drive to AHCI mode. Here are standard AMI UEFI BIOS settings for Gigabyte AMI UEFI BIOS,Gigabyte AWARD BIOS, ASUS AMI UEFI BIOS, and MSI AMI UEFI BIOS.
To access BIOS/UEFI Setup, press and hold Delete on a USB Keyboard while the system is booting up
Load Optimized Defaults
If your CPU supports VT-d, disable it
If your system has CFG-Lock, disable it
If your system has Secure Boot Mode, disable it
Set OS Type to Other OS
Save and exit.
STEP 4: Install OS X YosemiteYou’re almost done! All you need to do is boot from the USB drive and install!
Turn on the computer
Press the hotkey to choose boot device (usually F12 or F8)
Choose USB-HDD
At the Chimera Boot Screen, choose USB and hitEnter
If you have trouble reaching the installer, type -x at the Boot screen as shown below. You can type the boot flags GraphicsEnabler=Yes, PCIRootUID=1, maxmem=4096, maxmem=8192, andnpci=0x2000 by themselves or together in order to solve boot issues for older graphics cards and machines. Type -v to bypass the Apple boot screen and enter verbose startup mode. X58 and X79 systems always need npci=0x2000. For further explanations of boot flags, check out the post here. Also, if you need help with what to use for your graphics card, see the post here.
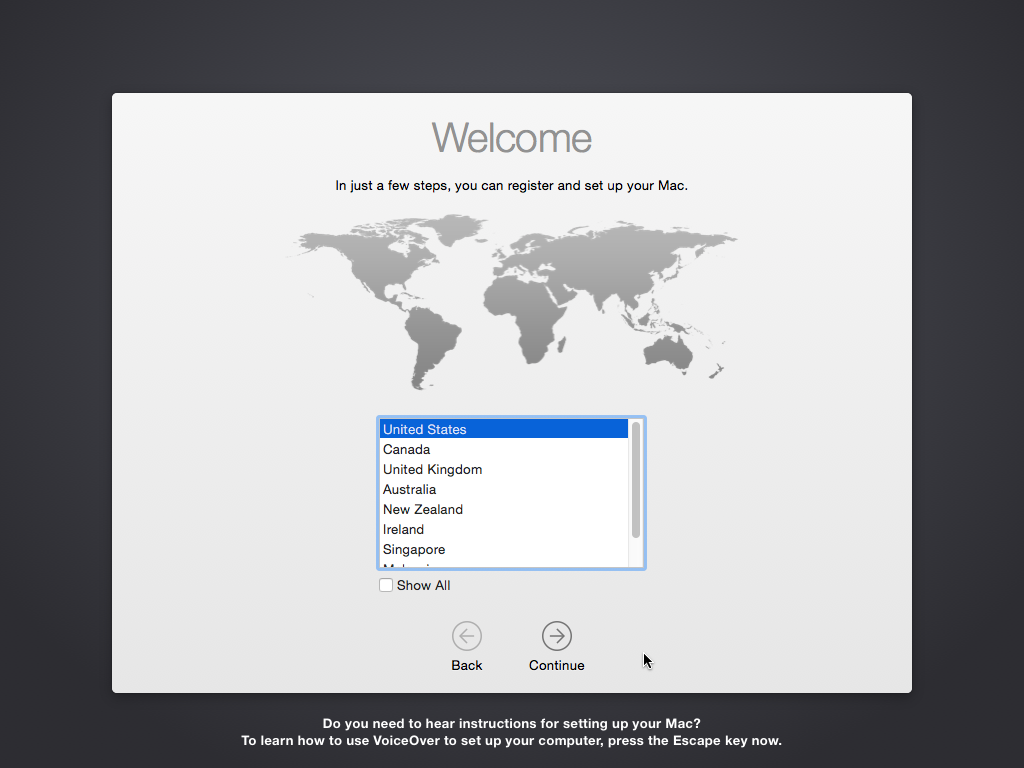
5. When you arrive at the Installer, choose language.
6. For a new installation of OS X, you MUST erase and format the destination drive according to the following steps before continuing.
a. In the top menu bar choose Utilities, and open Disk Utility
b. Highlight your target hard drive for the Yosemite installation in left column. c. Click Partition tab d. Click Current and choose 1 Partition e. Click Options… f. Choose GUID Partition Method g. Under Name: type Yosemite (You can rename it later) h. Under Format: choose Mac OS Extended (Journaled) i. Click Apply then Partition j. Close Disk Utility
7. When the installer asks you where to install, choose Yosemite, or your existing install. 8. Upon completion, restart the system.
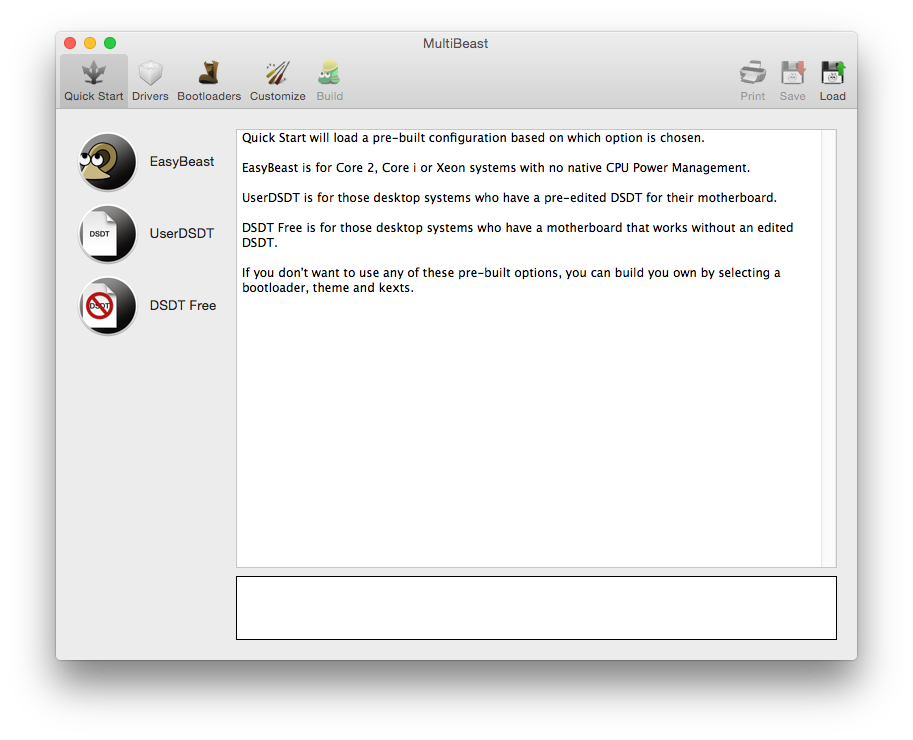
STEP 5: Post-Installation Using MultiBeastMultiBeast is an all-in-one post-installation tool designed to enable boot from hard drive, and install support for Audio, Network, and Graphics. In addition it includes System Utilities to repair permissions and a collection of drivers and config files. The installation is complete, but the drive isn’t bootable yet. Boot from the USB again, this time choosing Yosemite.
1. Turn on the computer 2. Press the hotkey to choose boot device 3. Choose USB-HDD 4. At the Chimera Boot Screen, choose your new Yosemite installation. 5. Complete OS X Yosemite setup
7. If this is a fresh installation, click Quick Start to choose EasyBeast, UserDSDT, or DSDT-Free.For 7/8/9 series recommended builds choose DSDT-Free.
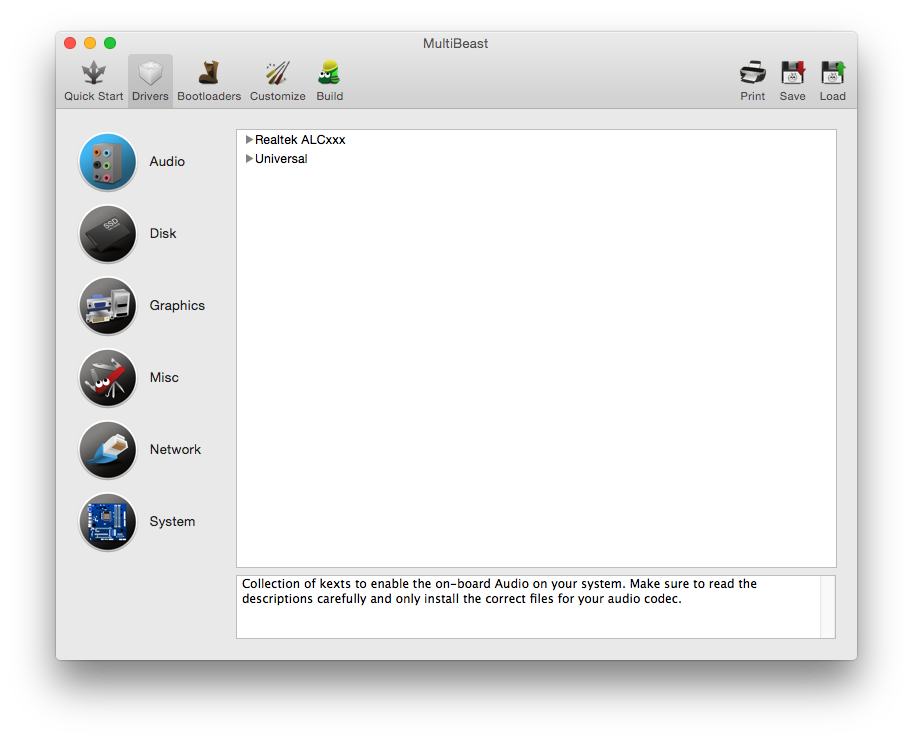
8. Click Drivers for Audio, Graphics, and Network options
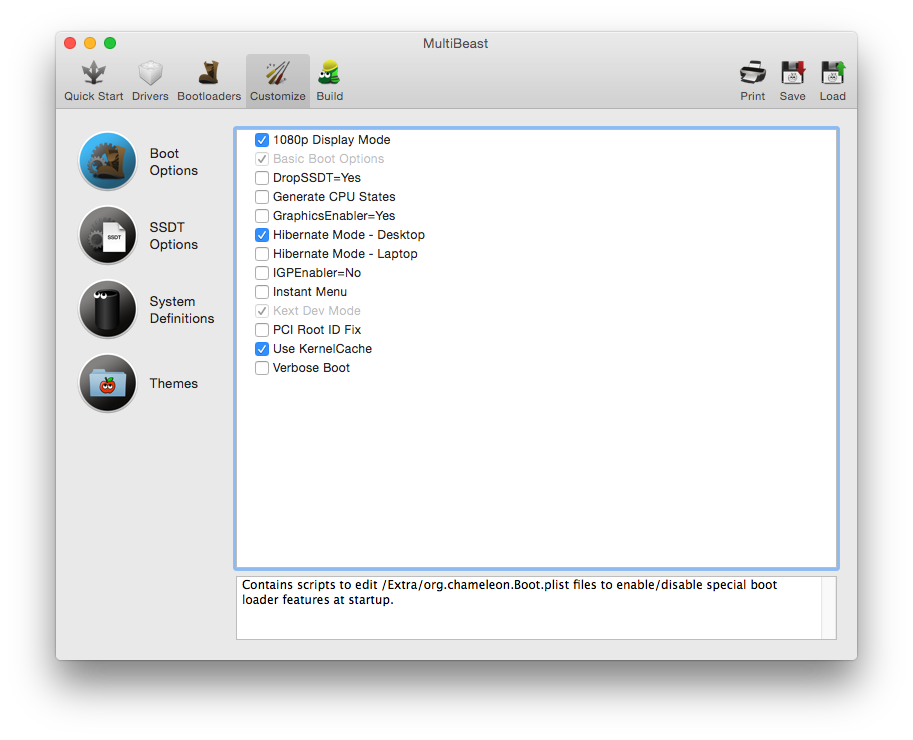
9. Click Customize for further options
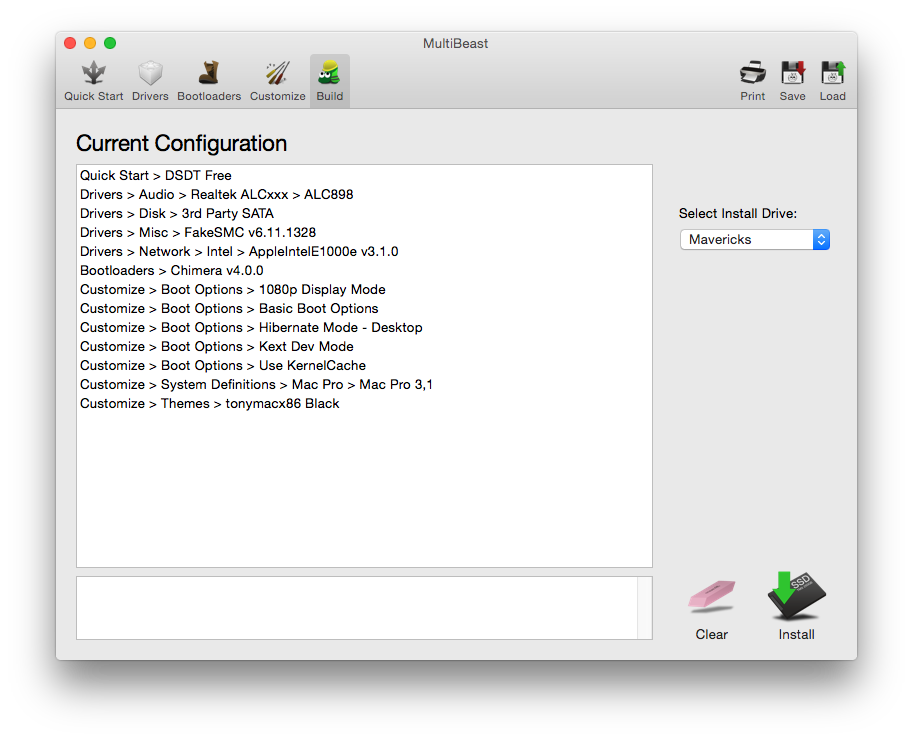
10. Click Print or Save to back up your configuration 11. Click Build then Install
12. Restart computer to complete installation
Yay! You now have a fully updated bootable version of OS X Yosemite on your CustoMac! And a super handy USB rescue drive. It’s easy to get frustrated, but don’t give up! If you get stuck, there are many users with similar hardware in the tonymacx86 Forum to provide support. Special thanks to everyone in the community, and our moderators for testing!
Troubleshooting and Optimizations:
After you’ve completed the guide, things such as HDMI audio and iMessage may not work automatically and universally. The list below should serve to fully optimize your system after initial setup.
Alternate NVIDIA Graphics Drivers NVIDIA releases alternate graphics drivers separately on the web for each OS X build. These are different from the drivers Apple ships as standard, and should be considered experimental. In the past, the drivers have been known to solve OpenCL issues with certain applications, as well as providing better native GPU power management for certain devices. They also will enable the latest ‘Maxwell’ cards to work with full acceleration- NVIDIA GeForce GTX 750, GTX 750 Ti, GTX 970, and GTX 980.
Download Windows Server 2012 R2 VHD and Run It on VirtualBox or VMware Workstation
the article is taken from the following link Source
Do you want to try Windows server 2012 R2 VHD on VirtualBox or VMware?, this guide is for you. Using pre installed virtual hard disks always ease our job by avoiding ISO download, installation and configuration. You can find out more information about download link of Windows 2012 R2 server VHD and how to attach it to VirtualBox or VMware in this guide.
R2 version has come up with several major changes. Hyper-V hypervisor has been improved well with few great features. They called that ‘Start Button is back’, but believe me, it’s not. The start menu/button icon is useless in this version.
Install Win Server 2012 by VirtualBox or VMware
Each aspect of server functions have been improved significantly in 2012 R2. You can find out them all inMicrosoft Site here.
If you want to know the included changes in Windows 2012 R2 Hyper-V hypervisor, refer this nice presentation here.
2) Extract the exe file you have downloaded. Since this is made for Hyper-v server to import directly, you will find more files and folders inside it.
We need the VHD file only which resides inside ‘Virtual Hard Disks’ folder.
How to Run Windows Server 2012 R2 VHD on VirtualBox.
3) You must have latest version of VirtualBox. VirtualBox supports Windows 8.1 (2012 R2) from 4.2.16 version only. Better upgrade to latest version, otherwise you might get an error message says ‘Your PC needs to restart’ in black screen.
4) Create a new virtual machine. Select Windows 2012(64bit) as client OS.
Instead of creating new hard disk, select existing virtual hard drive option. Browse the extracted VHD file which is located inside ‘Virtual Hard Disks’ folder.
5) There should not be any issue once you have started virtual machine.
Administrator password is R2Preview! , as of now. You could find more information here from Microsoft site.
Here is the working virtual machine on VirtualBox.
How to Use Windows Server 2012 R2 VHD in VMware Workstation.
6) VMware workstation or VM Player do not support VHD disk files for direct import. Therefore, VHD file needs to converted to VMDK format. There are few free tools available for this purpose in Windows OS platform.
WinImage is a tool (free for 30 days) can be used to convert VHD to VMDK in Windows 8 or 7. Also, StarWind’s V2V converter is available for free after registration.
From Disk menu select ‘Convert Virtual Hard Disk image’. Browse the VHD file you need to convert and select default option in next screen to make fixed size volume.
In the saving dialogue box, select VMDK file format from drop down and press save. This will start the conversion process of VHD to VMDK.
If you want to know more about how to use WinImage for this process, refer this guide.
7) Once the disk has been converted successfully, create a new virtual machine in VMware workstation.
Select ‘I will install OS later’ option because we are not going to install OS.
8.) Select Windows Server 2012 as guest OS.
9) Once the new VM is created successfully, follow below step to delete default vmdk file.
After deleting, let’s attach our Windows server 2012 R2 VMDK file which was converted from original VHD.
Press Add and select hard drive. Make sure to select existing disk option as shown below.
Browse and attach the converted 2012 R2 VMDK file.
10) You can modify other hardware settings ( such as RAM and processor cores) if you wish. Then power on the virtual machine.
I’m sure it will start smoothly. VMware tools for Windows 2012 R2 also works fine in VMware workstation 10. I could able to install and use few extra features such as full screen, unity mode and improved display performance.
By using this method, you can use same VMDK (which converted from original Windows server 2012 R2 VHD) on VMware ESXi or vSphere hypervisor hosts.
Share your experience about these steps to install and run Windows server 2012 R2 VHD on VirtualBox or VMware workstation.
خريج تقنية معلومات قسم الشبكات في كلية التقنية العليا بإمتياز مع مرتبة الشرف و موظف تقنية معلومات في مجال التعليم. حضرت عدة دورات لتحسين وتطوير المهارات اللازمة في مجال عملي وفي دراستي وغيرها من الدورات الشخصية لتطوير الذات.
من هواياتي تصميم المواقع الإلكترونية وادارتها و الدعم الفني.