Any OSx86 installation guide can seem daunting at first glance, especially when trying to remember cryptic terminal commands and sorting through volumes of misinformation on the web. This guide requires no coding, terminal work, or Mac experience of any kind. You will not need access to a Mac. In fact, it’s easier and faster for me to install Snow Leopard with fully working components on my system than it is to install Windows 7. And more fun.
The iBoot + MultiBeast method is designed and tested for any desktop or laptop running the latest line of Intel processors, the Core i3/i5/i7s. I have had reports of success with older machines as well including CoreDuo, Core2Duo, and even Pentium 4. However, AMD processors are not supported. YOU WILL NEED
Patience and humility- it may not work out perfectly the first time- but with enough tenacity and grit, you’ll reach the promised land. It’s easy to get frustrated, but don’t give up! There are a community of users with similar hardware in the tonymacx86 Forum to provide support if you get stuck.
BEFORE YOU BEGIN
Use only 1 graphics card in the 1st PCIe slot with 1 monitor plugged in.
Remove any hard drives besides the blank drive being used for OS X.
Remove any USB peripherals besides keyboard and mouse.
Remove any PCI cards besides graphics- they may not be Mac compatible.
It’s best to use an empty hard drive– you will have to partition and format the drive.
Always back up any of your important data.
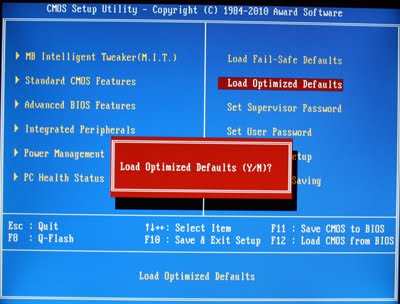
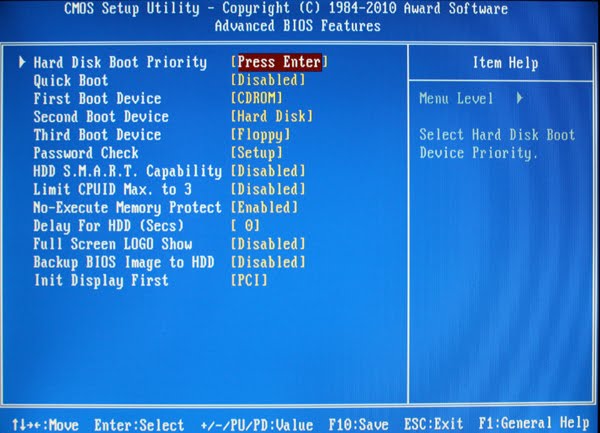
STEP 1: BIOS SETTINGS You will need to set your BIOS to ACHI mode and your Boot Priority to boot from CD-ROM first. This is the most important step, and one many people overlook. Make sure your bios settings match these. It’s not difficult- the only thing I did on my Gigabyte board besides setting Boot Priority to CD/DVD first was set Optimized Defaults, change SATA to AHCI mode, and set HPET to 64-bit mode.
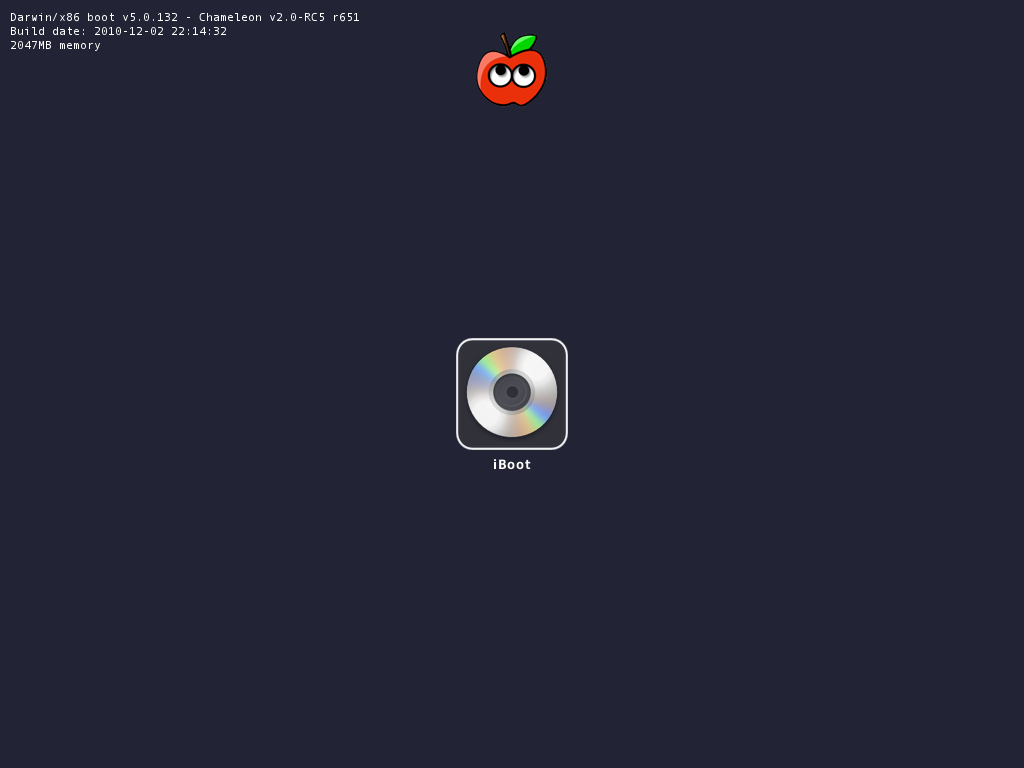
STEP 2: INSTALL MAC OS X In order to boot the Mac OS X Retail DVD, you’ll need to download and burniBoot. For desktops and laptops using unsupported Intel CPUs and graphics, a legacy version of iBoot can be downloaded here. If you have an Ivy Bridge or Haswell system, you can’t use the default iBoot. Use iBoot Ivy Bridge or iBoot Haswell.
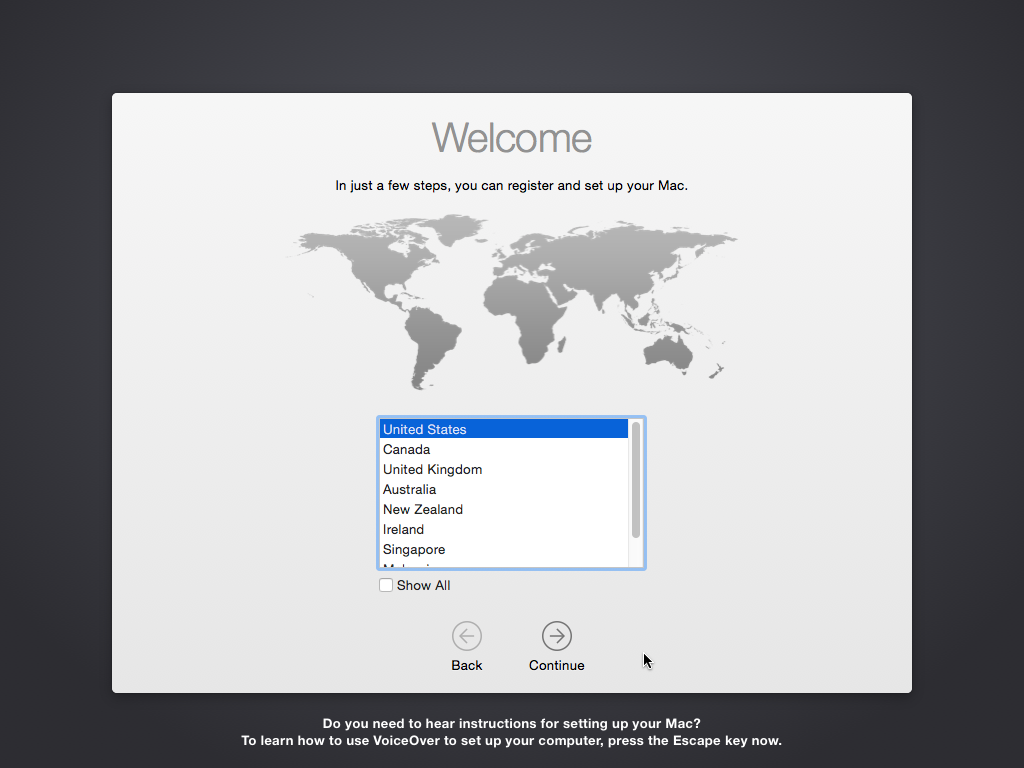
When you see the screen below, press enter to begin the boot process
When you get to the installation screen, open Utilities/Disk Utility. NOTE: If you cannot get to the installation screen, retry from Step 4, type PCIRootUID=1 before hitting enter. If that doesn’t work then try PCIRootUID=1 -x or just -x which will enter Mac OS X Safe Mode and will allow you to proceed. For some graphics cards, use GraphicsEnabler=No boot flag to proceed.
Partition your hard drive to GUID Partition Table
Format your hard drive to Mac OS Extended (Journaled). NOTE: The bootloader can only boot from a disk or partition of 1 TB or less. Partition larger drives.
For the purposes of this guide, name it Snow Leopard. You can rename it later.
Close Disk Utility
When the installer asks you where to install, choose Snow Leopard
Choose Customize‚ and uncheck additional options. This will hasten the install process. You can always install this stuff later.
Restart computer.
Place iBoot back in drive.
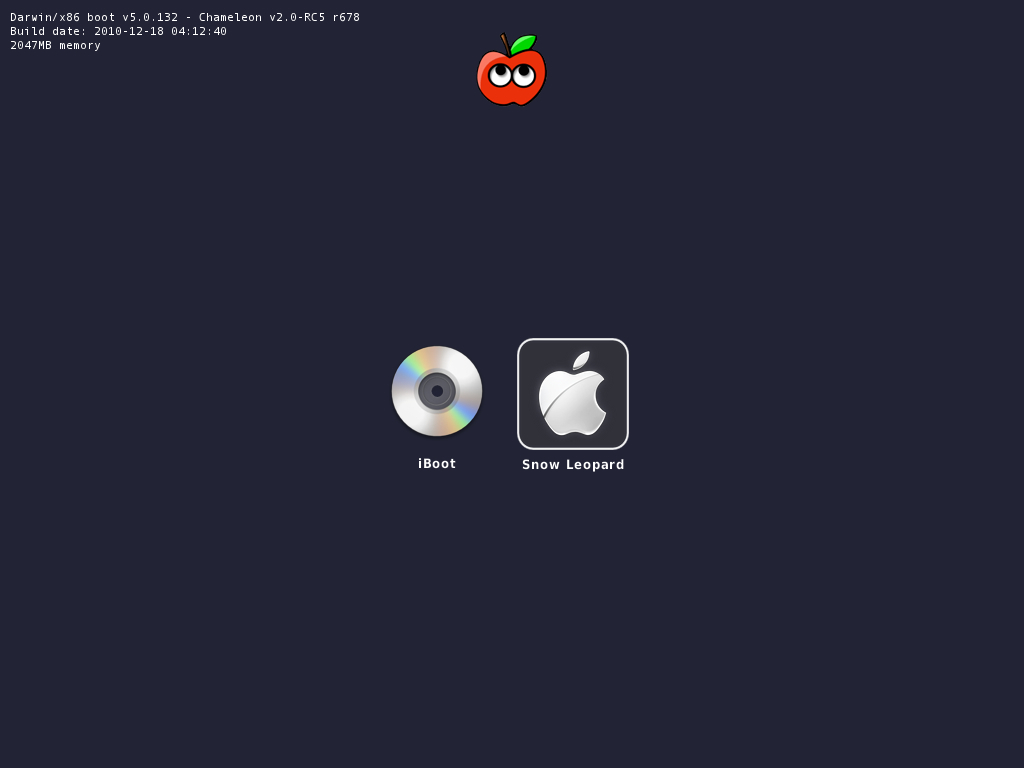
When you get to the boot selection screen, choose your new Snow Leopard installation.
Open MultiBeast– don’t run it yet, just leave it open. Set up windows as shown.
Mount MacOSXUpdCombo10.6.8.dmg
Install MacOSXUpdCombo10.6.8.pkg
Upon completion, the installer will ask you to reboot. DO NOT REBOOT.
Switch to the already open MultiBeast. If it closes, just re-open it.
STEP 4: MULTIBEAST
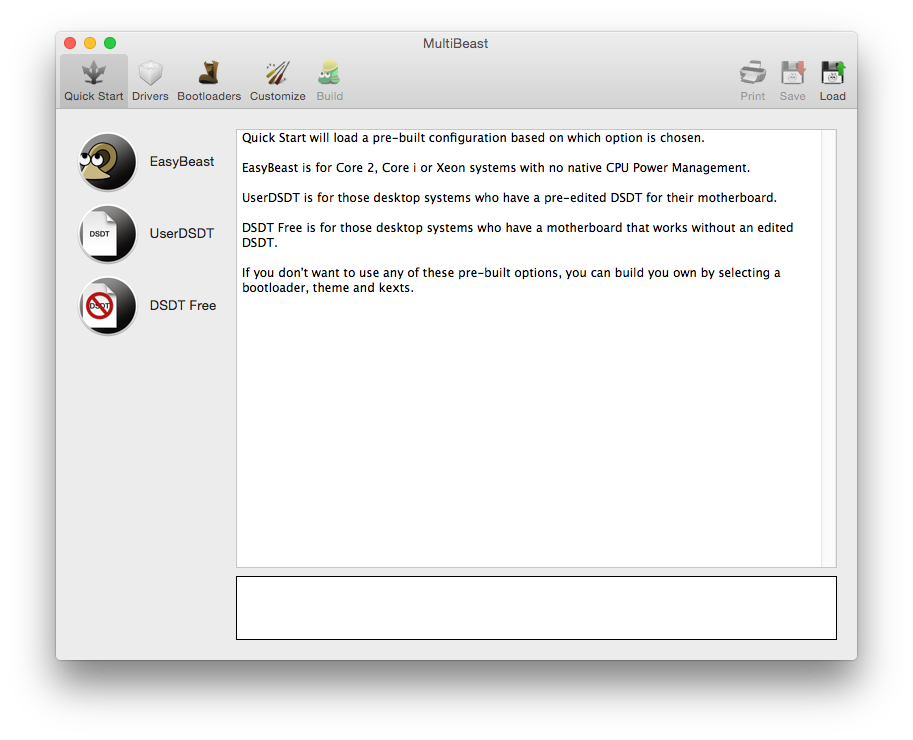
MultiBeast is an all-in-one post-installation tool designed to enable boot from hard drive, and install support for Audio, Network, and Graphics. It contains two different complete post-installation solutions: EasyBeast and UserDSDT. In addition it includes System Utilities to rebuild caches and repair permissions and a collection of drivers, boot loaders, boot time config files and handy software.
Choose one of the following options directly following a fresh installation and update:
EasyBeast is a DSDT-free solution for any Core/Core2/Core i system. It installs all of the essentials to allow your system to boot from the hard drive. Audio, Graphics and Network will have to be enabled separately.
UserDSDT is a bare-minimum solution for those who have their own pre-edited DSDT. Place your DSDT.aml on the desktop before install. Audio, Graphics and Network will have to be enabled separately. HINT: Check the DSDT Database for a pre-edited DSDT.
Run MultiBeast.
If you have a custom DSDT that’s been edited, place the file on your desktop and choose UserDSDT.
All others select EasyBeast
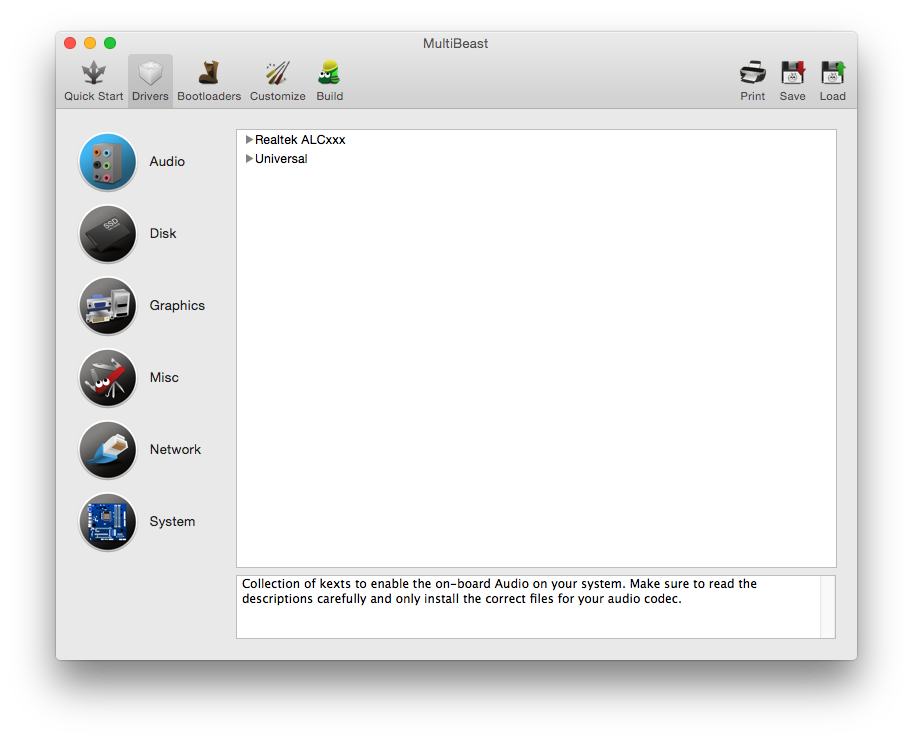
Select System Utilities.
Optionally, you may install further drivers via Advanced Options to enable ethernet, sound, graphics, etc… Be sure to read the documentation provided about each installation option. NOTE:EasyBeast, and UserDSDT install the bootloader by default, so you’ll not need to check that option.
Install to Snow Leopard– it should take about 4 minutes to run scripts.
Eject iBoot.
Reboot- from your new Snow Leopard installation drive.
If your drive doesn’t boot on its own, and you get an error referencing boot0, fix it using the methods listed here.
Congratulations! You’re done!!
Your PC is now fully operational, while running the latest version of Mac OS X Snow Leopard! And you have a nice Boot CD to get into your system in case things go awry. Boot your system from iBoot if you have issues. You may run MultiBeast as often as you like.
If you can’t boot, try typing -x at the boot prompt to enter safe mode, or just boot with iBoot. When you get to the desktop, you can make all of the changes you need to. The best way to start fresh is delete whatever you’re trying to get rid of- including the whole /Extra folder, as most kexts are installed there. Then you can re-run MultiBeast. As long as you rebuild caches and repair permissions after you’re done, you can do just about anything you want to /Extra/Extensions and /System/Library/Extensions. Anything can be tweaked and enabled upon subsequent uses of MultiBeast.
If you’ve had success using iBoot + MultiBeast, consider a contribution to help keep the sites going. We’re constantly updating and tweaking our tools to help you.
The following guide is a complete walkthrough for installing a fresh version of OS X Yosemite. It requires no experience and all of the necessary installation and post-installation tools are available on tonymacx86.com.
UniBeast is a tool that creates a bootable installer out of your downloaded version of OS X. In order to start fresh, you’ll need access to a functional computer running Mac OS X Snow Leopard 10.6.8 or later. This is a requirement, as you need access to the Mac App Store to download OS X and create the installation drive. To start from scratch, booting the 10.6 Snow Leopard Retail DVD directly, check out iBoot + MultiBeast.
1. Register here at tonymacx86! If you don’t have a user account, create one! 2. Get our latest MultiBeast and UniBeast tools from the downloads section. 3. Purchase a 8GB or larger USB drive. 4. Do a full backup of your system
The following guide is meant as a fresh installation method. To perform an update from OS X Mavericks to OS X Yosemite, saving system settings, data, and apps follow this guide.
STEP 1: Download OS X Yosemite
The full operating system is a free download for anyone who has purchased Mac OS X Snow Leopard, Lion, or Mountain Lion, or a Mac preloaded with Mavericks. Download the Application from the Mac App Store using your Apple ID on any Mac or functional computer running Mac OS X 10.6.8 or later.
Open Mac App Store
Log in with your Apple ID
Download OS X Yosemite
The Application Install OS X Yosemite will appear in /Applications.
STEP 2: Create a Bootable USB Drive with UniBeastTake a deep breath and take your time- this is pretty simple, but it’s easy to miss things if you rush. Follow each step to the letter.
Insert the USB drive
Open /Applications/Utilities/Disk Utility
Highlight the USB drive in left column
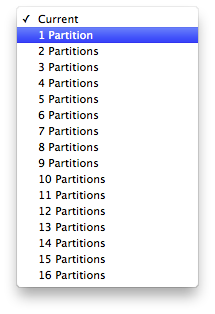
4. Click on the Partition tab 5. Click Current and choose 1 Partition
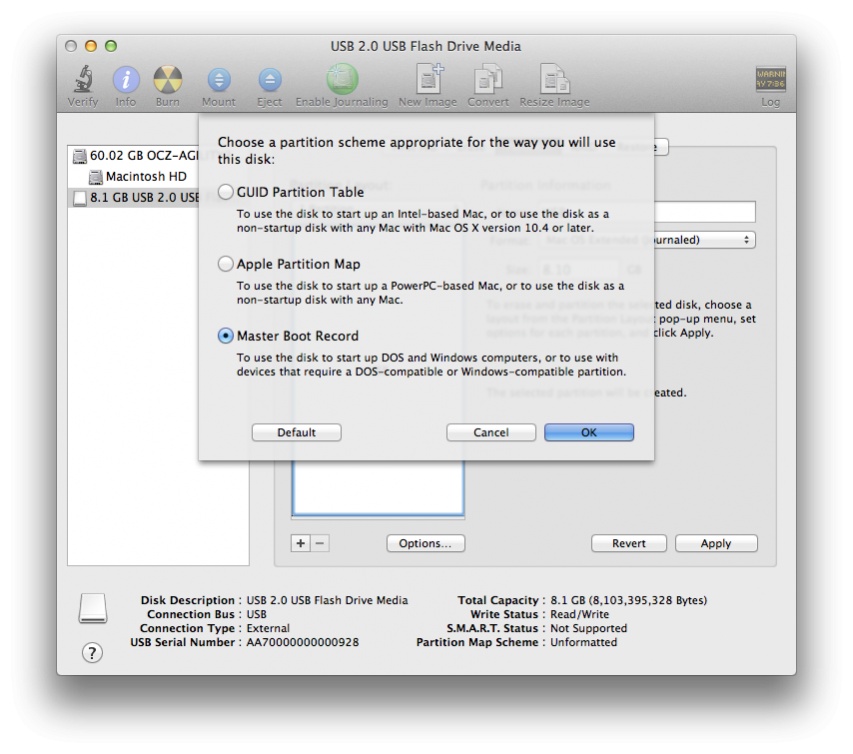
6. Click Options… 7. Choose Master Boot Record
8. Under Name: type USB (You can rename it later)
9. Under Format: choose Mac OS Extended (Journaled) 10. Click Apply then Partition
11. Download and run UniBeast 12. Click Continue, Continue, Continue, Agree
13. At Destination Select, choose USB and click Continue
14. Choose Yosemite on the Select OS Installation screen 15. Click Continue
16. If using a 5 or 6 Series system with AWARD BIOS choose Legacy USB Support 17. If using a laptop, choose Laptop Support 18. Click Continue
19. Enter password and click Install
UniBeast will now create the bootable USB drive. The process will only take about 10-15 minutes, depending on system and drive speed. Do not unplug or stop during this time.
20. Drag MultiBeast to your completed USB drive.
STEP 3: Recommended BIOS Settings
If you’re installing on a recommended CustoMac desktop with AMI UEFI BIOS, the options are simple. For other systems make sure to set your BIOS to Optimized Defaults, and your hard drive to AHCI mode. Here are standard AMI UEFI BIOS settings for Gigabyte AMI UEFI BIOS,Gigabyte AWARD BIOS, ASUS AMI UEFI BIOS, and MSI AMI UEFI BIOS.
To access BIOS/UEFI Setup, press and hold Delete on a USB Keyboard while the system is booting up
Load Optimized Defaults
If your CPU supports VT-d, disable it
If your system has CFG-Lock, disable it
If your system has Secure Boot Mode, disable it
Set OS Type to Other OS
Save and exit.
STEP 4: Install OS X YosemiteYou’re almost done! All you need to do is boot from the USB drive and install!
Turn on the computer
Press the hotkey to choose boot device (usually F12 or F8)
Choose USB-HDD
At the Chimera Boot Screen, choose USB and hitEnter
If you have trouble reaching the installer, type -x at the Boot screen as shown below. You can type the boot flags GraphicsEnabler=Yes, PCIRootUID=1, maxmem=4096, maxmem=8192, andnpci=0x2000 by themselves or together in order to solve boot issues for older graphics cards and machines. Type -v to bypass the Apple boot screen and enter verbose startup mode. X58 and X79 systems always need npci=0x2000. For further explanations of boot flags, check out the post here. Also, if you need help with what to use for your graphics card, see the post here.
5. When you arrive at the Installer, choose language.
6. For a new installation of OS X, you MUST erase and format the destination drive according to the following steps before continuing.
a. In the top menu bar choose Utilities, and open Disk Utility
b. Highlight your target hard drive for the Yosemite installation in left column. c. Click Partition tab d. Click Current and choose 1 Partition e. Click Options… f. Choose GUID Partition Method g. Under Name: type Yosemite (You can rename it later) h. Under Format: choose Mac OS Extended (Journaled) i. Click Apply then Partition j. Close Disk Utility
7. When the installer asks you where to install, choose Yosemite, or your existing install. 8. Upon completion, restart the system.
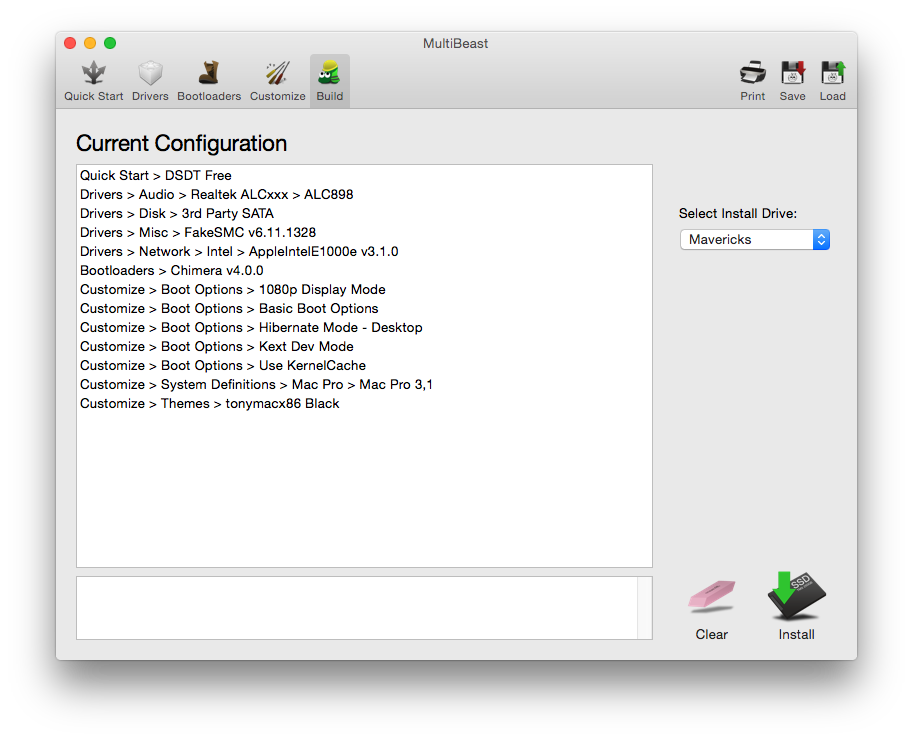
STEP 5: Post-Installation Using MultiBeastMultiBeast is an all-in-one post-installation tool designed to enable boot from hard drive, and install support for Audio, Network, and Graphics. In addition it includes System Utilities to repair permissions and a collection of drivers and config files. The installation is complete, but the drive isn’t bootable yet. Boot from the USB again, this time choosing Yosemite.
1. Turn on the computer 2. Press the hotkey to choose boot device 3. Choose USB-HDD 4. At the Chimera Boot Screen, choose your new Yosemite installation. 5. Complete OS X Yosemite setup
7. If this is a fresh installation, click Quick Start to choose EasyBeast, UserDSDT, or DSDT-Free.For 7/8/9 series recommended builds choose DSDT-Free.
8. Click Drivers for Audio, Graphics, and Network options
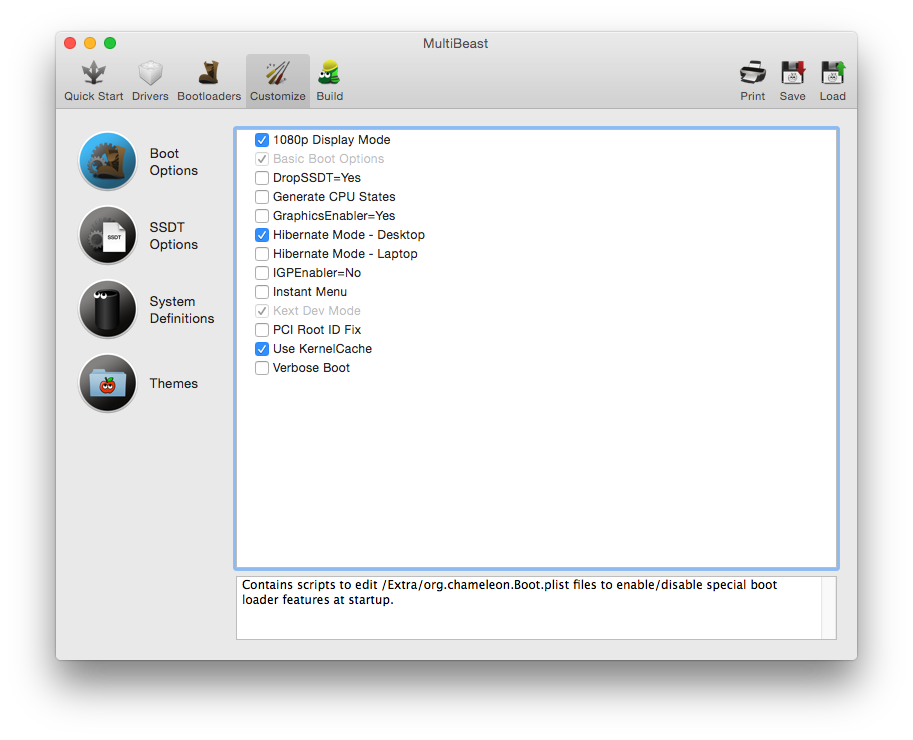
9. Click Customize for further options
10. Click Print or Save to back up your configuration 11. Click Build then Install
12. Restart computer to complete installation
Yay! You now have a fully updated bootable version of OS X Yosemite on your CustoMac! And a super handy USB rescue drive. It’s easy to get frustrated, but don’t give up! If you get stuck, there are many users with similar hardware in the tonymacx86 Forum to provide support. Special thanks to everyone in the community, and our moderators for testing!
Troubleshooting and Optimizations:
After you’ve completed the guide, things such as HDMI audio and iMessage may not work automatically and universally. The list below should serve to fully optimize your system after initial setup.
Alternate NVIDIA Graphics Drivers NVIDIA releases alternate graphics drivers separately on the web for each OS X build. These are different from the drivers Apple ships as standard, and should be considered experimental. In the past, the drivers have been known to solve OpenCL issues with certain applications, as well as providing better native GPU power management for certain devices. They also will enable the latest ‘Maxwell’ cards to work with full acceleration- NVIDIA GeForce GTX 750, GTX 750 Ti, GTX 970, and GTX 980.
نسخة حديثة من برنامج Parallels Desktop تدعم النظام الجديد OS X 10.10 Yosemite
برنامج Parallels Desktop هو برنامج يمكنك من تشغيل “الويندوز” ومختلف الأنظمة الآخرى على الماك من دون إعادة تشغيل. وهو بلا شك مفيد لمن يستخدمون نظام الماك لكنهم يحتاجون لاستخدام برامج خاصة بالويندوز كمايكروسوفت اوفيس وغيره. أيضاً البرنامج يدعم أحدث التقنيات لتشغيل الألعاب بأداء ممتاز.
[ads1] الإصدار المتوفر والذي يدعم النظام الجديد : Parallels Desktop 10.1.0 لشراء النسخة أو الإطلاع على أبرز المزايا المتوفره بالنسخة توجه إلى موقع الشركة على الرابط : https://www.parallels.com/products/desktop/
يمكن إيقاف تشغيل ال”ماك” الخاص بك بشكل صحيح لتجنب تكبد مشاكل مثل تعطل بعض الملفات في النظام. كل ما يتطلبه الأمر هو القليل من الصبر والقليل من الروتين الصحيح. يمكنك استخدام القائمة Apple لإيقاف جهاز الكمبيوتر الخاص بك، ووضعها على النوم، أو إعادة تشغيله، ولكن مع الـ “Terminal” يمكنك تحديد المزيد من الخيارات لاغلاق جهازك، بما في ذلك تسجيل خروج كافة المستخدمين ووضع أوقات معينة لإغلاق جهاز نظام التشغيل Mac الخاص بك. وهذه الأوامر هي في متناول يديك، وبالاضافة إلى ذلك حتى إذا كنت تدير الخادم أو ماك عن بعد من خلال SSH. بإمكانك متابعة القراءة لمعرفة المزيد.
إيقاف التشغيل Shutting Down
لإيقاف تشغيل جهازك ال”ماك”، يمكنك استخدام او كتابة الأمر التالي للقيام بذلك على
sudo shutdown -h now
h- يعطي الأمر لجهازك ويعلمه بالإيقاف التشغيل. بعد تنفيذ الأمر باستخدام كلمة المرور الرئيسية للنظام سيتم إيقاف تشغيل الجهاز، او عن طريق الحصول على صلاحيات الإدارة التي تتيح لك المجال أن تستدعي إيقاف تشغيل الجهاز.
إعادة التشغيل Rebooting
لإعادة تشغيل الجهاز، بإمكانك استخدام الأمر التالي لإعادة التشغيل:
sudo shutdown -r now
r- ينفذ عملية إعادة التشغيل ضمن أمر إعادة التشغيل. بعد تنفيذ الأمر سيتم إعادة التشغيل مباشرة.
وضعية النوم Sleeping
لوضع جهازك في وضع النوم أو وضع توفير الطاقة، بإمكانك استخدام الأمر التالي:
sudo shutdown -s now
عند تفعيل الأمر، سيتم وضع الجهاز في وضع توفير للطاقة. وان كنت تستخدم SSH البروتوكول الخاص بتشفير الاتصال وتأمين الاتصال. يجب عليك التأكد من إتاحة الخيار التالي “Wake for network access” من الخطوات التالية: System Preferences > Energy Saver
لن تتمكن من الدخول على الجهاز عن بعد إلا ان تم تشغيله يدويا بتحريك الفأرة أو الضغط على زر التشغيل أو الضغط على زر لوحة المفاتيح.
إستخدام إيقاف مؤقت Using a Timed Shutdown
في الأوامر السابقة تم استخدام “now” بعد كتابة الأمر المرغوب به. بحيث يقوم بإعطاء الأوامر للجهاز بالتنفيذ الفوري. ومع ذلك، بإمكانك ان تعطي الأمر للجهاز بالايقاف او وضعه في وضعية النوم او موفر للطاقة بعد فترة زمنية معينة. بإمكانك استخدام احدى الطرق التالية:
في وقت معين
بإمكانك إيقاف تشغيل الجهاز،إعادة تشغيل الجهاز، وضع النوم للجهاز، في وقت معين باستبدال “now” باستخدام احد التنسيقات التالية للتواقيت على سبيل المثال: yymmddhhmm .
بحيث يبدأ ب “yy” أي السنة يتم كتابة العام المرغوب حسب التوقيت المتوفر في الجهاز، و “mm” الشهر اي في اي
شهر تريد، “dd” اليوم، “hh” الساعة بنظام ال24 ساعة، “mm” الدقيقة/الدقائق.
في المثال التالي أرغب في إيقاف تشغيل الجهاز في الساعة
So, if for instance, we wanted the computer to restart at 3:30pm on January 1, 2013, we’d issue the following command:
sudo shutdown -r 1301011530
After executing the command, you’ll be given the date and time of the shutdown in your system’s format, along with the process id (pid).
خريج تقنية معلومات قسم الشبكات في كلية التقنية العليا بإمتياز مع مرتبة الشرف و موظف تقنية معلومات في مجال التعليم. حضرت عدة دورات لتحسين وتطوير المهارات اللازمة في مجال عملي وفي دراستي وغيرها من الدورات الشخصية لتطوير الذات.
من هواياتي تصميم المواقع الإلكترونية وادارتها و الدعم الفني.