In Part 1 of this series, we took a look at how the Network Policy and Access Services in Windows 2012, and particularly Network Access Protection (NAP) can help to protect your network when VPN clients connect to it by validating health requirements that you institute as part of a health enforcement plan. In Part 2, we shared some tips on actually deploying NAP on Windows Server 2012. In Part 3, we’re going to discuss the process of setting up RADIUS servers.
A brief review of RADIUS: What it does
In Windows Server 2012, the Network Policy Service (NPS) can do more than just Network Access Protection (NAP). It can also function as a RADIUS server or a RADIUS proxy, as we mentioned in Part 1 of this series. RADIUS has been around since the early 1990s and is an IETF standard. It was defined in by RFCs 2058 and 2059, which have since been made obsolete by new standards. A good starting point when you’re planning to deploy RADIUS in your organization is RFC 6158, Radius Design Guidelines, published in March 2011.
RADIUS is an open source client/server protocol designed to give network administrators the capability of managing authentication, authorization and account (AAA) from a centralized location. These three functions work together to provide control over remote users and computers by first authenticating their identities to determine whether they are allowed to access the network, then authorizing them to use specific network services or connect to specific network resources and proving an accounting so you can track the use of the services. RADIUS servers verify identity through a database on the RADIUS server, the Active Directory database, an LDAP server, Kerberos, a SQL database or other means. Because RADIUS keeps accounting records, it makes it possible to collect statistical information about usage or even to bill users, departments or organizations according to their usage.
A brief review of RADIUS: How it works
[ads1]
The RADIUS AAA process works as follows:
Remote user/computer sends a request to the remote access server to access specific network resources contained on a network access server.
The network access server prompts for credentials (e.g., user name and password).
User provides credentials.
The remote access server sends a request to the RADIUS server for authentication and authorization, which includes the credentials (password is encrypted).
The RADIUS server examines the request and responds by rejecting the request (if no or incorrect credentials are provided), challenge the request by asking for more information (PIN, Smart Card, etc.), or accepting the request by authenticating the user’s/machine’s identity.
If the request is accepted, the RADIUS server checks the database to determine which resources the user is allowed to use and authorizes the user to use the requested resources if they are on the list.
Begins tracking when the network access server sends an Accounting Start packet.
Receives interim update packets from the network server during the active session. Information can include the amount of time and data used.
Receives an Accounting Stop packet when the session ends.
RADIUS uses UDP packets to communicate, over ports 1645 and 1646. It can use a number of different authentication methods.
Configuring RADIUS
To configure RADIUS authentication for your network, you start by opening the NPS management console that’s shown in Figure 1, which you’ll find in the administrative tools menu after you’ve installed the NPS server role (as we showed you in a previous installment in this article series).
You can use either the Standard or Advanced Configuration option to configure RADIUS. The Standard Configuration option will start a configuration wizard, so we’ll look at it first.
Figure 1
You have two choices under the Standard Configuration option:
You can configure a RADIUS server for dial-up or VPN connections
You can configure a RADIUS server for 802.1x wireless or wired connection
In our scenario, we’ll configure the RADIUS server for dial-up or VPN connections, since we have already set up a VPN server. Click the Configure VPN or Dial-up link.
On the next page, you’ll be asked to select the type of connection (Dial-up or VPN). In this case, we’ll choose Virtual Private Network (VPN) Connections. NPS will be able to authenticate and authorize the connection requests from VPN clients. On this page, you also need to provide a name to be used as part of the policy name for policies that the wizard will create. This dialog box is shown in Figure 2.
Figure 2
On the next page, you need to add the RADIUS clients. These are the network access servers that will forward connection requests from remote clients to the RADIUS server. Click the ADD button, shown in Figure 3,to add your RADIUS clients and fill in the dialog box fields asking for a friendly name, IP address or DNS, and a shared secret template if you’re using one. You can also manually type a shared secret if you prefer, or you can have a shared secret automatically generated, by clicking the appropriate button.
Figure 3
On the following page of the wizard, you will configure the authentication method(s) to be used by RADIUS. The default selection is Microsoft Encrypted Authentication version 2 (MS-CHAPv2). You can also select MS-CHAP if the operating systems on your network do not support MS-CHAPv2, but this is not recommended as it’s not as secure. The other choice is to use the Extensible Authentication Protocol (EAP). If you choose EAP, you can use a secured password (EAP-MSCHAPv2) or Microsoft Protected EAP (PEAP), or you can use a smart card or certificate. This is the most secure authentication method. Note that you can select multiple protocols, as shown in Figure 4.
Figure 4
The next step is to select user groups, the members of which will be allowed or denied access to the network access servers through the VPN, based on the network policy Access Permission setting. Click the Add button to add user groups. This will invoke a dialog box through which you can select the groups, as shown in Figure 5.
Figure 5
The next page in the wizard allows you to configure IPv4 and IPv6 IP filters to control what types of network traffic can be sent and received through the VPN server. You can configure input and output filters for each IP protocol here, as you can see in Figure 6. We discussed input and output filters in a previous installment of this article series.
Figure 6
The next page of the wizard is where you specify the encryption settings to determine the minimum encryption strength(s) that will be allowed between the access clients and the network access servers.
Your choices include:
Basic encryption (MPPE 40 bit)
Strong encryption (MPPE 56 bit)
Strongest encryption (MPPE 128 bit)
You can select multiple encryption strengths and the server and clients will negotiate the strongest supported by both. All strengths are allowed by default, as shown in Figure 7. You can unchecked the lower strength encryption choices to force connections only when the more secure encryption can be supported. If you uncheck all of the boxes, the traffic from the clients to the network access server will not be encrypted, so this is not recommended.
Figure 7
The next page of the wizard asks you to specify a realm name, which is part of the user name that the ISP uses to identify the connection requests that route to this server. It is not required that you specify a realm name; you can leave this field blank if you don’t know the realm name or don’t care about it. If you do specify a realm name, you should leave the box checked that says Before authentication, remove the realm name form the user name, as shown in Figure 8, so Windows will be able to authenticate the connection request.
Figure 8
This completes the wizard and when you click Finish on the next page, it will automatically create two policies: a network policy and a connection request policy. The names of these policies will use the name that you assigned earlier in the wizard. The RADIUS clients will also be configured. There is a link labeled Configuration Details by which you can see a summary of the configuration settings (it opens in your default web browser) so you can review it and make sure everything is right before you click the Finish button.
After you click Finish, the new policies will show up in the Policies nodes of the NPS management console, under Connect Request Policies and Network Policies, as you can see in Figure 9.
Figure 9
Your RADIUS clients that you configured through the wizard will show up in the RADIUS Clients node.
Summary
In Part 3 of this multi-part series on Understanding and Configuring NPAS in Windows Server 2012, we began our discussion of RADIUS and how to configure the NPS to act as a RADIUS server. We covered the steps of the configuration wizard this time, and next time we’ll talk about how to use the Advanced Configuration option, how to configure RADIUS server groups and how to configure a RADIUS proxy.
In Part 1 of this series, we took a look at how the Network Policy and Access Services in Windows 2012, and particularly how Network Access Protection (NAP) can help to protect your network when VPN clients connect to it by validating health requirements that you institute as part of a health enforcement plan. In Part 2, we’ll go into some tips on actually deploying NAP on Windows Server 2012. Keep in mind, however, that NPAS and NAP are complex topics and we are covering only some basics here. There is are much more detailed guidelines available in the TechNet Library that address many different network scenarios.
Installing the NPS role service on Windows Server 2012
To deploy NAP on Windows Server 2012, you need to install the Network Policy and Access Services role with the Network Policy Server role service. You can do this in one of two ways: by using Server Manager to install NPS via the graphical user interface, or by using PowerShell to install NPS via the command line.
Before attempting installation, you need to know that if there is a manually configured IPv6toIPv4 address on the computer, NPS may fail to install correctly. You should disable the IPv6 configuration before attempting to install NPS. Here’s how:
On the Windows Server 2012 Start Screen, type Network.
In the right Search pane, select Settings.
Click the View Network Connections option in the list.
Right click the network connection for your local network and select Properties.
On the Networking tab, uncheck the check box for Internet Protocol Version 6 (TCP/IPv6).
Click OK.
Installing the NPS role service using Server Manager
To install the NPS role service in Windows Server 2012 via the graphical interface, first open Server Manager from the desktop taskbar or the Server Manager tile on the Start Screen, and perform the following steps:
In Server Manager, click Manage and click Add Roles and Features.
On the Before you begin page, click Next.
On the Select Installation Type page, click Role/Feature Based Install and then click Next.
On the Select destination server page, click Select a server from the server pool, click the names of the servers where you want to install NPS and then click Next.
On the Select Server Roles page, click Network Policy and Access Services, and then click Next three times.
On the Select role services page, click Network Policy Server, and in the Add Roles and Features Wizard dialog box, verify that Include management tools (if applicable) is selected.
Click Add Features, and then click Next.
On the Confirm installation selections page, click Install.
On the Installation Results page, verify that the installation was successful, and then click Close.
Installing the NPS role service using PowerShell
[ads2]
To install the NPS role service in Windows Server 2012 using PowerShell, you first need to right-click the PowerShell icon on the taskbar and select to Run as administrator in order to open a PowerShell session with administrative privileges. Then perform the following steps:
Load the Server Manager module by typing: Import-Module Servermanager
Next, install the NPS role service by typing: Install-WindowsFeature –name napas-policy-server –includemanagementtools Note: This will also install the DHCP server role
When the role service has been successfully installed, PowerShell will report Success = True and the Feature Result will show Network Policy and Access Services, as shown in Figure 1.
Figure 1: The NPS role has been successfully installed
Configuring the NAP server
You can configure the NAP server with three different types of policies:
Connection Request Policies that use connections and settings to authenticate client requests to access the network. These policies also control where the authentication will be performed. You must have a connection request policy for each NAP enforcement method.
Network Policies that use conditions, settings and constraints to determine the level of access that will be authorized for a client that attempts to connect to the network. You need at least two network policies to deploy NAP: one for client computers that are found to be compliant with your health policies and one for those clients that are out of compliance.
Health Policies that specify which System Health Validators (SHVs) are to be evaluated and how they’re to be used to evaluate health status. You have to enable at least one SHV for each health policy.
When creating network policies, you need to keep in mind that a client request can match one connection policy and one network policy. It cannot match multiple policies of a type, so when a match is made, none of the other policies will be applied. That means the order of processing policies is important. The source of the request is also used in determining the order for evaluation.
If there are policies that specify a source, requests sent from a matching source are only evaluated against these policies. If none of the policies specify a source that matches, clients try to match policies with the Unspecified source. If there are multiple policies with the same source that matches the client source, the policy that’s highest in the processing order is used (and if it fails, the NPS goes down the list of policies in the processing order until it finds a policy that matches).
To configure NSP with a network policy, use the New Network Policy wizard on the NPS server. On the NPS server, open the Network Policy Server administrative tool from the Administrative Tools menu. In the left pane, expand the Policies node and click Network Policies. Right click and select New to start the New Network Policy Wizard, as shown in Figure 2.
Figure 2: Creating a new network policy
You can create a new connection request policy or a new health policy by right clicking the Connection Request Policy or Health Policies node and selecting New.
Configuring the VPN servers with NPS
The steps involved in configuring VPN servers with NPS are as follows:
Install and configure your VPN servers as discussed in the first part of this chapter.
Decide what authentication method is to be used.
Install the NPS role on the NPS server.
Autoenroll a server certificate to the NPS server(s) or purchase a server certificate (for PEAP-MS-CHAP v2 authentication).
For EAP-TLS or PEAP-TLS without smart cards, autoenroll user and/or computer certificates to domain users and client computers that are domain members.
Configure your VPN servers as RADIUS clients in NPS.
Create an Active Directory user group for users who will be allowed to connect via the VPN servers.
Configure network policies for VPN services in NPS.
To create the connection request and network policies that you need in order to deploy VPN servers as RADIUS clients to the NPS server, you can use the New Dial-up or Virtual Private Network Connections wizard. Open the NPS console from the Administrative Tools menu on the server where you have installed the Network Policy Server role service. Click the NPS (Local) top level node in the left pane and follow these steps:
Under Standard Configuration, in the drop-down box, select RADIUS server for Dial-up or VPN Connections, as shown in Figure 3.
Figure 3: Creating the policies required to deploy VPN servers as RADIUS clients to the NPS
Click Configure VPN or Dial-Up.
In the wizard, select Virtual Private Network (VPN) Connections under the Type of connections section, as shown in Figure 4.
Figure 4:Selecting the connections type (VPN)
Provide text to be part of the name for each of the policies the wizard creates or accept the default, and click Next.
On the Specify Dial-Up or VPN Server page, the local computer will be automatically added as a RADIUS client to the NPS server if it is running RRAS as a VPN server. You can add remote VPN servers by clicking the Add button.
On the Configure Authentication Methods page, select the protocol(s) you want to use for authentication, as shown in Figure 5.
Figure 5: Configuring the authentication method(s)
On the Specify User Groups page, you can select the groups to which the policy will apply by clicking the Add button. If you don’t select any groups, the policy will apply to all users.
On the Specify IP Filters page, you can configure IPv4 and IPv6 input and output filters for the RRAS VPN server.
On the Specify Encryption Settings page, you can select the encryption strength to be used for MPPE (40-bit, 56-bit and/or 128-bit). By default, all three are selected, as shown in Figure 6.
Figure 6:Specifying encryption settings
On the Specify Realm Name page, you can specify a realm name to replace the domain name in user credentials. This is the name that your ISP uses to forward requests. This is an optional field.
On the Completing New Dial-Up or Virtual Private Network Connections and RADIUS clients page (the last page of the wizard), you can click Configuration Details to review your configuration choices. This will open the configuration details in your default web browser, as shown in Figure 7.
Figure 7: Viewing configuration details in the browser
Click Finish in the wizard to create the policies. They will now show up in the Connection Request Policies and Network Policies nodes in the Network Policy Server console.
Configuring the HRA
You can configure the authentication requirements, certification authorities and request policy for the HRA.
Authentication requirements: You can either restrict the issuance of health certificates to authenticated domain users or you can allow anonymous users to obtain health certificates. If you allow both, two separate web sites will be created, one for requests by domain users and one for requests by anonymous users. You can enable SSL so that clients communicating with the web sites must use a secure (https://) URL. The IIS server will need an SSL certificate in the local computer certificate store or the current user certificate store, to be used for server authentication.
Certification Authority: You must configure the HRA with at least one NAP CA. You can add or delete CAs and change their order from the HRA console’s Certification Authority node. You can use either a standalone CA or an enterprise CA.
Request Policy: The request policy settings define how the HRA communicates with clients, specifically the cryptographic policy elements that include asymmetric key algorithms, hash key algorithms, cryptographic service providers and transport policy. You can use the default request policy setting that negotiate a mutually acceptable encryption mechanism, and this is usually the best practice unless you are certain your modified settings will work properly.
Configuring Client Computers
Microsoft recommends, as part of its best practices, that client computers be configured automatically. NAP-capable client computers (those Windows XP SP3 and above systems on which the NAP Agent software is installed and running) can be configured automatically by importing NAP configuration files into Group Policy. You can configure NAP client settings in one of three ways:
NAP Client Configuration Console gives you a graphical UI for configuring the NAP client settings.
Netsh gives you a way to configure NAP client settings from the command line.
Group Policy Management Console allows you to configure NAP client settings in Group Policy on clients that are domain members.
You can save NAP client settings in a configuration file that you can then apply to other computers. You need to be a member of the local Administrators group on the computer to import a configuration file. To import a configuration file, type NAPCLCFG.MSC at the command line or in the Run box to open the NAP Client Configuration console. Right click the top level node, NAP Client Configuration (Local Computer) in the left pane, and select Import. Navigate to the location where the file is stored, type the file name for the configuration file and select Open.
Alternatively, you cantype netsh nap client import filename = <file name>
You must enable at least one NAP enforcement client on the client computers. The six NAP enforcement client types are:
DCHP
IPsec
Remote Desktop Gateway
EAP
Remote Access
Wireless EAP over LAN
Your VPN clients need to be enabled as Remote Access clients so health policies will be enforced when they attempt to access the network through the NAP-enabled VPN server. The NAP enforcement clients are enabled and disabled through the NAP Client Configuration console or the netsh command. You need to be a local Administrator to enable or disable enforcement clients. To enable the Remote Access enforcement client through the console, click the Enforcement Clients node in the left pane. In the middle pane, right click Remote Access Quarantine Enforcement Client and click Enable.
To enable the Remote Access enforcement client at the command line, type: netsh nap client set enforcement ID = 79618 ADMIN – “ENABLE”
Summary
In Parts 1 and 2 of this series on understanding and configuring Network Policy and Access Services in Windows Server 2012, we have looked at the deployment of NAP. In Part 3, we’ll move on to the process of setting up RADIUS servers.
An important part of a network security strategy is the protection of the network from threats that can be introduced via the client computers that connect to that network. This becomes particularly vital in the case of remote clients, such as laptops that workers take off site and home computers that employees use to access their work during off-work time or even full-time as telecommuters. Windows Server 2012 based networks have many mechanisms aimed at giving administrators more control over who connects to the corporate network and over the computers they use to connect.
DirectAccess is one such technology, and I’ve discussed it in previous articles. But not all clients are able to use DirectAccess; those that run legacy operating systems (pre-Windows 7) and those that are not domain members will need to use a different connection method, such as virtual private networking (VPN). Windows Server operating systems provide features that help to protect the network when VPN clients connect, as well.
Network Access Protection (NAP) has been around for quite some time. It was introduced with Windows Server 2008 to provide a built-in policy-based technology similar to Cisco’s Network Access Control (NAC). Windows Server 2008 R2 added functionality and features.
Remote Authentication Dial In User Service (RADIUS) server support in Windows Server has been around even longer. If you’re coming to Windows Server 2012 from Windows Server 2003, when you think of RADIUS in Windows, you probably think of Internet Authentication Service (IAS). In Windows Server 2008, IAS was replaced by NPS – the Network Policy Server. The NPS is part of a larger framework: Microsoft’s Network Policy and Access Services (NPAS).
[ads1]
Understanding NPAS: What it includes
The Network Policy and Access Services include the following role services:
Network Policy Server (NPS)
Health Registration Authority (HRA)
Host Credential Authorization Protocol (HCAP)
RADIUS server and proxy
This is the server role through which you deploy Network Access Protection (NAP) in Windows Server 2012, and that’s what we’re going to be talking about in the first part of this series of articles.
A new feature in Windows Server 2012 is the ability to use PowerShell to install and configure the Network Policy Server.
NAP enforces health policies on a number of connection types, including IPsec-protected communications, IEEE 802.1X-authenticated communications, and terminal services gateway connections. In this article, we’ll be looking at NAP primarily as an enforcement mechanism for remote clients connecting via a VPN.
Understanding NAP: What it does
NAP utilizes a number of components on the server and client to allow administrators much greater control over which computers are allowed to connect to the network, and specifically to prevent systems that may be at risk – such as those that do not have up-to-date security patches, aren’t running antivirus software and antimalware software with current definitions, don’t have an active host firewall, etc. – from connecting to the network and potentially putting other systems at risk as well.
NAP can be used with client computers running Windows XP SP3 and above; these operating systems support the NAP Agent that is the component on the client that collects and manages health information. When the NAP Agent service is installed and running, the client can communicate its health status to the NAP servers.
The health status information is based on the state of the client’s configuration and can include such factors as:
The firewall status
Antivirus signature status
Status of service packs and security updates.
Understanding NAP: How it works
NAP is Microsoft’s implementation of a “health” enforcement solution. In the context of protecting remote clients and protecting the network from health “issues” that those remote clients may bring to the network, it checks the identity of each remote client and determines whether it is in compliance with the organization’s health policies. The health information that each client sends to the NAP server is called a statement of health or SoH.
The server evaluates this information based on the policies and settings that have been configured. It uses this information, along with group membership, to determine whether and at what level of access the client will be allowed to connect to the corporate network. Clients that are out of compliance with the policies can be brought into compliance through NAP’s mechanisms.
NAP does this by performing a network health analysis, verifying the effectiveness of existing security policies, and helping administrators to identify risks by creating a health profile for the network. This improves the overall health of the network by enforcing compliance with your network health policies and restricting the access of remote client computers that are not in compliance.
Understanding NAP: The parts and pieces
The Network Policy Server is the core component of a NAP deployment. It is used to manage network access through the VPN server, RADIUS servers and other points of access to the network. Depending on your network environment, you may deploy multiple NPS servers.
An NPS can be a RADIUS server, a RADIUS proxy or a NAP policy server. The NAP server is where you configure the NAP policies and settings such as health policies, SHVs, and remediation server groups. Remediation servers are the servers to which non-compliant clients are allowed to connect in order to update their configurations so as to become compliant, after which they can be re-evaluated and allowed to connect to other network resources.
The NPS works in conjunction with other components, including the System Health Agents (SHAs) and System Health Validators (SHVs). The SHA that is built into Windows Vista and Windows 7 operating systems is called the Windows Security Health Agent (WSHA), which works with the Windows Security Center on the client computer and the Windows Security Health Validator (WSHV).
You can configure the WSHV settings to report on the host firewall, virus protection, spyware protection, automatic updating status, and security updates installed. Third party vendors can use the NAP API to create SHAs and SHVs for their software products (for example, third party antivirus programs).
The Health Registration Authority (HRA) is another server component of NAP that is used in IPsec enforcement and is installed on a computer that is running NPS and IIS. These services must be installed on the HRA computer. When you install the Network Policy and Access Services server role on a Windows Server 2012 server, the HRA administrative tool will be installed on the NPS server. Likewise, if you install HRA, NPS is automatically installed.
The HRA approves the issuance of health certificates to NAP clients. These health certificates are X.509 certificates that are issued by an Active Directory certification authority (CA). A CA that issues health certificates is known as a NAP CA. To get a health certificate from the NAP CA, the client must submit a SoH to the HRA. IIS is used to provide the interface by which the clients contact the HRA to request a health certificate.
Understanding NPS policies
The NPS can apply and enforce three different types of policies:
Connection request policies
Network policies
Health policies
In Part 2, when we start configuring policies, we’ll go into more detail about what each of these policy types does.
NPS also supports templates for health policies, that you can use to make it quicker and easier to configure NPS on the server. These are available in the Templates Management section of the NPS console (which you’ll see in Part 2). You can easily create new templates.
Planning for NAP
Before you undertake the deployment of NAP on your network, there are a number of planning tasks that you should complete. The following checklist can serve as a guideline for planning your NAP deployment:
Determine the NAP enforcement method (in this case, we are focusing on VPN enforcement)
Plan the appropriate placement of your NAP server(s) on the network so it can communicate with other NAP components and so it will have a connection to Active Directory Domain Services (AD DS) for authentication of domain users connecting through the VPN.
Determine whether you need multiple NAP servers for load balancing and failover.
Determine which health requirements you want to enforce (for example, firewall, virus protection, antivirus software updates, spyware protection and updates, automatic updating enabled, security updates installed via WSUS and/or Windows Update).
Determine how you will deal with those computers that will be exempt from health checks (e.g., domain controllers and most other servers, devices that are not NAP-capable, and users who must have access at all times. This is your exception management strategy.
Consider your NAP reporting strategy.
Create a pilot program to help you evaluate your NAP deployment decisions.
Document the NAP deployment design.
Deploying NAP: A preview
To deploy NAP on Windows Server 2012, you will need to install the Network Policy and Access Services role with the Network Policy Server role service. You can do this in one of two ways: by using Server Manager to install NPS via the graphical user interface, or by using PowerShell to install NPS via the command line. In Part 2 of this article series, we’ll dig down into how to install NPAS using both of these methods, and then we’ll look at the steps that you need to complete in order to your VPN servers to work with the Network Policy Server (NPS) so they can use NAP to validate the health of VPN clients that attempt to connect to your corporate network.
Windows 10 is set to be released later this month. The OS will be available on flash drives, however, if you want to create your own bootable USB drive for Windows 10, you can do that pretty easily. Here’s how to:
The easy way
There’s always an “easy way” to do things on Windows using some kind of software. Creating a bootable USB drive is also pretty easy – here’s how to do it:
Once the user interface of the software opens up, plug-in your USB
After that, look for the “Create a bootable USB drive option” and from the drop-down, select an ISO Image
Then, click on the button next to the dropdown and select the Windows 10 ISO that you want to install
Lastly, click on “Start” and wait for the software to create the bootable USB drive.
That’s pretty much it. You now have a bootable USB drive, just plug it in your device and make sure your BIOS is all setup and you should now be able to easily install Windows 10 using the bootable USB drive that you just created.
The hard way
If you don’t want to use any software, there’s another way of creating a bootable USB drive, but that’s a bit trickier. Here’s how to do it:
First, make sure your USB drive is plugged in
Search and open Command Prompt as an administrator
Next, you’ll have to open the disk management utility using CMD (Command Prompt) – to do that, type in disk part and hit enter
After that, you will have to display the connected disks that are available – to do that, type in list disk and hit enter
Then, you’ll need to select your USB drive – to do that, type select disk # and hit enter – you’ll have to replace the # with your disk number
Next, you’ll have to clean the USB drive – to do that, type clean and hit enter
Then you’ll need to create a bootable partition – type in create partition primary and hit enter
You will now need to select the partition that you just created. To do that, type in select partition 1.
After that, type active and hit enter
Next, you’ll need to format the USB drive – just type in format fs=fat32 and hit enter
You’ll now need to assign your USB drive a letter, to do that, just type in assign
Lastly, copy all the Windows 10 files and paste it inside the USB drive. (You can copy the files by extracting an ISO or copy it from a Windows 10 disk).
That’s it! You have just manually created a Windows 10 bootable USB drive and it’s ready to install Windows 10 on your device.
Creating a bootable USB drive is pretty easy, to be honest. I’d recommend following the easy way of creating the bootable USB drive if you’re not an expert – however, if you’re an expert, just follow the hard way of creating the bootable USB drive and avoid using any type of software.
Playbox HD is an awesomely designed application for watching TV programs and films. Follow this peculiar tutorial to download PlayBox for PC on Microsoft Windows. It can be downloaded on Windows 8.1, Windows 7/8 and also on Windows 10. You may have used thisPlayBox for Android, but watching the videos on laptop will surely make It has so many perplex characteristics and as a result it has driven the huge popularity.
[adinserter block=”1″]
Play Box is an fabulous and very well working application which is avail to download to Android, PC and also to iOS. Yes, you can get PlayBox HD for iPad/iPhone also. This will play all movies, cartoons and shows with no buffering. If you’ve good Internet connection, you can savor them more. Various quality options are there and opt any of them to start watching your video. I’m saying so much about this app because, in this session I am willing to present you the way to bring Play Box HD for PC.
PlayBox for PC Download to Windows 7/8.1/8
Just perform the below points as it is in your laptop and it takes just 2 minutes to install the app.
As you wanna make PlayBox download to your PC, you must have installed an emulator in laptop.
That software or App player is BlueStacks and you can get it here.
It’ll take no time to download. After downloading, do install it.
Now, fetch the android apk of Play Box, below is the link for it.
Later completing the download, just leave it like that.
Now open settings of your mobile and step into Security.
Enable the foremost option which lets you install unknown source applications.
Afterwards applying this change, run the apk file with BlueStacks software that you fetched a little while ago.
It’ll get installed in Bluestack and to find where the app is located in that software, move onto the All Apps and you’ll see the app.
That’s it, I hope you’ve accomplished the process without any issues.
This is the entire process to download PlayBox for PC, I believe you’ve acquired enough info to perform the phenomena. If you would like to inquire any sort of stuff about PlayBox HD app, please do post a comment in here. We are very glad to assist you and finally share this post in the popular social media networks with your friends and family members to let them know considering this perplex movies application, apps like Playbox.
Any OSx86 installation guide can seem daunting at first glance, especially when trying to remember cryptic terminal commands and sorting through volumes of misinformation on the web. This guide requires no coding, terminal work, or Mac experience of any kind. You will not need access to a Mac. In fact, it’s easier and faster for me to install Snow Leopard with fully working components on my system than it is to install Windows 7. And more fun.
The iBoot + MultiBeast method is designed and tested for any desktop or laptop running the latest line of Intel processors, the Core i3/i5/i7s. I have had reports of success with older machines as well including CoreDuo, Core2Duo, and even Pentium 4. However, AMD processors are not supported. YOU WILL NEED
Patience and humility- it may not work out perfectly the first time- but with enough tenacity and grit, you’ll reach the promised land. It’s easy to get frustrated, but don’t give up! There are a community of users with similar hardware in the tonymacx86 Forum to provide support if you get stuck.
BEFORE YOU BEGIN
Use only 1 graphics card in the 1st PCIe slot with 1 monitor plugged in.
Remove any hard drives besides the blank drive being used for OS X.
Remove any USB peripherals besides keyboard and mouse.
Remove any PCI cards besides graphics- they may not be Mac compatible.
It’s best to use an empty hard drive– you will have to partition and format the drive.
Always back up any of your important data.
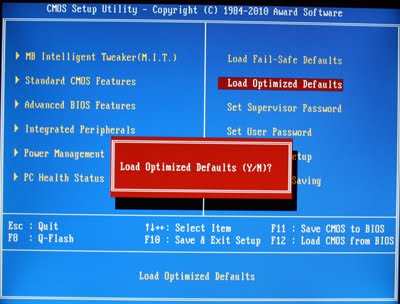
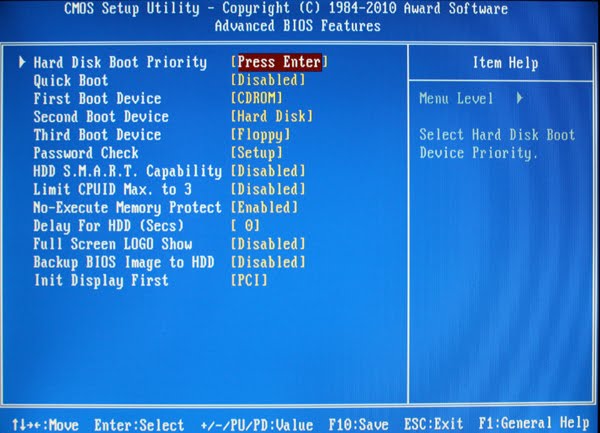
STEP 1: BIOS SETTINGS You will need to set your BIOS to ACHI mode and your Boot Priority to boot from CD-ROM first. This is the most important step, and one many people overlook. Make sure your bios settings match these. It’s not difficult- the only thing I did on my Gigabyte board besides setting Boot Priority to CD/DVD first was set Optimized Defaults, change SATA to AHCI mode, and set HPET to 64-bit mode.
STEP 2: INSTALL MAC OS X In order to boot the Mac OS X Retail DVD, you’ll need to download and burniBoot. For desktops and laptops using unsupported Intel CPUs and graphics, a legacy version of iBoot can be downloaded here. If you have an Ivy Bridge or Haswell system, you can’t use the default iBoot. Use iBoot Ivy Bridge or iBoot Haswell.
When you see the screen below, press enter to begin the boot process
When you get to the installation screen, open Utilities/Disk Utility. NOTE: If you cannot get to the installation screen, retry from Step 4, type PCIRootUID=1 before hitting enter. If that doesn’t work then try PCIRootUID=1 -x or just -x which will enter Mac OS X Safe Mode and will allow you to proceed. For some graphics cards, use GraphicsEnabler=No boot flag to proceed.
Partition your hard drive to GUID Partition Table
Format your hard drive to Mac OS Extended (Journaled). NOTE: The bootloader can only boot from a disk or partition of 1 TB or less. Partition larger drives.
For the purposes of this guide, name it Snow Leopard. You can rename it later.
Close Disk Utility
When the installer asks you where to install, choose Snow Leopard
Choose Customize‚ and uncheck additional options. This will hasten the install process. You can always install this stuff later.
Restart computer.
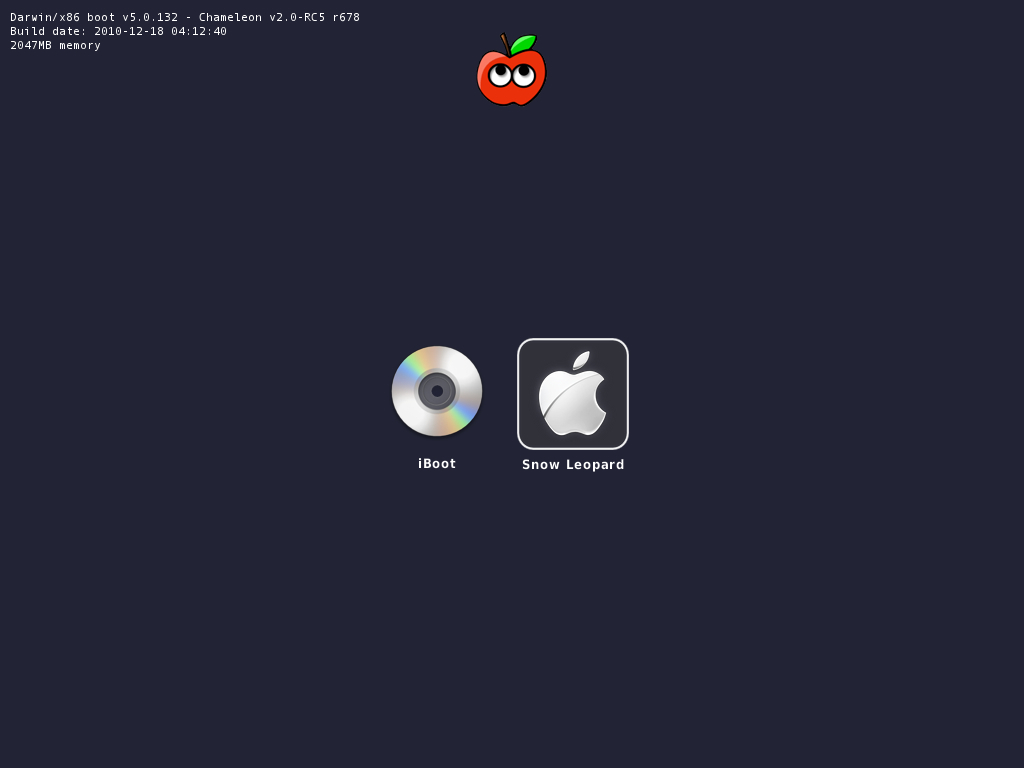
Place iBoot back in drive.
When you get to the boot selection screen, choose your new Snow Leopard installation.
Open MultiBeast– don’t run it yet, just leave it open. Set up windows as shown.
Mount MacOSXUpdCombo10.6.8.dmg
Install MacOSXUpdCombo10.6.8.pkg
Upon completion, the installer will ask you to reboot. DO NOT REBOOT.
Switch to the already open MultiBeast. If it closes, just re-open it.
STEP 4: MULTIBEAST
MultiBeast is an all-in-one post-installation tool designed to enable boot from hard drive, and install support for Audio, Network, and Graphics. It contains two different complete post-installation solutions: EasyBeast and UserDSDT. In addition it includes System Utilities to rebuild caches and repair permissions and a collection of drivers, boot loaders, boot time config files and handy software.
Choose one of the following options directly following a fresh installation and update:
EasyBeast is a DSDT-free solution for any Core/Core2/Core i system. It installs all of the essentials to allow your system to boot from the hard drive. Audio, Graphics and Network will have to be enabled separately.
UserDSDT is a bare-minimum solution for those who have their own pre-edited DSDT. Place your DSDT.aml on the desktop before install. Audio, Graphics and Network will have to be enabled separately. HINT: Check the DSDT Database for a pre-edited DSDT.
Run MultiBeast.
If you have a custom DSDT that’s been edited, place the file on your desktop and choose UserDSDT.
All others select EasyBeast
Select System Utilities.
Optionally, you may install further drivers via Advanced Options to enable ethernet, sound, graphics, etc… Be sure to read the documentation provided about each installation option. NOTE:EasyBeast, and UserDSDT install the bootloader by default, so you’ll not need to check that option.
Install to Snow Leopard– it should take about 4 minutes to run scripts.
Eject iBoot.
Reboot- from your new Snow Leopard installation drive.
If your drive doesn’t boot on its own, and you get an error referencing boot0, fix it using the methods listed here.
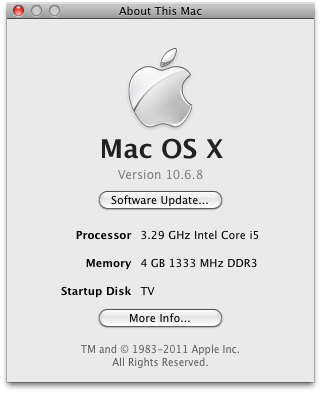
Congratulations! You’re done!!
Your PC is now fully operational, while running the latest version of Mac OS X Snow Leopard! And you have a nice Boot CD to get into your system in case things go awry. Boot your system from iBoot if you have issues. You may run MultiBeast as often as you like.
If you can’t boot, try typing -x at the boot prompt to enter safe mode, or just boot with iBoot. When you get to the desktop, you can make all of the changes you need to. The best way to start fresh is delete whatever you’re trying to get rid of- including the whole /Extra folder, as most kexts are installed there. Then you can re-run MultiBeast. As long as you rebuild caches and repair permissions after you’re done, you can do just about anything you want to /Extra/Extensions and /System/Library/Extensions. Anything can be tweaked and enabled upon subsequent uses of MultiBeast.
If you’ve had success using iBoot + MultiBeast, consider a contribution to help keep the sites going. We’re constantly updating and tweaking our tools to help you.
خريج تقنية معلومات قسم الشبكات في كلية التقنية العليا بإمتياز مع مرتبة الشرف و موظف تقنية معلومات في مجال التعليم. حضرت عدة دورات لتحسين وتطوير المهارات اللازمة في مجال عملي وفي دراستي وغيرها من الدورات الشخصية لتطوير الذات.
من هواياتي تصميم المواقع الإلكترونية وادارتها و الدعم الفني.