Feb 22, 2016 | Learn and Teach, network scanning files, sharing, sharing network scan, smb, xerox
Download Word Document – scan to smb error 031-523
source
I was trying to configure network scanning on a brand new Xerox WorkCenter 6605 network printer. I managed to specify the SMB details via printer’s web interface but despite hours of playing with different configuration settings I was unable to get the network scan working.
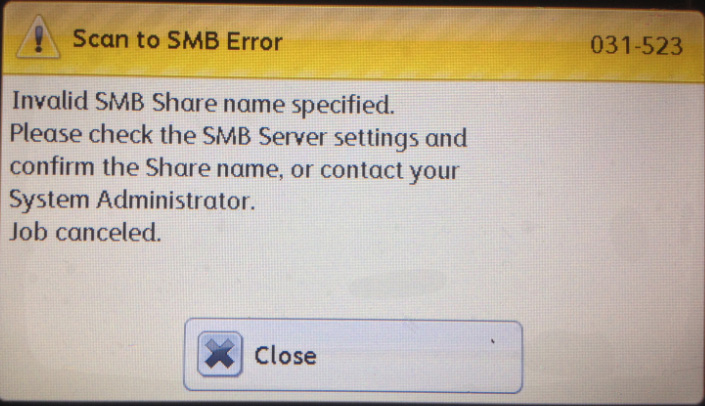
Here is the Error
Error No. 031-523
Scan To SMB Error – Invalid SMB Share Name Specified.
Please Check the SMB Server settings and confirm the Share name or contact your System Administrator.

Scan to SMB Error
I spent about 3 hours in trying with different values and combination for “Login Name (if required by host):“, “Name of Shared Directory:” and “Subdirectory Path (optional):” but none of these combinations worked.
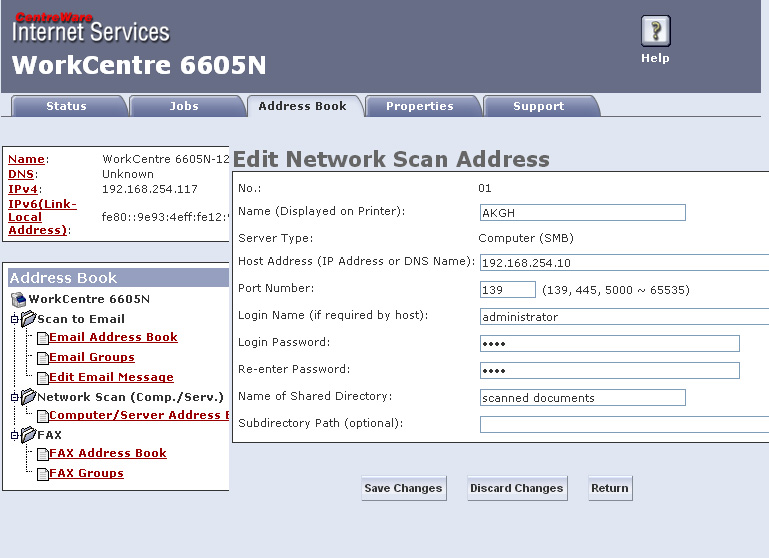
I contacted Xerox support which was picked up by a girl in Philippines. While still on phone with her and trying to play around with the values I managed to get it working with the following settings:

Xerox WorkCenter 6605 SMB Scan Settings
This setting will give you a path which you can enter in Windows Explorer and able to see the folder.
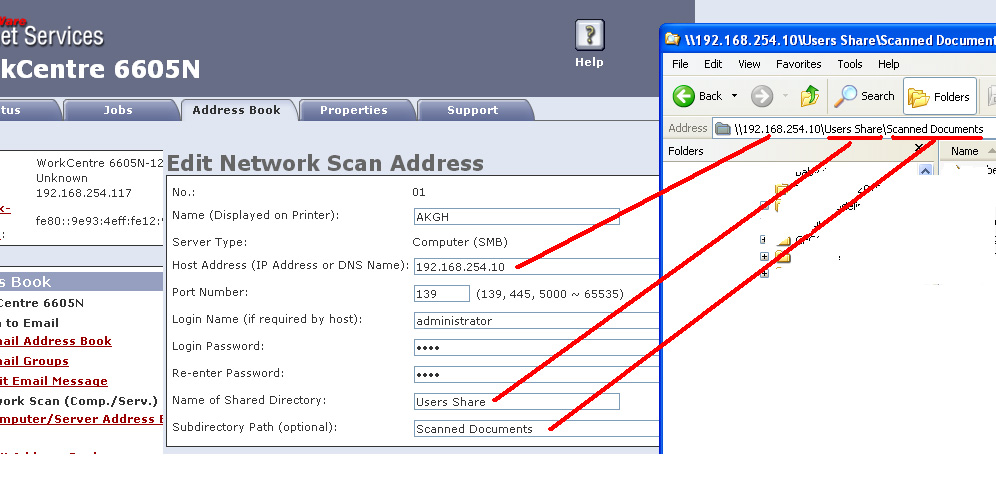
In my case if I copy \192.168.254.10Users ShareScanned Documents and pasted in windows explorer I’m able to see the folder’s content.
So the trick here is to first identify your host by IP address, then find a top level folder and finally a sub folder (optional).
Avoid entering any forward or backward slashes in any of these two folder paths.
The biggest pain was figuring out the login name. After some search I found confusing answers. In one Xerox forum posts it was mentioned to specify DOMAIN/username and on a Microsoft support page they mentioned DOMAINusername – pay attention to the backward and forward slashes. For me it’s just theusername worked.
Once I figured that out the next problem was finding the path for folders. I was making mistakes in adding slashes before the folder names which is not required.
And as you might have already guessed it is a Windows Network (Windows 2003 to be precise).
Here is the visuals of the shared scanned folder and how to map it to the Xerox WorkCenter 6605 SMB scan settings.

Xerox WorkCenter 6605, Scan To SMB Error, Invalid SMB Share Name Specified,031-523,Xerox WorkCenter 6605 SMB scan settings vs Network path
Download Word Document – scan to smb error 031-523
Sep 15, 2015 | Learn and Teach, Mac, mac and windows, share files, sharing, windows
Share files between Windows and Mac OS X
Overview
To share files between any two machines they will need to be on the same network. The easiest way of doing this is connecting both machines to a common hub, switch, or router. A crossover cable can suffice as well, but it isn’t typically recommended as it has many limitations. Once the machines are connected under the same network, you can use either the Mac or the PC as the host.
Using Windows as the host
1. File sharing first needs to be enabled on the Windows machine. This process is different depending on the version of Windows.
- Windows XP: Go to Control Panel, double click and run through the Network Setup Wizard.
- Windows Vista: Go to Control Panel, Network and Sharing Center. Expand the File Sharing drop down and click Finally click “Turn on File and Printer Sharing”
- Windows 7: Go to Control Panel, Network and Sharing Center. Go to Choose Homegroup and Sharing options, Change Advanced Sharing Settings. Finally click “Turn on File and Printer Sharing”.
2. Next, we need to connect to the windows machine from the Mac. You can do this in one of two ways:
- Automatically: Open up a finder window, and on the left pane you will see shared machines under the “Shared” heading. Find the name of the windows machine you wish to share with. Clicking it will bring up a folder view where you can drag and drop files to/from the shared folder.
- Manually: Select finder, and click Go > Connect to Server (Shortcut for this is Command+K). Type in the prefix smb:// followed by the ip address or hostname of the windows machine. For example: smb://192.168.1.102 or smb://MyPC
Using Mac OS X as the host
- File sharing first needs to be enabled on the Mac machine. To do this, go to System Preferences, and click on the Sharing category. OSX has a multitude of ways to serve files, but right now we are just concerned with sharing for windows. Click the check box next to “File Sharing”. Then, click the options button, and check the box next to “Share files and folders using SMB (Windows)”
- Next, make note of the address (IP or hostname) of the Mac. It will be listed at the top of the sharing window.
- Finally, we need to connect to the Mac machine from windows. Go to Start > Run (in Windows XP), or use the Quick Search bar (in Vista/Windows 7), and type in \ followed by the address of the Mac. For example: \192.168.1.102 or \MyMac


