May 2, 2016 | cmd, Learn and Teach, net command, net user, user accounts, windows
source: http://www.windows-commandline.com/cmd-net-user-command/
Net user command : Manage user accounts from command line
Using Net user command, administrators can manage user accounts from windows command prompt. Below are some examples on how to use this command.
Add a domain user account:
Net user /add newuseLoginid newuserPassword /domain
Add new user on local computer:
Net user /add newuserLoginid newuserPassword
Advanced options to add new user account can be read in the below article.
Add new user from windows command line.
Disable/Lock a domain user account:
Net user loginid /ACTIVE:NO /domain
To enable/unlock a domain user account:
Net user loginid /ACTIVE:YES /domain
Prevent users from changing their account password:
Net user loginid /Passwordchg:No
To allow users to change their password:
Net user loginid /Passwordchg:Yes
To retrieve the settings of a user:
Net user username
Example:
C:>net user techblogger
User name                    techblogger
Full Name
Comment
User's comment
Country code                 000 (System Default)
Account active               Yes
Account expires              Never

Password last set            4/21/2011 10:10 PM
Password expires             8/19/2011 10:10 PM
Password changeable          4/21/2011 10:10 PM
Password required            Yes
User may change password     Yes

Workstations allowed         All
Logon script
User profile
Home directory
Last logon                   Never

Logon hours allowed          All

Local Group Memberships      *Users
Global Group memberships     *None
The command completed successfully.

Apr 7, 2016 | Learn and Teach, windows
Using SCCM 2012 R2 to Deploy Windows 7
copied from the source Here
Deploying Windows 7 Using SCCM 2012 R2 n this post we will see the steps for deploying windows 7 using SCCM 2012 R2. In my previous post we saw the steps to capture a reference operating system (Windows 7) using SCCM 2012 R2. Note that this post is different from the one which shows the steps to build and capture the operating systems using SCCM 2012, we will not be using build and capture approach here rather we will capture a reference operating system, i.e. capture windows 7 using SCCM 2012 R2 and we will deploy the same using SCCM 2012 R2 in the this post. We will be creating a device collection first and then we will import the computer information to this device collection. One the computer is added to the collection we will create task sequence, configure it and deploy it the device collection.
Deploying Windows 7 Using SCCM 2012 R2
So in my previous post we had successfully captured the windows 7 operating system and now we will be deploying the captured image using SCCM 2012 R2. To do that lets create a blank virtual machine without any operating system installed on it. Note down the MAC address of the virtual machine (the same applies to a physical box too).

Lets create a new device collection. This is to add the computer to this collection for which the operating system is going to be deployed. Right click on Device Collections, click Create Device Collection.
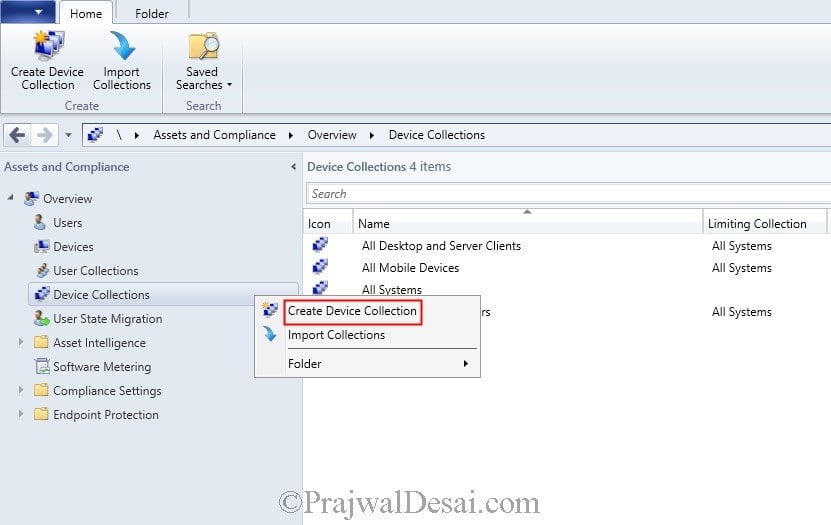
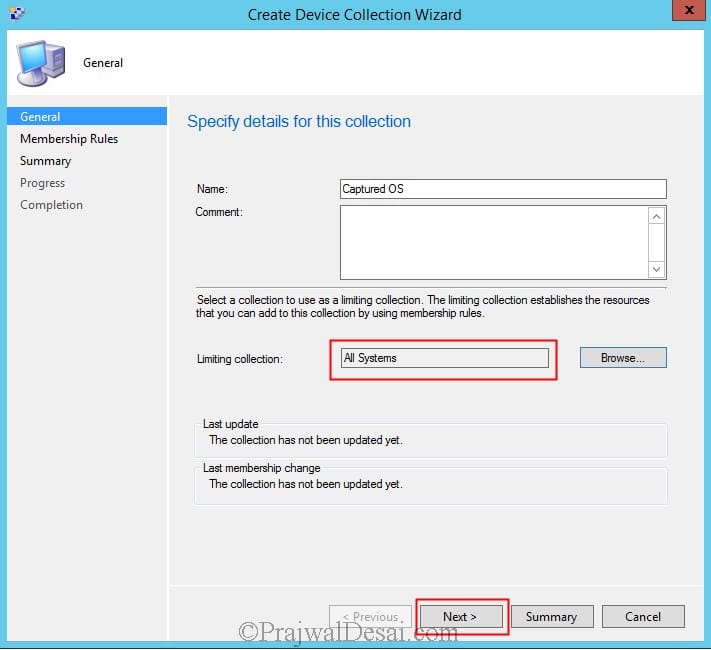
Provide the name for this collection , set the Limiting collection to All Systems. Click Next.
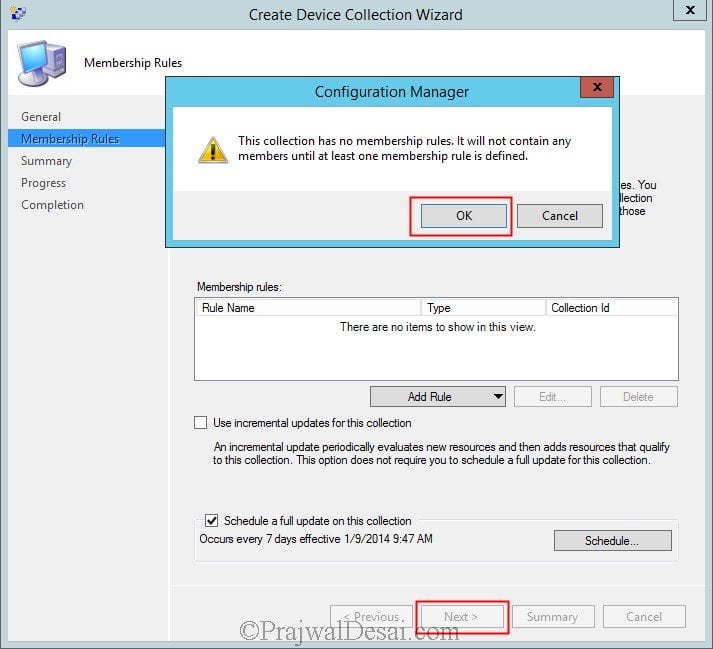
We will not define any rules for this collection. Click on Next. Since we will be creating a collection without defining any rule, the wizard prompts that the collection will not contain any members until we define a membership rule. On the pop up box click on OK.
[ads1]
The device collection has been created. Now we will import the computer information to add the new computer object to this collection. Click on Devices, click on Import Computer Information.

Choose Import single computer and click Next.
[ads2]
Apr 7, 2016 | capture, Learn and Teach, sccm, server 2012, Take an image, win ser 2012, windows, windows 7
Take an image for window 7 by sccm
Capture Windows 7 Using SCCM 2012 R2
copied from the source Here
In this post we will see the steps to capture windows 7 using SCCM 2012 R2. This post is different from the one which shows the steps to build and capture the operating systems using SCCM 2012 R2. We will not be using build and capture approach here rather we will capture a reference operating system, i.e. capture windows 7 using SCCM 2012 R2 and we will also see how to deploy the same using SCCM 2012 R2 in the next post. Please note that the computer operating system that we are going to capture should not be part of domain, else the sysprep fails during this process. So you capture a computer that has windows 7 installed (along with softwares like office, adobe reader etc) which is not joined to the domain. At any point of time you can check the step by step guide for SCCM 2012 R2 which contains all the posts related to SCCM 2012 R2.
Capture Windows 7 Using SCCM 2012 R2
We will first create a task sequence media and create a capture media which is in saved .iso format. This .iso file contains the necessary files and instructions to capture a reference operating system. The same .iso file captures the operating system and stores the captured OS in .wim format. Once we get the .wim file we will import the file to SCCM 2012 R2 and we can use this .wim to deploy this OS to another computer either by using SCCM or WDS.
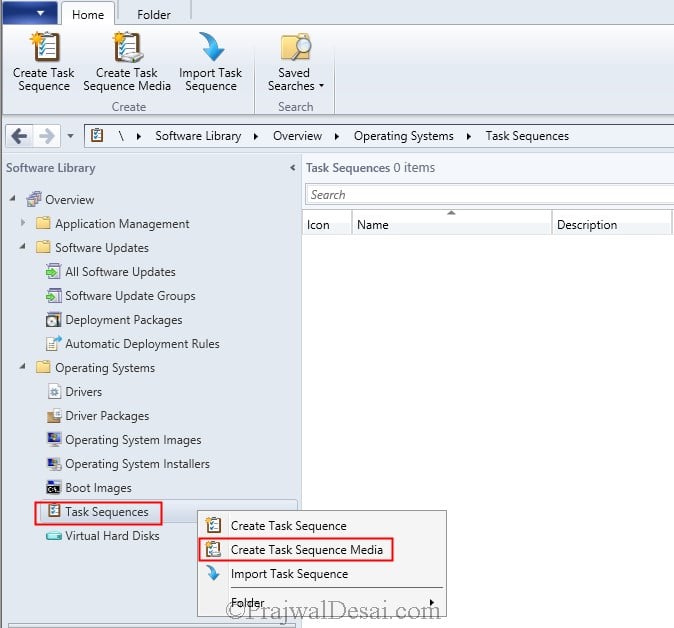
The first step involves creating a capture media which is in .iso file. Launch the ConfigMgr console, click on Software Library, expand Overview, expand Operating Systems, right click Task Sequences and click on Create Task Sequence Media.
Type of Media – Select the type of media as Capture Media. Click Next.
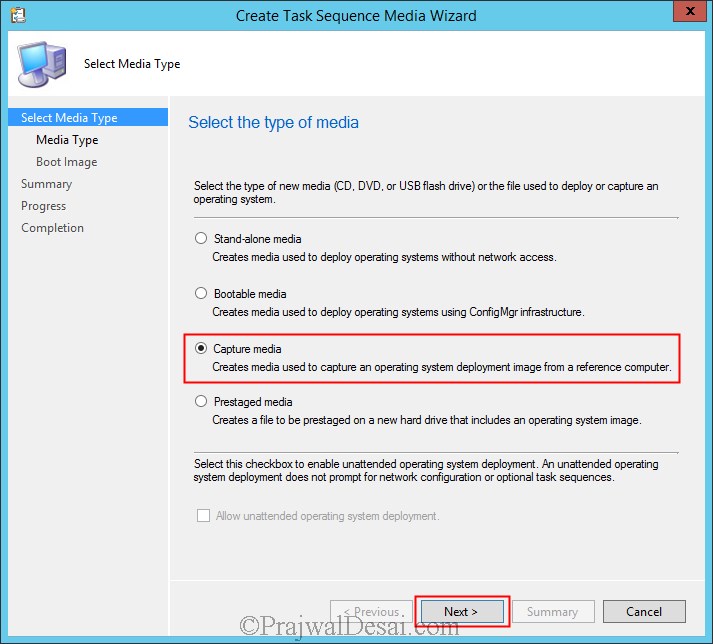
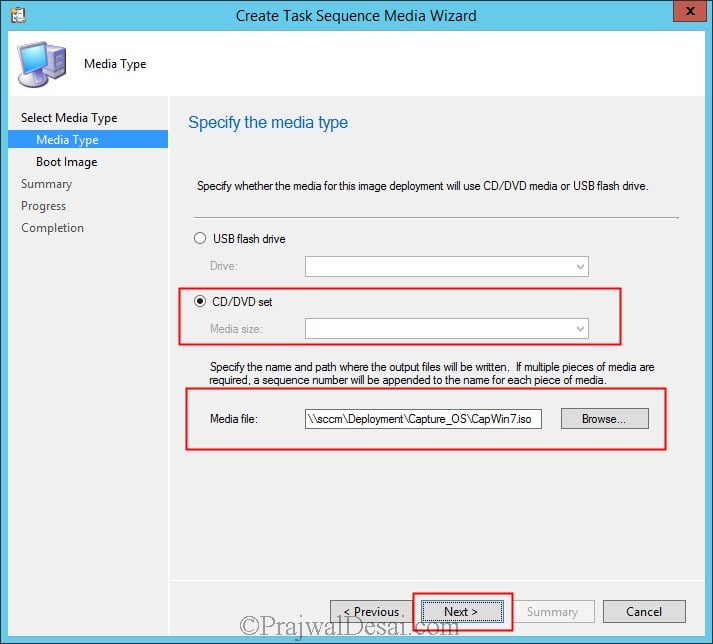
Media Type – You can select either USB flash drive or CD/DVD. I have tried using USB flash drive and even that works. In this example we will choose CD/DVD, and we will store the media file in one of the shared location on SCCM server. You can choose to store the capture media on any shared location, it may not be necessarily SCCM server. One important thing here you must save the capture media with .isoextension. Click on Next.
[ads1]
Selecting Boot Image – This is very important step. Select the Boot Image by clicking on Browse. Select Boot Image (x64) and for DP click on Browse and select the desired DP. Click Next.
NOTE – You must first enable the command support on both the boot images(x64 and x86) and then distribute it to the distribution point. To enable the command support right click on each of the boot image, click on properties and under Customization tab check the box Enable Command Support (testing only). Enable command support for both the boot images. By default the boot images are not distributed to DP and if you don’t distribute the boot images you will not be able to select the DP in the below step. To distribute the boot images to DP, right click on each boot image and click Distribute Content.

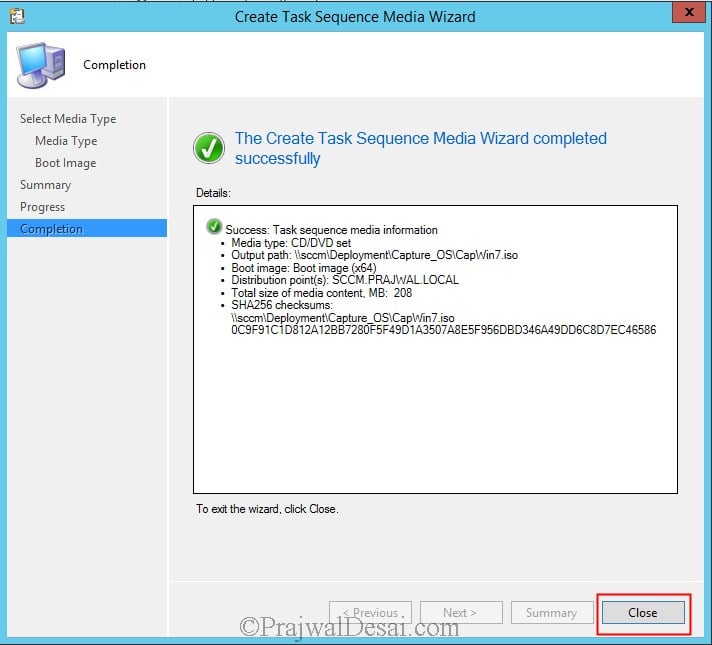
The capture media has been created by the wizard. Click on Close.
[ads2]
After creating the capture media we will now mount the capture media (.iso file) on the windows 7 machine and run the image capture wizard. In this example I have a virtual machine which has been installed with windows 7 professional SP1 x64 OS and we will be capturing this computer OS image. If its a physical machine you can burn the capture media .iso to a CD and insert it in the CD tray and run the image capture wizard. If its a virtual machine you can mount the .iso file by providing the path where the capture media .iso file exists. On a virtual machine when you mount the .iso file by providing a shared location, it asks for a user account to access the .iso file, provide a domain user account which has enough permissions to access the folder where the .iso file exists.
Once you mount the capture media on a windows 7 machine you will see the autorun box. Click Run TSMBAutorun.exe, you will see the Image Capture Wizard. Click on Next.

[ads1]
Image Destination – Provide a folder path where the captured image should be stored. The name of the captured image should have .wim as extension. Also provide a user account that has enough permissions to store the captured file to the shared folder. Click Next.
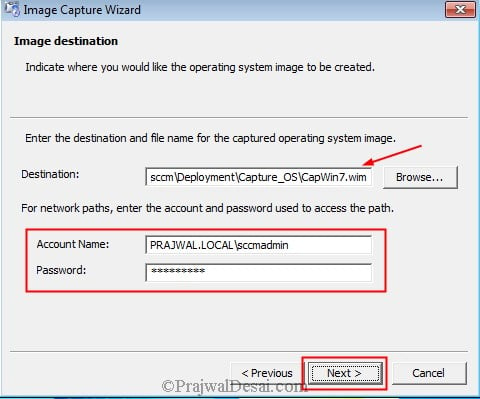
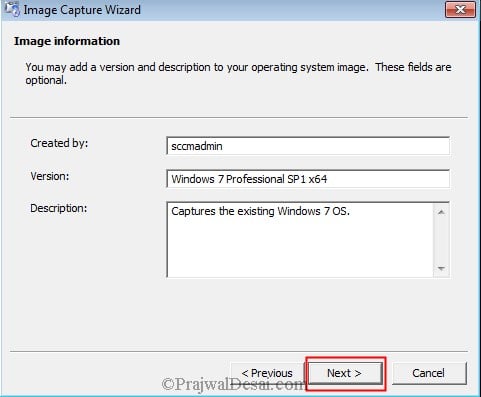
Image Information – Provide the image information such as Created by, Version and Description. Click on Next.
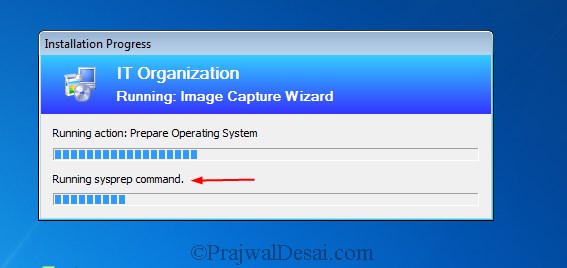
Click on Finish to complete the Image Capture Wizard. Note that we have just run the image capture wizard, in the next step sysprep captures the OS.

In the below screenshot we can see that the sysprep command is running. Wait for the computer to restart automatically where the actual capture process begins.
The computer restarts and we see that the wizard now starts capturing volume and the OS. This process took around 25 minutes to complete in my lab setup.

Alright, we now see that the windows 7 OS image has been captured and saved to the destination folder. Click on OK. The computer now restarts and enters Out of Box experience (OOBE).

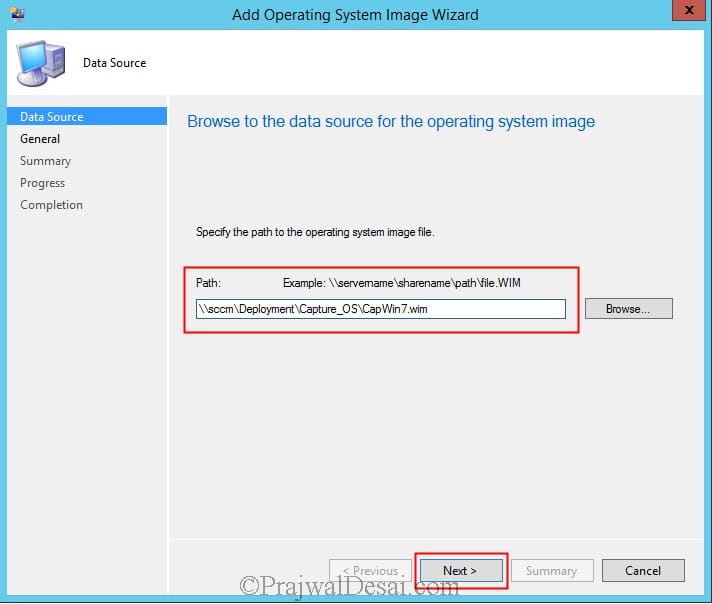
Once we have got the .wim file, we can import the .wim as operating system image in SCCM 2012 R2. To import the operating system image, right click Operating System Images, click on Add Operating System Image. Enter the path where the captured .wim file is present. Click on Next.
The name and version is picked up automatically, click on Next.

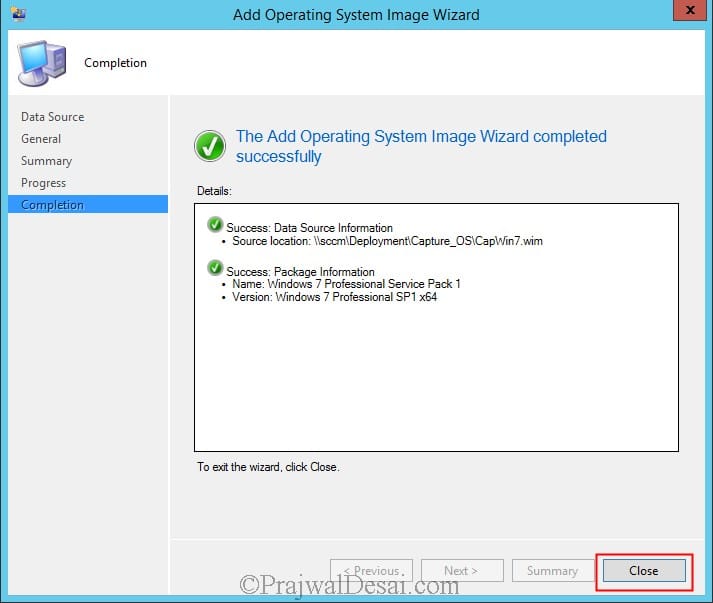
The operating system image has been imported successfully. Click on Close.
After importing the image the next step is to distribute the image to the DP. Right click on the windows 7 image and click on Distribute Content.
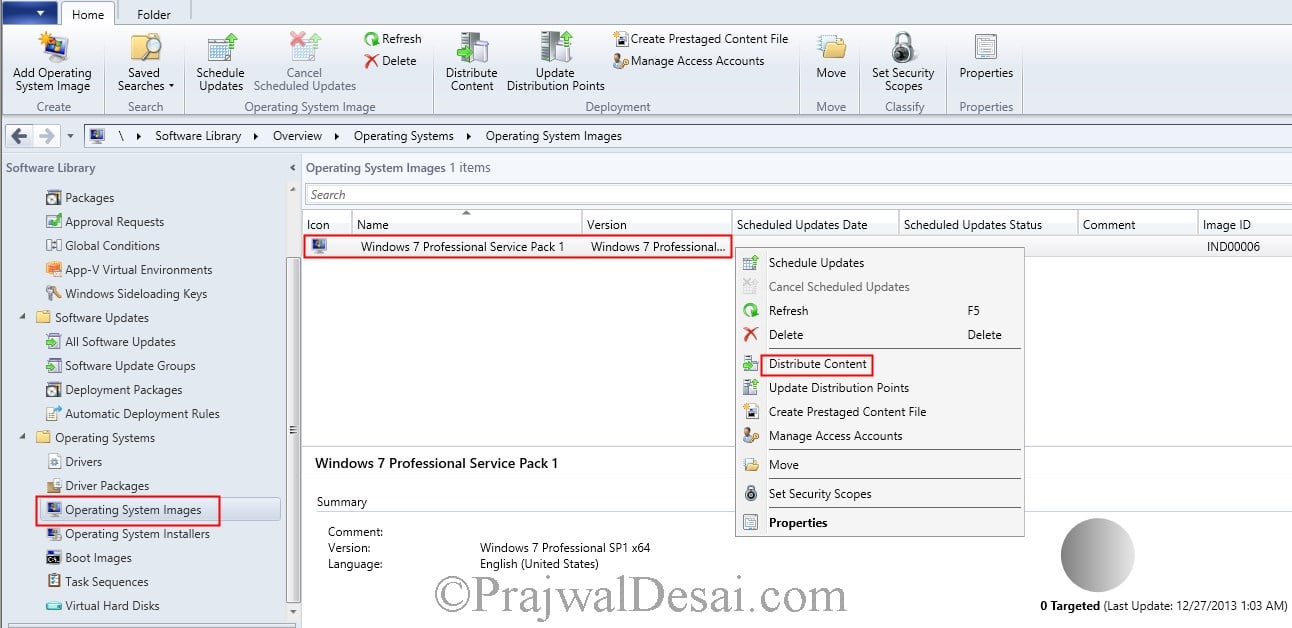
Add the DP and click Next.
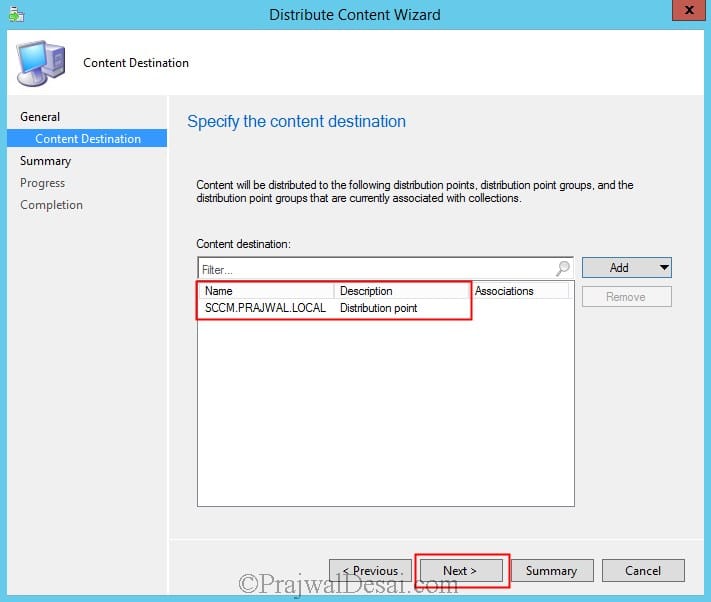
The image file has been distributed to the DP. Click on Close. Wait for sometime while the DP updates the content, check the content status and you must see a green circle which means that content is now available with DP.

Feb 23, 2016 | cmd, glossary, Learn and Teach, windows, windows command
Her I am going to report all windows command that I have been used to make easy for me and visitors who would like to return to it at anytime and wherever.
All Windows command will be below I will try to sort it alphabetically:
A
B
C
D
Listing the files
Listing all files and directories in the Directory that you are in
Listing all files and sub-directories files
Dir syntax
Microsoft Windows 2000, XP, Vista, 7, and 8 syntax
Displays a list of files and subdirectories in a directory.
DIR [drive:][path][filename] [/A[[:]attributes]] [/B] [/C] [/D] [/L] [/N] [/O[[:]sortorder]] [/P] [/Q] [/R] [/S] [/T[[:]timefield]] [/W] [/X] [/4]
| [drive:][path][filename] |
Specifies drive, directory, or files to list. |
| /A |
Displays files with specified attributes. |
| attributes |
D- Directories
R- Read-only files
H- Hidden files
A- Files ready for archiving
S- System files
I- Not content indexed files
L- Reparse Points
– Prefix meaning not |
| /B |
Uses bare format (no heading information or summary). |
| /C |
Display the thousand separator in file sizes. This is the default. Use /-C to disable display of separator. |
| /D |
Same as wide but files are list sorted by column. |
| /L |
Uses lowercase. |
| /N |
New long list format where filenames are on the far right. |
| /O |
List by files in sorted order. |
| sortorder |
N By name (alphabetic) S By size (smallest first) E By extension (alphabetic) D By date/time (oldest first) G Group directories first – Prefix to reverse order |
| /P |
Pauses after each screenful of information. |
| /Q |
Display the owner of the file. |
| /R |
Display alternate data streams of the file. |
| /S |
Displays files in specified directory and all subdirectories. |
| /T |
Control what time field displayed or used for sorting |
| timefield |
C Creation
A Last Access
W Last Written |
| /W |
Uses wide list format. |
| /X |
This displays the short names generated for non-8dot3 file names. The format is that of /N with the short name inserted before the long name. If no short name is present, blanks are displayed in its place. |
| /4 |
Displays four-digit years |
Microsoft Windows 95, 98, and ME syntax
Displays a list of files and subdirectories in a directory.
DIR [drive:][path][filename] [/P] [/W] [/A[[:]attributes]] [/O[[:]sortorder]] [/S] [/B] [/L] [/V]
| [drive:][path][filename] |
Specifies drive, directory, or files to list. (Could be enhanced file specification ormultiple filespecs.) |
| /P |
Pauses after each screenful of information. |
| /W |
Uses wide list format. |
| /A |
attributes:
D Directories
R Read-only files
H Hidden files
A Files ready for archiving
S System files
– Prefix meaning not |
| /O |
List by files in sorted order, sortorder:
N By name (alphabetic)
S By size (smallest first)
E By extension (alphabetic)
D By date and time (earliest first)
G Group directories first
– Prefix to reverse order
A By Last Access Date (earliest first) |
| /S |
Displays files in specified directory and all subdirectories. |
| /B |
Uses bare format (no heading information or summary). |
| /L |
Uses lowercase. |
| /V |
Verbose mode. |
Switches may be preset in the DIRCMD environment variable. Override preset switches by prefixing any switch with – (hyphen)–for example, /-W.
Dir examples
dir
Lists all files and directories in the current directory. By default the dir command lists the files and directories in alphabetic order.
dir *.exe
The above command lists any file that ends with the .exe file extension. See the wildcarddefinition for further wildcard examples.
dir *.txt *.doc
The above is using multiple filespecs to list any files ending with .txt and .doc in one command.
dir /ad
List only the directories in the current directory. If you need to move into one of the directories listed use the cd command.
dir /s
Lists the files in the directory that you are in and all sub directories after that directory, if you are at root “C:>” and type this command this will list to you every file and directory on the C: drive of the computer.
dir /p
If the directory has lots of files and you cannot read all the files as they scroll by, you can use this command and it displays all files one page at a time.
dir /w
If you don’t need file information you can use this command to list only the files and directories going horizontally, taking as little as space needed.
dir /s /w /p
This would list all the files and directories in the current directory and the sub directories after that, in wide format and one page at a time.
dir /on
List the files in alphabetical order by the names of the files.
dir /o-n
List the files in reverse alphabetical order by the names of the files.
dir /s |find “i” |more
A nice command to list all directories on the hard drive, one screen page at a time, and see the number of files in each directory and the amount of space each occupies.
dir > myfile.txt
Takes the output of dir and re-routes it to the file myfile.txt instead of outputting it to the screen.
E
F
G
H
I
J
K
L
M
N
NBTSTAT -A IPADDRS
Used for:
- Finding computer name using IP
O
P
Q
R
S
T
U
V
W
X
Y
Z
Feb 22, 2016 | Alcatel, Alcatel Plus, Alcatel Plus 10, Image, Information Center, Technology, two in one, windows
ألكاتيل تعلن عن حاسبها الهجين Alcatel Plus 10 من فئة اثنان في واحد
Alcatel Plus 10
أعلنت شركة ألكاتيل اليوم عن حاسبها المحمول الهجين Alcatel Plus 10 من فئة إثنان في واحد العامل بنظام ويندوز 10 ويندوز مع لوحة مفاتيح قابلة للفصل والتي تقدم ميزة فريدة من نوعها بحيث تعتبر نقطة LTE ساخنة.
ويقدم الحاسب شاشة من نوع IPS LCD بقياس 10.1 إنش بدقة 1280×800 بيكسل تعمل باللمس بكثافة 149 بيكسل بالإنش، مع معالج Atom x5 Z8350 رباعي الأنوية من شركة إنتل بتردد 1.92 جيجاهيرتز.
ويحوي الجهاز على 2 جيجابايت من ذاكرة الوصول العشوائي إلى جانب 32 جيجابايت من مساحة التخزين الداخلية والتي يمكن زيادتها إلى 64 جيجابايت عبر بطاقة MicroSD.
كما قامت شركة ألكاتيل بتضمين الحاسب مكبرات صوت ستيريو على الجهة الأمامية، بالإضافة لوجود كاميرا أمامية للصور الشخصية بدقة 2 ميجابيكسل في الزاوية وكاميرا خلفية بدقة 5 ميجابيكسل.
ويضم الحاسب منافذ USB ومايكرو USB ومايكرو HDMI، وتأتي لوحة المفاتيح بالحجم الكامل وتقدم بنية اتصال مدمجة لتقنية LTE وتعمل بمثابة نقطة اتصال واي فاي تسمح باتصال 15 جهاز، ويتميز الحاسب بامكانيات اتصال مختلفة مثل البلوتوث 4.0 وWi-Fi b/g/n.
وتبلغ سعة بطارية الحاسب 5.830 ميلي أمبير، بينما تضم لوحة المفاتيح بطارية بسعة 2.850 ميلي أمبير، مما يوفر سعة 8.410 ميلي أمبير معاً، بحيث يعمل الجهاز لمدة تصل إلى 8 ساعات متواصلة.
وتم تصميم حاسب Alcatel Plus 10 من البلاستيك بشكل كامل على الرغم من أنه يظهر بانه من المعدن، ويتوفر ابتداءً من شهر يونيو في أسواق أوروبا وأمريكا اللاتينية والشرق الأوسط وافريقا، مع خيارات متعددة من ناحية الألوان.
Jan 24, 2016 | document, edit, Image, Learn and Teach, Mac, Office, windows, word
Simultaneously edit a document with other authors
Source
When you collaborate with other authors to create a document, you can save time by simultaneously editing the document, instead of doing this separately. To edit the document at the same time, each author opens the file from a common location on a server.
IMPORTANT You can simultaneously edit documents in the .docx file format that are located on Windows Live OneDrive or a server that has Microsoft SharePoint Server 2010 installed. To work with SharePoint in Office for Mac, you have to have Microsoft Office for Mac Home and Business 2011, Microsoft Office for Mac Academic 2011, or Microsoft Office for Mac Standard 2011.
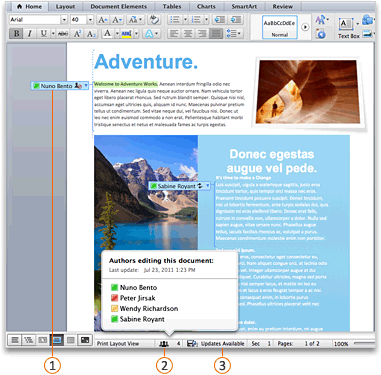
With the document open on your computer, you can see who else is editing the document, who is editing a specific paragraph, and when updates from other authors are available on the server.
 Other author currently editing the document
 All authors currently editing the document
 Changes from other authors available on the server
When you save your changes to the server, any updates from other authors are automatically refreshed in the document. Updates from other authors are refreshed automatically only if they don’t conflict with changes that you made. If you and another author both change the same item, then a conflict may occur. If a conflict occurs when you save the document, you are prompted to review the conflict and accept or reject the change.
Do any of the following:
Save a document to a SharePoint site
When you save a document in a library on your organization’s SharePoint site, you and your colleagues have a central location for accessing the document. You can send a link instead of sending an attachment. In this manner, you maintain just a single copy of the document. If people make revisions, they do so in the same copy. You do not have to reconcile multiple versions and copies of the document.
- On the File menu, point to Share, and then click Save to SharePoint.
- To add a SharePoint site, click Add a location
 , enter the URL to the SharePoint library, and then clickAdd.NOTE By default, many SharePoint sites have a Shared Documents library. An example of a URL that links to this library is http://fabrikam/shared%documents.
- In the Save As box, enter the name of your document.
- Under Recent Locations or Saved Locations, click the SharePoint library where you want to save the document, and then click Save.TIP The last several documents that you have opened from a SharePoint site, either through Office for Mac, Document Connection for Mac, or your browser, are listed under Recent Locations.
Save a document to a Windows Live OneDrive
When you save a document to OneDrive, the document is stored in a central location that you can access from almost anywhere. Even if you’re away from your computer, you can work on your document whenever you have a connection to the Web. Saving a document to OneDrive also makes it easy to share the document with other people. You can send a link instead of sending an attachment. In this manner, you maintain just a single copy of the document. If people make revisions, they do so in the same copy. You do not have to reconcile multiple versions and copies of the document.
- On the File menu, point to Share, and then click Save to OneDrive.
- If this is the first time that you have tried to access OneDrive, enter your Window Live ID and Password, and then click Sign In.If you use Hotmail, Messenger, or Xbox Live, you already have a Windows Live ID. If you don’t have one, clickGet a Live ID to create a new Windows Live ID.
- In the Save As box, enter the name of your document.
- Under Personal Folders or Shared Folders, click the folder where you want to save the document, and then click Save.
Open a document that is located on a SharePoint site
- On the File menu, click Open URL.
- In the URL box, type the URL for the document that is located on SharePoint, such as http://fabrikam/shared%20documents/DocumentName.docx.NOTE You have to use a URL for a document in a SharePoint library. You cannot use a URL for other areas of a SharePoint site, such as a SharePoint list or top-level sites.
- Click Open.NOTES
- You can also open a document that is located on SharePoint from your browser. To open the document in Word, click Open in Word.
- If you prefer to edit the file separately instead of at the same time as other authors, you can check out the file from the SharePoint site. When you check out a file, the other authors are “locked out” and can only read the file.
Open a document that is located on a Windows Live OneDrive
- Open your browser and sign in to Windows Live OneDrive.
- Find and click the document, and then click Open in Word.
See who else is editing a document
- On the View menu, click Print Layout.
- Do one of the following:
| To |
Do this |
| See who is editing anywhere in the document |
On the status bar at the bottom of the window, click the numbered icon  . .
To send a communication to someone, click his or her name, and then click a communication method – for example, send an instant message. |
| See who is editing a specific paragraph |
In the document, click the icon next to the paragraph.

To send a communication to someone, click his or her name, and then click a communication method – for example, send an instant message. |
Save and refresh a document that has updates
When you save your changes to the server, any other authors who are editing the document are notified that updates are available. Any updates from other authors are automatically refreshed in the document at that time if they don’t conflict with your changes. You can see when other authors save changes to the server because a message that indicates that updates are available appears on the status bar at the bottom of the window.
- On the status bar at the bottom of the window, click Updates Available
 to refresh the document with updates.
- On the This document was refreshed with updates by other authors dialog box, click OK.Your changes are saved to the server, and updates that were made by the other authors appear in your document as tracked changes.
NOTES
- Updates that were made by other authors are refreshed automatically only if they don’t conflict with your changes. If any updates conflict with your changes, you will be able to review the conflicting changes before they are saved and decide which changes to accept or reject.
- You can also click Save
 on the Standard toolbar to refresh the document with updates that were made by other authors.
Review and accept changes from other authors
If you want to track the changes made by other authors, turn on Track Changes and save the document to the server. When you are ready to review the updates from other authors, you can see what has been added to or removed from the document. By using Track Changes, you can decide whether you want to accept or reject those changes.
CAUTION Before you can accept or reject another author’s changes in a blocked area, you must remove that author’s block. You should only remove a block when you know that all other authors are finished editing the document. Otherwise, you run the risk of creating conflicts. Using Undo  does not restore a block.
- Click any areas that are blocked by other authors and then click Unblock.
- Accept or reject changes as you would in any other document. For more information, see Use tracked changes.
- When you finish accepting changes, save this version of the document on the server.
