The easiest way to create a new user in an Active Directory domain is using the Active Directory Users and Computers MMC snap-in. However, what if you need to create multiple user accounts in bulk, or ADUC is not available for some reason? In this article, we explain several ways to create Active Directory user accounts with PowerShell using the New-ADUser cmdlet.Handpicked related content:
Create New User Accounts using the New-ADUser Cmdlet
So what is the PowerShell cmdlet used to create user objects? It’s the New-ADUser cmdlet, which is included in the Active Directory PowerShell module built into Microsoft Windows Server 2008R2/2012 and above. Therefore, the first thing we need to do is enable the AD module:
Import-Module ActiveDirectory
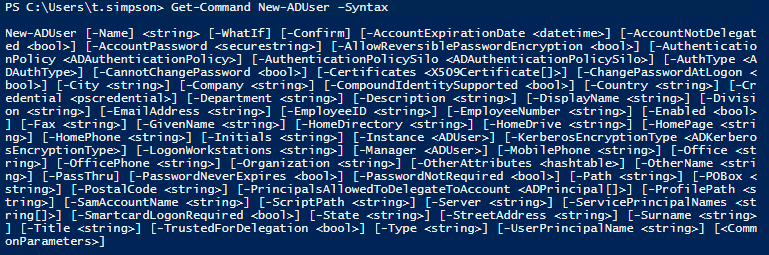
Now let’s take a closer look at cmdlet New-ADUser. We can get its full syntax by running the following command:
Get-Command New-ADUser –Syntax
When you know the syntax, it’s easy to add users to Active Directory:
New-ADUser B.Johnson
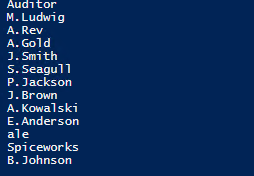
Now let’s check whether the user was added successfully by listing all Active Directory users using the following script:
Create a New Active Directory User Account with Password
Accounts are created with the following default properties:
Account is created in the “Users” container.
Account is disabled.
Account is a member of Domain Users group.
No password is set.
User must reset the password at the first logon.
Therefore, to make a new account that’s actually usable, we need to enable it using the Enable-ADAccount cmdlet and give it a password using the Set-ADAccountPassword cmdlet.
So let’s create a new account with the following attributes:
The Read-Host parameter will ask you to input new password. Note that the password should meet the length, complexity and history requirements of your domain security policy.
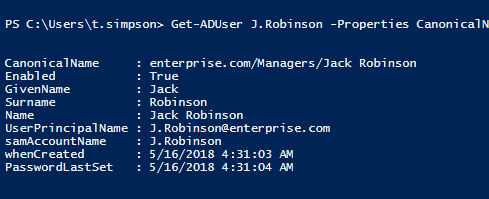
Now let’s take a look at the results by running the following cmdlet:
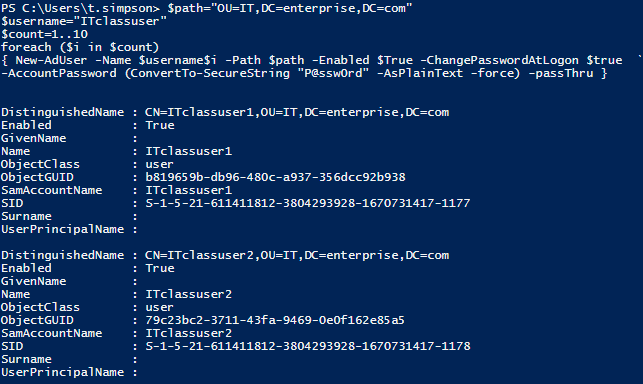
Now, let’s make our task a little bit harder and create ten similar Active Directory accounts in bulk, for example, for our company’s IT class, and set a default password (P@ssw0rd) for each of them. To send the default password in a protected state, we must use the ConvertTo-SecureString parameter. Here’s the script to use:
Another option for creating users in AD is to import them from a CSV file. This option is great when you have a list of users with predefined personal details such as:
FirstName
LastName
Username
Department
Password
OU
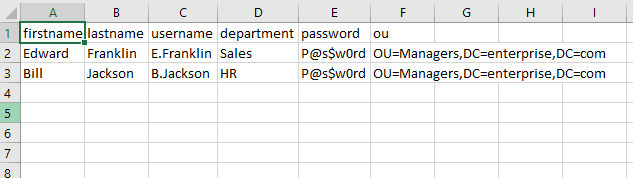
The CSV file must be in UTF8 encoding and contain contact data that looks like this:
The following script will create enabled user objects for any users in the CSV that don’t already have accounts in AD. The “Reset password at the next logon” option will be enabled for the new accounts, so you can use your default password:
#Enter a path to your import CSV file
$ADUsers = Import-csv C:\scripts\newusers.csv

foreach ($User in $ADUsers)
{

       $Username    = $User.username
       $Password    = $User.password
       $Firstname   = $User.firstname
       $Lastname    = $User.lastname
    $Department = $User.department
       $OU           = $User.ou

       #Check if the user account already exists in AD
       if (Get-ADUser -F {SamAccountName -eq $Username})
       {
               #If user does exist, output a warning message
               Write-Warning "A user account $Username has already exist in Active Directory."
       }
       else
       {
              #If a user does not exist then create a new user account

        #Account will be created in the OU listed in the $OU variable in the CSV file; don’t forget to change the domain name in the"-UserPrincipalName" variable
              New-ADUser `
            -SamAccountName $Username `
            -UserPrincipalName "$Username@yourdomain.com" `
            -Name "$Firstname $Lastname" `
            -GivenName $Firstname `
            -Surname $Lastname `
            -Enabled $True `
            -ChangePasswordAtLogon $True `
            -DisplayName "$Lastname, $Firstname" `
            -Department $Department `
            -Path $OU `
            -AccountPassword (convertto-securestring $Password -AsPlainText -Force)

       }
}
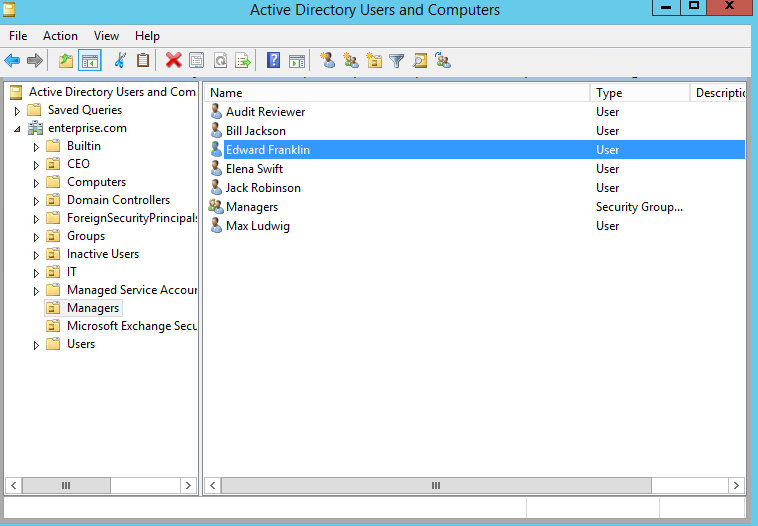
After script execution, we have two new users, Edward Franklin and Bill Jackson, in our Active Directory domain:
Let’s take a look at their details by running Get-ADUser cmdlet again:
Now you know how to create users in Active Directory using PowerShell scripts. Try performing some account creations, bulk account creations and CSV imports yourself on local or remote systems. Remember, the ADUC MMC snap-in is great for creating a few users with extended attributes, but PowerShell is much better for importing a large number of user accounts in bulk.
In this guide, I’m going to show you how to create bulk OUs in Active Directory using PowerShell.
Maybe you are migrating to a new domain, server, merging with another company, or creating a lab environment. Whatever the case PowerShell can be used to quickly create a bunch of OUs and save you time.
Let’s get started.
The New-ADOrganizationalUnit command
The New-ADOrganizationalUnit cmdlet creates an Active Directory organizational unit (OU).
Here is an example:
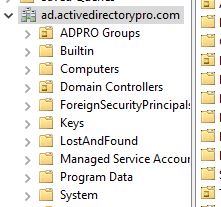
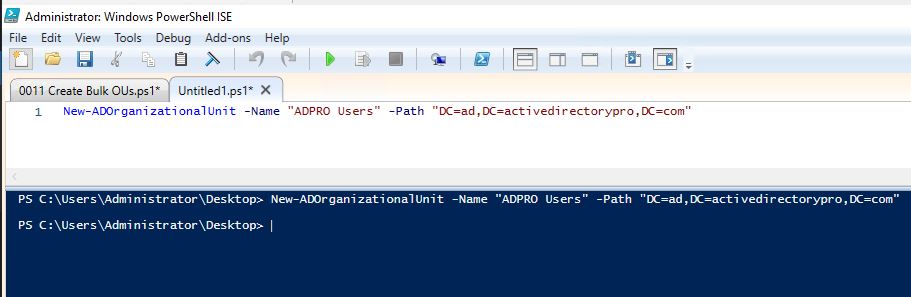
The command below will create the OU “ADPRO Users” under the path DC=ad,DC=activedirectorypro,DC=com
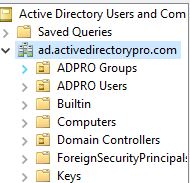
Before I run the command here is a screenshot of Active Directory, you can see ADPRO Users do not exist.
Now Open PowerShell ISE and run the command.
Refresh AD and the OU is now there.
That was an example of creating a single OU with PowerShell. Now let’s look at how to create a bunch of OUs.
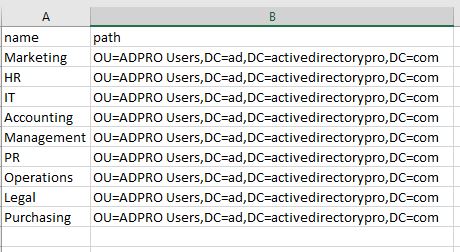
Step 1: Create a CSV file with a name and path header.
Step 2: Add the OU names under the name column and the path to where you want them created in AD.
In the above screenshot, I’m going to create several OUs (Marketing, HR, IT, and so on) in the ADPro Users OU.
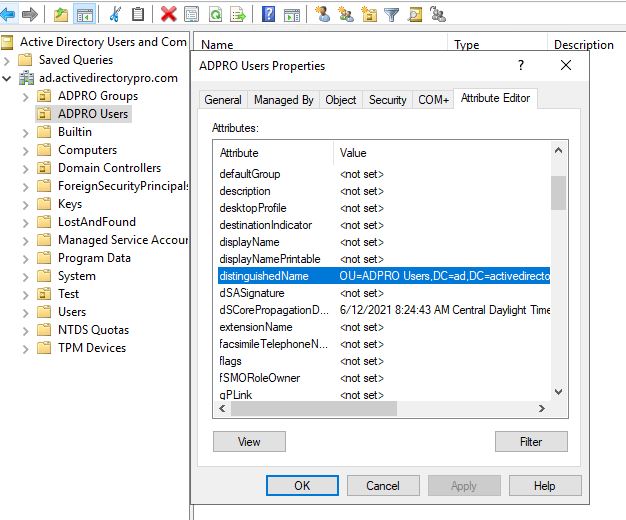
The path is the distinguishedName of the OU. To find this go to the OU, right-click, select properties, then select the attribute editor.
Step 3: Save the CSV
You can save it anywhere you want.
Step 4: Copy and Pase the script below into PowerShell ISE
# This script is used for creating bulk organizational units.

# Import active directory module for running AD cmdlets
Import-Module activedirectory

#Store the data from the CSV in the $ADOU variable.
$ADOU = Import-csv C:\it\ou.csv

#Loop through each row containing user details in the CSV file
foreach ($ou in $ADou)
{
#Read data from each field in each row and assign the data to a variable as below

$name = $ou.name
$path = $ou.path

#Account will be created in the OU provided by the $OU variable read from the CSV file
New-ADOrganizationalUnit `
-Name $name `
-path $path `

}
Modify line #7 and update the path to your CSV. I called my CSV ou.csv and saved it to the c:\it folder so my line 7 looks like this.
Step 5. Run the script
Click the “run script” button to run the script.
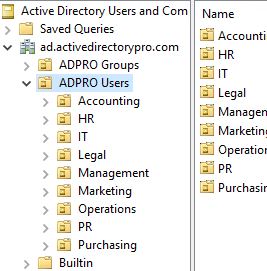
Refresh AD and you should see the newly created OUs.
Conclusion
In this guide, I showed you how to create a single OU and how to create bulk OUs by using the New-ADOrganizationalUnit cmdlet. I use this script to quickly rebuild my lab environment. I do a lot of testing in Active Directory so I often need to rebuild it from scratch to test new builds of the ad pro toolkit. This script helps to simplify the rebuild process of AD.
In Part 1 of this series, we took a look at how the Network Policy and Access Services in Windows 2012, and particularly how Network Access Protection (NAP) can help to protect your network when VPN clients connect to it by validating health requirements that you institute as part of a health enforcement plan. In Part 2, we’ll go into some tips on actually deploying NAP on Windows Server 2012. Keep in mind, however, that NPAS and NAP are complex topics and we are covering only some basics here. There is are much more detailed guidelines available in the TechNet Library that address many different network scenarios.
Installing the NPS role service on Windows Server 2012
To deploy NAP on Windows Server 2012, you need to install the Network Policy and Access Services role with the Network Policy Server role service. You can do this in one of two ways: by using Server Manager to install NPS via the graphical user interface, or by using PowerShell to install NPS via the command line.
Before attempting installation, you need to know that if there is a manually configured IPv6toIPv4 address on the computer, NPS may fail to install correctly. You should disable the IPv6 configuration before attempting to install NPS. Here’s how:
On the Windows Server 2012 Start Screen, type Network.
In the right Search pane, select Settings.
Click the View Network Connections option in the list.
Right click the network connection for your local network and select Properties.
On the Networking tab, uncheck the check box for Internet Protocol Version 6 (TCP/IPv6).
Click OK.
Installing the NPS role service using Server Manager
To install the NPS role service in Windows Server 2012 via the graphical interface, first open Server Manager from the desktop taskbar or the Server Manager tile on the Start Screen, and perform the following steps:
In Server Manager, click Manage and click Add Roles and Features.
On the Before you begin page, click Next.
On the Select Installation Type page, click Role/Feature Based Install and then click Next.
On the Select destination server page, click Select a server from the server pool, click the names of the servers where you want to install NPS and then click Next.
On the Select Server Roles page, click Network Policy and Access Services, and then click Next three times.
On the Select role services page, click Network Policy Server, and in the Add Roles and Features Wizard dialog box, verify that Include management tools (if applicable) is selected.
Click Add Features, and then click Next.
On the Confirm installation selections page, click Install.
On the Installation Results page, verify that the installation was successful, and then click Close.
Installing the NPS role service using PowerShell
[ads2]
To install the NPS role service in Windows Server 2012 using PowerShell, you first need to right-click the PowerShell icon on the taskbar and select to Run as administrator in order to open a PowerShell session with administrative privileges. Then perform the following steps:
Load the Server Manager module by typing: Import-Module Servermanager
Next, install the NPS role service by typing: Install-WindowsFeature –name napas-policy-server –includemanagementtools Note: This will also install the DHCP server role
When the role service has been successfully installed, PowerShell will report Success = True and the Feature Result will show Network Policy and Access Services, as shown in Figure 1.
Figure 1: The NPS role has been successfully installed
Configuring the NAP server
You can configure the NAP server with three different types of policies:
Connection Request Policies that use connections and settings to authenticate client requests to access the network. These policies also control where the authentication will be performed. You must have a connection request policy for each NAP enforcement method.
Network Policies that use conditions, settings and constraints to determine the level of access that will be authorized for a client that attempts to connect to the network. You need at least two network policies to deploy NAP: one for client computers that are found to be compliant with your health policies and one for those clients that are out of compliance.
Health Policies that specify which System Health Validators (SHVs) are to be evaluated and how they’re to be used to evaluate health status. You have to enable at least one SHV for each health policy.
When creating network policies, you need to keep in mind that a client request can match one connection policy and one network policy. It cannot match multiple policies of a type, so when a match is made, none of the other policies will be applied. That means the order of processing policies is important. The source of the request is also used in determining the order for evaluation.
If there are policies that specify a source, requests sent from a matching source are only evaluated against these policies. If none of the policies specify a source that matches, clients try to match policies with the Unspecified source. If there are multiple policies with the same source that matches the client source, the policy that’s highest in the processing order is used (and if it fails, the NPS goes down the list of policies in the processing order until it finds a policy that matches).
To configure NSP with a network policy, use the New Network Policy wizard on the NPS server. On the NPS server, open the Network Policy Server administrative tool from the Administrative Tools menu. In the left pane, expand the Policies node and click Network Policies. Right click and select New to start the New Network Policy Wizard, as shown in Figure 2.
Figure 2: Creating a new network policy
You can create a new connection request policy or a new health policy by right clicking the Connection Request Policy or Health Policies node and selecting New.
Configuring the VPN servers with NPS
The steps involved in configuring VPN servers with NPS are as follows:
Install and configure your VPN servers as discussed in the first part of this chapter.
Decide what authentication method is to be used.
Install the NPS role on the NPS server.
Autoenroll a server certificate to the NPS server(s) or purchase a server certificate (for PEAP-MS-CHAP v2 authentication).
For EAP-TLS or PEAP-TLS without smart cards, autoenroll user and/or computer certificates to domain users and client computers that are domain members.
Configure your VPN servers as RADIUS clients in NPS.
Create an Active Directory user group for users who will be allowed to connect via the VPN servers.
Configure network policies for VPN services in NPS.
To create the connection request and network policies that you need in order to deploy VPN servers as RADIUS clients to the NPS server, you can use the New Dial-up or Virtual Private Network Connections wizard. Open the NPS console from the Administrative Tools menu on the server where you have installed the Network Policy Server role service. Click the NPS (Local) top level node in the left pane and follow these steps:
Under Standard Configuration, in the drop-down box, select RADIUS server for Dial-up or VPN Connections, as shown in Figure 3.
Figure 3: Creating the policies required to deploy VPN servers as RADIUS clients to the NPS
Click Configure VPN or Dial-Up.
In the wizard, select Virtual Private Network (VPN) Connections under the Type of connections section, as shown in Figure 4.
Figure 4:Selecting the connections type (VPN)
Provide text to be part of the name for each of the policies the wizard creates or accept the default, and click Next.
On the Specify Dial-Up or VPN Server page, the local computer will be automatically added as a RADIUS client to the NPS server if it is running RRAS as a VPN server. You can add remote VPN servers by clicking the Add button.
On the Configure Authentication Methods page, select the protocol(s) you want to use for authentication, as shown in Figure 5.
Figure 5: Configuring the authentication method(s)
On the Specify User Groups page, you can select the groups to which the policy will apply by clicking the Add button. If you don’t select any groups, the policy will apply to all users.
On the Specify IP Filters page, you can configure IPv4 and IPv6 input and output filters for the RRAS VPN server.
On the Specify Encryption Settings page, you can select the encryption strength to be used for MPPE (40-bit, 56-bit and/or 128-bit). By default, all three are selected, as shown in Figure 6.
Figure 6:Specifying encryption settings
On the Specify Realm Name page, you can specify a realm name to replace the domain name in user credentials. This is the name that your ISP uses to forward requests. This is an optional field.
On the Completing New Dial-Up or Virtual Private Network Connections and RADIUS clients page (the last page of the wizard), you can click Configuration Details to review your configuration choices. This will open the configuration details in your default web browser, as shown in Figure 7.
Figure 7: Viewing configuration details in the browser
Click Finish in the wizard to create the policies. They will now show up in the Connection Request Policies and Network Policies nodes in the Network Policy Server console.
Configuring the HRA
You can configure the authentication requirements, certification authorities and request policy for the HRA.
Authentication requirements: You can either restrict the issuance of health certificates to authenticated domain users or you can allow anonymous users to obtain health certificates. If you allow both, two separate web sites will be created, one for requests by domain users and one for requests by anonymous users. You can enable SSL so that clients communicating with the web sites must use a secure (https://) URL. The IIS server will need an SSL certificate in the local computer certificate store or the current user certificate store, to be used for server authentication.
Certification Authority: You must configure the HRA with at least one NAP CA. You can add or delete CAs and change their order from the HRA console’s Certification Authority node. You can use either a standalone CA or an enterprise CA.
Request Policy: The request policy settings define how the HRA communicates with clients, specifically the cryptographic policy elements that include asymmetric key algorithms, hash key algorithms, cryptographic service providers and transport policy. You can use the default request policy setting that negotiate a mutually acceptable encryption mechanism, and this is usually the best practice unless you are certain your modified settings will work properly.
Configuring Client Computers
Microsoft recommends, as part of its best practices, that client computers be configured automatically. NAP-capable client computers (those Windows XP SP3 and above systems on which the NAP Agent software is installed and running) can be configured automatically by importing NAP configuration files into Group Policy. You can configure NAP client settings in one of three ways:
NAP Client Configuration Console gives you a graphical UI for configuring the NAP client settings.
Netsh gives you a way to configure NAP client settings from the command line.
Group Policy Management Console allows you to configure NAP client settings in Group Policy on clients that are domain members.
You can save NAP client settings in a configuration file that you can then apply to other computers. You need to be a member of the local Administrators group on the computer to import a configuration file. To import a configuration file, type NAPCLCFG.MSC at the command line or in the Run box to open the NAP Client Configuration console. Right click the top level node, NAP Client Configuration (Local Computer) in the left pane, and select Import. Navigate to the location where the file is stored, type the file name for the configuration file and select Open.
Alternatively, you cantype netsh nap client import filename = <file name>
You must enable at least one NAP enforcement client on the client computers. The six NAP enforcement client types are:
DCHP
IPsec
Remote Desktop Gateway
EAP
Remote Access
Wireless EAP over LAN
Your VPN clients need to be enabled as Remote Access clients so health policies will be enforced when they attempt to access the network through the NAP-enabled VPN server. The NAP enforcement clients are enabled and disabled through the NAP Client Configuration console or the netsh command. You need to be a local Administrator to enable or disable enforcement clients. To enable the Remote Access enforcement client through the console, click the Enforcement Clients node in the left pane. In the middle pane, right click Remote Access Quarantine Enforcement Client and click Enable.
To enable the Remote Access enforcement client at the command line, type: netsh nap client set enforcement ID = 79618 ADMIN – “ENABLE”
Summary
In Parts 1 and 2 of this series on understanding and configuring Network Policy and Access Services in Windows Server 2012, we have looked at the deployment of NAP. In Part 3, we’ll move on to the process of setting up RADIUS servers.
Server 2012 Print Management tool supports an export feature, this will export the printers, print queues, printer drivers to a print migration file. just go to print management > right click your print server > choose export. then take the file to you new print server and do an import.
you can access the print migration directly as well see the link below:
خريج تقنية معلومات قسم الشبكات في كلية التقنية العليا بإمتياز مع مرتبة الشرف و موظف تقنية معلومات في مجال التعليم. حضرت عدة دورات لتحسين وتطوير المهارات اللازمة في مجال عملي وفي دراستي وغيرها من الدورات الشخصية لتطوير الذات.
من هواياتي تصميم المواقع الإلكترونية وادارتها و الدعم الفني.