Locking your Mac’s display (or “sleeping” the display) can be a great security measure when paired with a user account password. While it won’t prevent the outright theft of your Mac, it can be a quick and easy way to prevent nosy family members or coworkers from getting access to your data.
In order for a Mac lock screen command to be effective, you’ll first need to configure System Preferences to require your user account password when unlocking or waking up. To do this, head to System Preferences > Security & Privacy > General. Check the box next to “Require Password” and set an interval that meets your workflow. If you want the highest level of security, set it to “immediately.” If you often find yourself accidentally locking your screen, set it to 5 seconds so that you can quickly unlock the display without having to enter your password.
Next, you’ll need to decide on the exact functionality you want: lock (sleep) the display only, or sleep the entire system. Locking or sleeping the display will shut the display off but keep the Mac running in the background. If you performed the steps above to require a password, users will need to enter the correct account password in order to unlock the display.
Lock or Sleep Only Your Mac’s Screen
To lock your Mac’s screen, simultaneously press the following keys: Control + Shift + Eject. If you have a newer Mac that doesn’t have an optical drive (and thus has no eject key on the keyboard, such as the Retina MacBook Pro), the command is Control + Shift + Power. In both cases, you’ll see your Mac’s display shut off immediately, while the system continues to run in the background.
Performing a lock or display sleep command is useful for situations in which you’ll only be gone for a few minutes, as it allows you to jump immediately back to work. It’s also a good idea to use if you want to lock your Mac but have applications running in the background, such as a rendering operation or an encryption sequence. The Mac will still chug away at its task; the only difference is that anyone without the password won’t be able to access it.
Sleep Your Entire Mac
The second option is to sleep the Mac entirely. MacBook owners are familiar with sleep; it occurs every time they shut their computer’s lid, or automatically after a user-defined period of time. But users can also trigger an immediate sleep state with a simple keyboard command: Command + Option + Eject. Optical drive-less Mac owners can repeat the substitution discussed above and replace the Eject key with the Power key, resulting in a command for Retina MacBook Pro owners, et al. of Command + Option + Power.
Your Mac will immediately go to sleep, shutting down all functions and requiring a password to resume. Users running on battery power who need to step away from their Macs may prefer this option over a locked screen. The practical effect is the same (preventing others from accessing your Mac), but this latter option saves battery power while the user is away. On the other hand, this will stop all background tasks, discussed above, and may not be ideal for users who want their Macs to keep working while they grab a coffee or stop for a bathroom break. Also, it takes longer to wake up from a sleep state than from a display lock state, although on modern Macs with fast SSD storage the time difference between the two options has shrunk considerably.
It’s recommended that users experiment with both options to find the one that suits them best. It’s also likely that users, especially those “on the go” with MacBooks, will find occasion to use both frequently. Regardless, having a strong user account password and taking a moment to ensure that your Mac is locked while you are away are both crucial steps to protecting your data.
Want news and tips from TekRevue delivered directly to your inbox? Sign up for the TekRevue Weekly Digest using the box below. Get tips, reviews, news, and giveaways reserved exclusively for subscribers.
How to Set a Custom Lock Screen Message in Mac OS X
Mac users, especially those with portable Macs, will want to take steps to protect their hardware and data in the event of loss or theft. But not everyone who finds a lost Mac is a thief, and it would be nice to provide these good samaritans with the information they need to return your Mac to you. Many traveling businesspeople choose to tape business cards to their laptops, but we don’t want such an inelegant solution to mar your Mac’s hardware, so we’ll use OS X’s built-in lock screen message feature instead.
To set a Mac lock screen message, head to System Preferences > Security & Privacy > General. Click the padlock icon in the lower-left section of the screen and authenticate as an administrative user.
Find and check the box “Show a message when the screen is locked” and then click Set Lock Message.
In the text box that appears, type any information you wish to help return your Mac to you, such as a phone number, address, or email address. We’ve also found that the lock screen message is a handy way to quickly identify identical hardware. At TekRevue, for example, we have two 15-inch MacBook Pros that look the same but run different software. We use the Mac lock screen message to label the first system “Alpha” and the second “Beta,” so that we can quickly tell which system we’ve got in hand.
You can enter as much text as you want in the Lock Message box. On the Mac lock screen, OS X will display the top three lines by default, with a scroll bar to view additional text. If you wish to enter line breaks, press Control-Enter. Otherwise, the text will format as a single paragraph.
Once you’ve set your message, log out of your user account or lock your screen to see it.
While our screenshots demonstrated this process using OS X Mavericks, users can set lock screen messages in any version of OS X starting with 10.7 Lion. To disable your Mac’s lock screen message, head back to the Security & Privacy preference pane and uncheck the box referenced above.
Any OSx86 installation guide can seem daunting at first glance, especially when trying to remember cryptic terminal commands and sorting through volumes of misinformation on the web. This guide requires no coding, terminal work, or Mac experience of any kind. You will not need access to a Mac. In fact, it’s easier and faster for me to install Snow Leopard with fully working components on my system than it is to install Windows 7. And more fun.
The iBoot + MultiBeast method is designed and tested for any desktop or laptop running the latest line of Intel processors, the Core i3/i5/i7s. I have had reports of success with older machines as well including CoreDuo, Core2Duo, and even Pentium 4. However, AMD processors are not supported. YOU WILL NEED
Patience and humility- it may not work out perfectly the first time- but with enough tenacity and grit, you’ll reach the promised land. It’s easy to get frustrated, but don’t give up! There are a community of users with similar hardware in the tonymacx86 Forum to provide support if you get stuck.
BEFORE YOU BEGIN
Use only 1 graphics card in the 1st PCIe slot with 1 monitor plugged in.
Remove any hard drives besides the blank drive being used for OS X.
Remove any USB peripherals besides keyboard and mouse.
Remove any PCI cards besides graphics- they may not be Mac compatible.
It’s best to use an empty hard drive– you will have to partition and format the drive.
Always back up any of your important data.
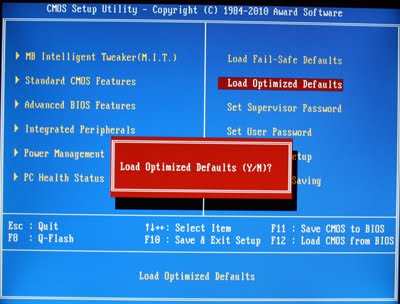
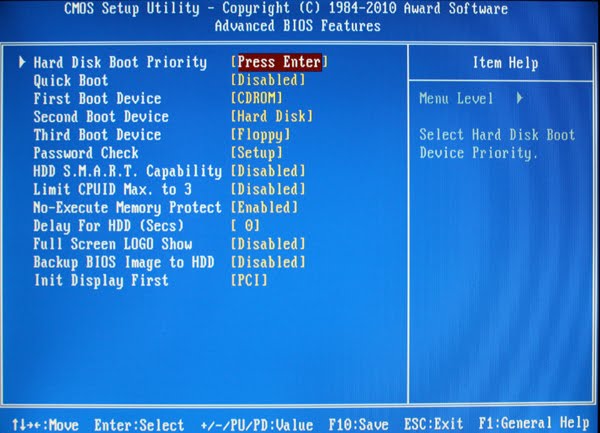
STEP 1: BIOS SETTINGS You will need to set your BIOS to ACHI mode and your Boot Priority to boot from CD-ROM first. This is the most important step, and one many people overlook. Make sure your bios settings match these. It’s not difficult- the only thing I did on my Gigabyte board besides setting Boot Priority to CD/DVD first was set Optimized Defaults, change SATA to AHCI mode, and set HPET to 64-bit mode.
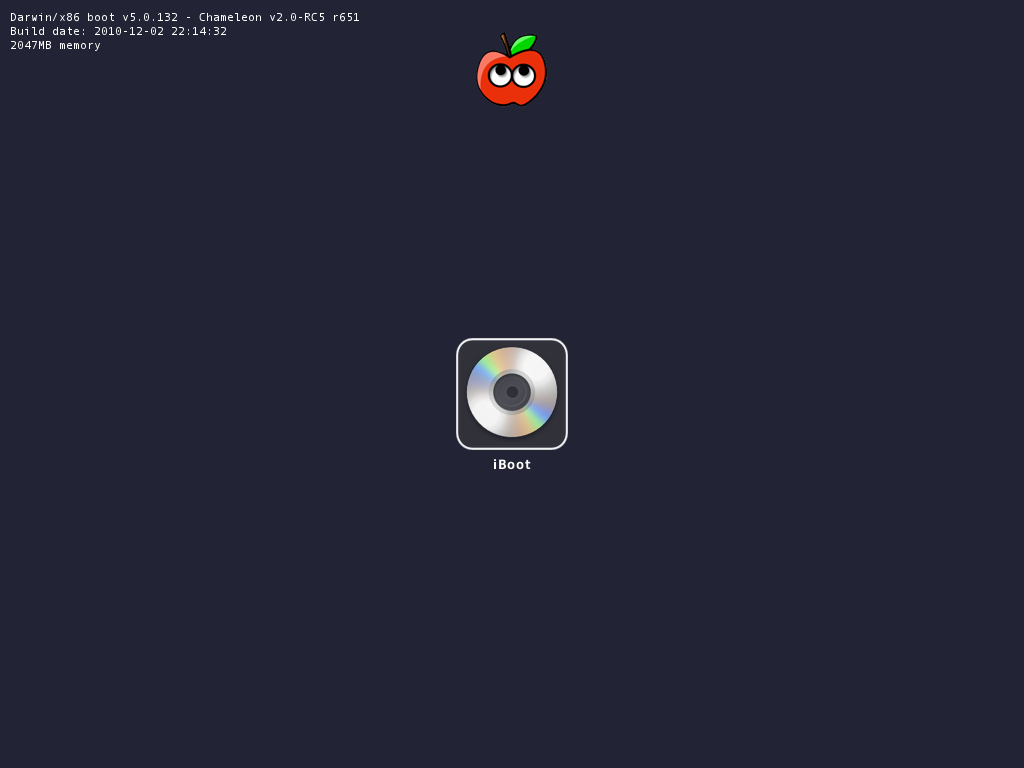
STEP 2: INSTALL MAC OS X In order to boot the Mac OS X Retail DVD, you’ll need to download and burniBoot. For desktops and laptops using unsupported Intel CPUs and graphics, a legacy version of iBoot can be downloaded here. If you have an Ivy Bridge or Haswell system, you can’t use the default iBoot. Use iBoot Ivy Bridge or iBoot Haswell.
When you see the screen below, press enter to begin the boot process
When you get to the installation screen, open Utilities/Disk Utility. NOTE: If you cannot get to the installation screen, retry from Step 4, type PCIRootUID=1 before hitting enter. If that doesn’t work then try PCIRootUID=1 -x or just -x which will enter Mac OS X Safe Mode and will allow you to proceed. For some graphics cards, use GraphicsEnabler=No boot flag to proceed.
Partition your hard drive to GUID Partition Table
Format your hard drive to Mac OS Extended (Journaled). NOTE: The bootloader can only boot from a disk or partition of 1 TB or less. Partition larger drives.
For the purposes of this guide, name it Snow Leopard. You can rename it later.
Close Disk Utility
When the installer asks you where to install, choose Snow Leopard
Choose Customize‚ and uncheck additional options. This will hasten the install process. You can always install this stuff later.
Restart computer.
Place iBoot back in drive.
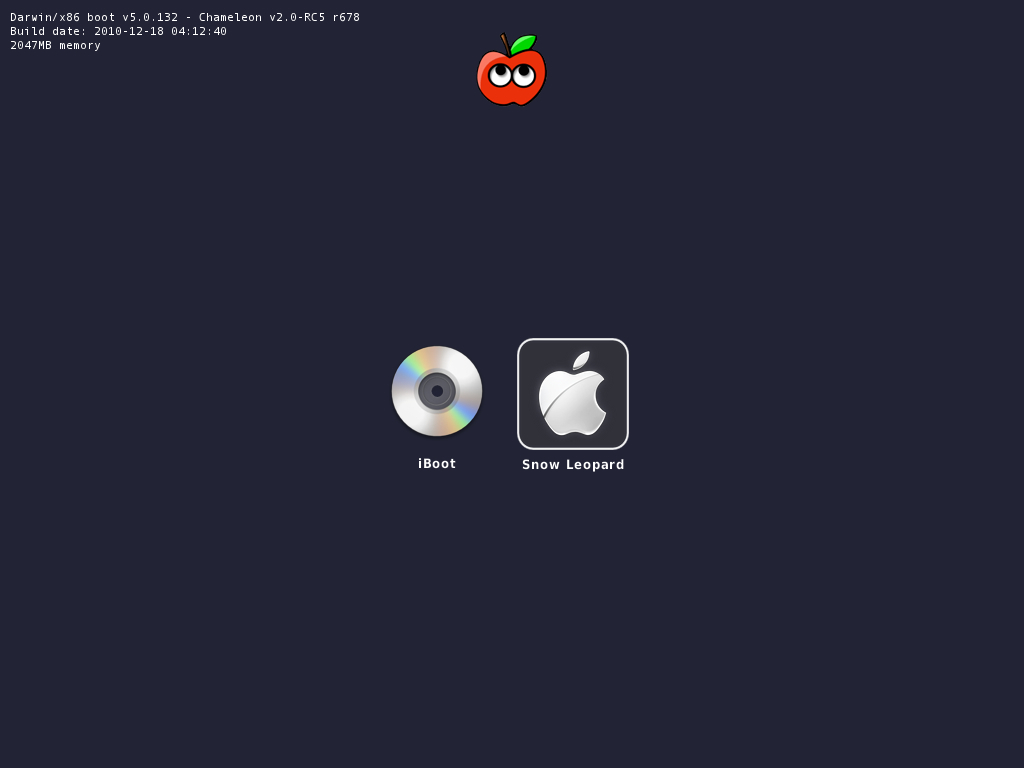
When you get to the boot selection screen, choose your new Snow Leopard installation.
Open MultiBeast– don’t run it yet, just leave it open. Set up windows as shown.
Mount MacOSXUpdCombo10.6.8.dmg
Install MacOSXUpdCombo10.6.8.pkg
Upon completion, the installer will ask you to reboot. DO NOT REBOOT.
Switch to the already open MultiBeast. If it closes, just re-open it.
STEP 4: MULTIBEAST
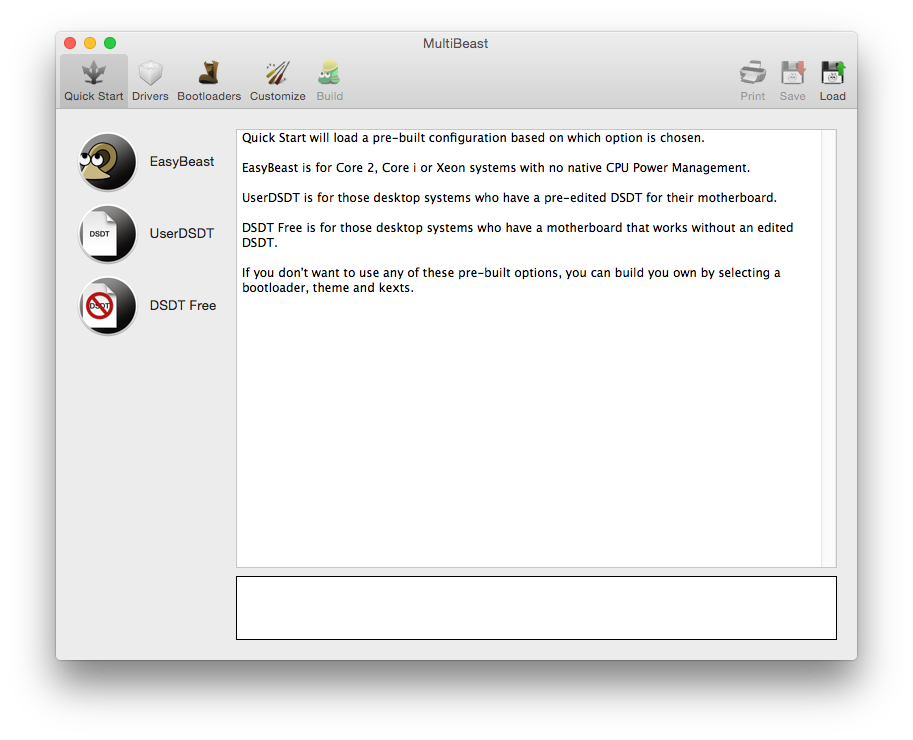
MultiBeast is an all-in-one post-installation tool designed to enable boot from hard drive, and install support for Audio, Network, and Graphics. It contains two different complete post-installation solutions: EasyBeast and UserDSDT. In addition it includes System Utilities to rebuild caches and repair permissions and a collection of drivers, boot loaders, boot time config files and handy software.
Choose one of the following options directly following a fresh installation and update:
EasyBeast is a DSDT-free solution for any Core/Core2/Core i system. It installs all of the essentials to allow your system to boot from the hard drive. Audio, Graphics and Network will have to be enabled separately.
UserDSDT is a bare-minimum solution for those who have their own pre-edited DSDT. Place your DSDT.aml on the desktop before install. Audio, Graphics and Network will have to be enabled separately. HINT: Check the DSDT Database for a pre-edited DSDT.
Run MultiBeast.
If you have a custom DSDT that’s been edited, place the file on your desktop and choose UserDSDT.
All others select EasyBeast
Select System Utilities.
Optionally, you may install further drivers via Advanced Options to enable ethernet, sound, graphics, etc… Be sure to read the documentation provided about each installation option. NOTE:EasyBeast, and UserDSDT install the bootloader by default, so you’ll not need to check that option.
Install to Snow Leopard– it should take about 4 minutes to run scripts.
Eject iBoot.
Reboot- from your new Snow Leopard installation drive.
If your drive doesn’t boot on its own, and you get an error referencing boot0, fix it using the methods listed here.
Congratulations! You’re done!!
Your PC is now fully operational, while running the latest version of Mac OS X Snow Leopard! And you have a nice Boot CD to get into your system in case things go awry. Boot your system from iBoot if you have issues. You may run MultiBeast as often as you like.
If you can’t boot, try typing -x at the boot prompt to enter safe mode, or just boot with iBoot. When you get to the desktop, you can make all of the changes you need to. The best way to start fresh is delete whatever you’re trying to get rid of- including the whole /Extra folder, as most kexts are installed there. Then you can re-run MultiBeast. As long as you rebuild caches and repair permissions after you’re done, you can do just about anything you want to /Extra/Extensions and /System/Library/Extensions. Anything can be tweaked and enabled upon subsequent uses of MultiBeast.
If you’ve had success using iBoot + MultiBeast, consider a contribution to help keep the sites going. We’re constantly updating and tweaking our tools to help you.
The following guide is a complete walkthrough for installing a fresh version of OS X Yosemite. It requires no experience and all of the necessary installation and post-installation tools are available on tonymacx86.com.
UniBeast is a tool that creates a bootable installer out of your downloaded version of OS X. In order to start fresh, you’ll need access to a functional computer running Mac OS X Snow Leopard 10.6.8 or later. This is a requirement, as you need access to the Mac App Store to download OS X and create the installation drive. To start from scratch, booting the 10.6 Snow Leopard Retail DVD directly, check out iBoot + MultiBeast.
1. Register here at tonymacx86! If you don’t have a user account, create one! 2. Get our latest MultiBeast and UniBeast tools from the downloads section. 3. Purchase a 8GB or larger USB drive. 4. Do a full backup of your system
The following guide is meant as a fresh installation method. To perform an update from OS X Mavericks to OS X Yosemite, saving system settings, data, and apps follow this guide.
STEP 1: Download OS X Yosemite
The full operating system is a free download for anyone who has purchased Mac OS X Snow Leopard, Lion, or Mountain Lion, or a Mac preloaded with Mavericks. Download the Application from the Mac App Store using your Apple ID on any Mac or functional computer running Mac OS X 10.6.8 or later.
Open Mac App Store
Log in with your Apple ID
Download OS X Yosemite
The Application Install OS X Yosemite will appear in /Applications.
STEP 2: Create a Bootable USB Drive with UniBeastTake a deep breath and take your time- this is pretty simple, but it’s easy to miss things if you rush. Follow each step to the letter.
Insert the USB drive
Open /Applications/Utilities/Disk Utility
Highlight the USB drive in left column
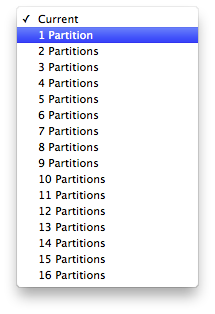
4. Click on the Partition tab 5. Click Current and choose 1 Partition
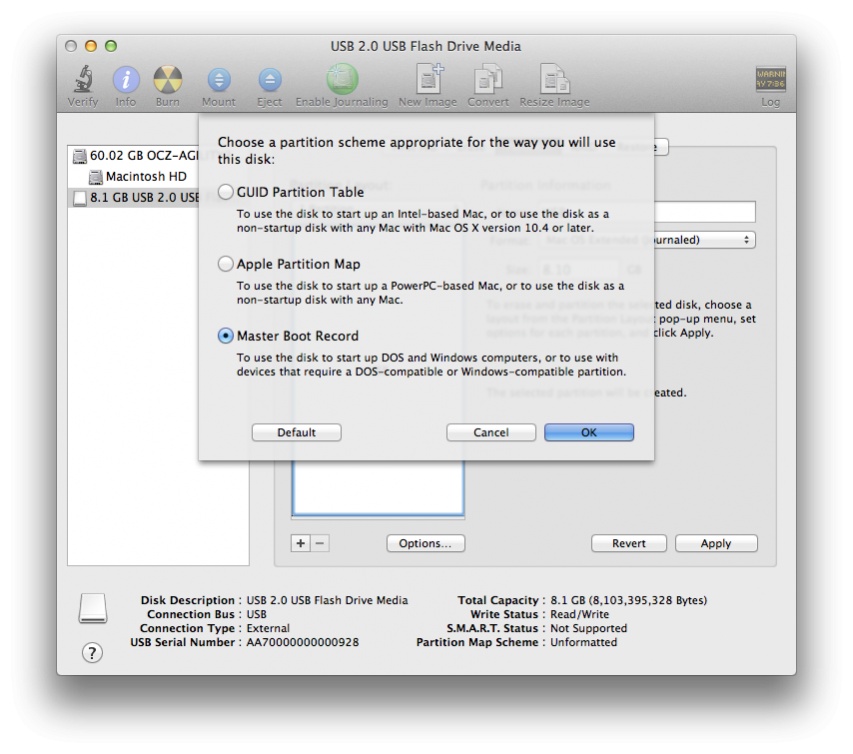
6. Click Options… 7. Choose Master Boot Record
8. Under Name: type USB (You can rename it later)
9. Under Format: choose Mac OS Extended (Journaled) 10. Click Apply then Partition
11. Download and run UniBeast 12. Click Continue, Continue, Continue, Agree
13. At Destination Select, choose USB and click Continue
14. Choose Yosemite on the Select OS Installation screen 15. Click Continue
16. If using a 5 or 6 Series system with AWARD BIOS choose Legacy USB Support 17. If using a laptop, choose Laptop Support 18. Click Continue
19. Enter password and click Install
UniBeast will now create the bootable USB drive. The process will only take about 10-15 minutes, depending on system and drive speed. Do not unplug or stop during this time.
20. Drag MultiBeast to your completed USB drive.
STEP 3: Recommended BIOS Settings
If you’re installing on a recommended CustoMac desktop with AMI UEFI BIOS, the options are simple. For other systems make sure to set your BIOS to Optimized Defaults, and your hard drive to AHCI mode. Here are standard AMI UEFI BIOS settings for Gigabyte AMI UEFI BIOS,Gigabyte AWARD BIOS, ASUS AMI UEFI BIOS, and MSI AMI UEFI BIOS.
To access BIOS/UEFI Setup, press and hold Delete on a USB Keyboard while the system is booting up
Load Optimized Defaults
If your CPU supports VT-d, disable it
If your system has CFG-Lock, disable it
If your system has Secure Boot Mode, disable it
Set OS Type to Other OS
Save and exit.
STEP 4: Install OS X YosemiteYou’re almost done! All you need to do is boot from the USB drive and install!
Turn on the computer
Press the hotkey to choose boot device (usually F12 or F8)
Choose USB-HDD
At the Chimera Boot Screen, choose USB and hitEnter
If you have trouble reaching the installer, type -x at the Boot screen as shown below. You can type the boot flags GraphicsEnabler=Yes, PCIRootUID=1, maxmem=4096, maxmem=8192, andnpci=0x2000 by themselves or together in order to solve boot issues for older graphics cards and machines. Type -v to bypass the Apple boot screen and enter verbose startup mode. X58 and X79 systems always need npci=0x2000. For further explanations of boot flags, check out the post here. Also, if you need help with what to use for your graphics card, see the post here.
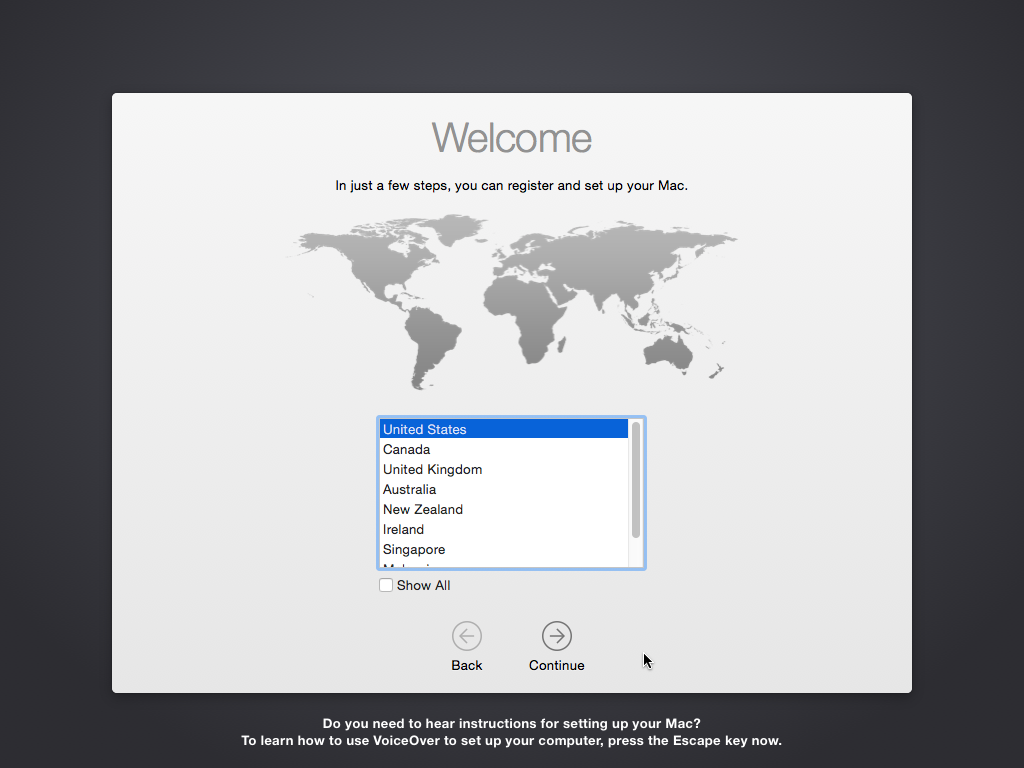
5. When you arrive at the Installer, choose language.
6. For a new installation of OS X, you MUST erase and format the destination drive according to the following steps before continuing.
a. In the top menu bar choose Utilities, and open Disk Utility
b. Highlight your target hard drive for the Yosemite installation in left column. c. Click Partition tab d. Click Current and choose 1 Partition e. Click Options… f. Choose GUID Partition Method g. Under Name: type Yosemite (You can rename it later) h. Under Format: choose Mac OS Extended (Journaled) i. Click Apply then Partition j. Close Disk Utility
7. When the installer asks you where to install, choose Yosemite, or your existing install. 8. Upon completion, restart the system.
STEP 5: Post-Installation Using MultiBeastMultiBeast is an all-in-one post-installation tool designed to enable boot from hard drive, and install support for Audio, Network, and Graphics. In addition it includes System Utilities to repair permissions and a collection of drivers and config files. The installation is complete, but the drive isn’t bootable yet. Boot from the USB again, this time choosing Yosemite.
1. Turn on the computer 2. Press the hotkey to choose boot device 3. Choose USB-HDD 4. At the Chimera Boot Screen, choose your new Yosemite installation. 5. Complete OS X Yosemite setup
7. If this is a fresh installation, click Quick Start to choose EasyBeast, UserDSDT, or DSDT-Free.For 7/8/9 series recommended builds choose DSDT-Free.
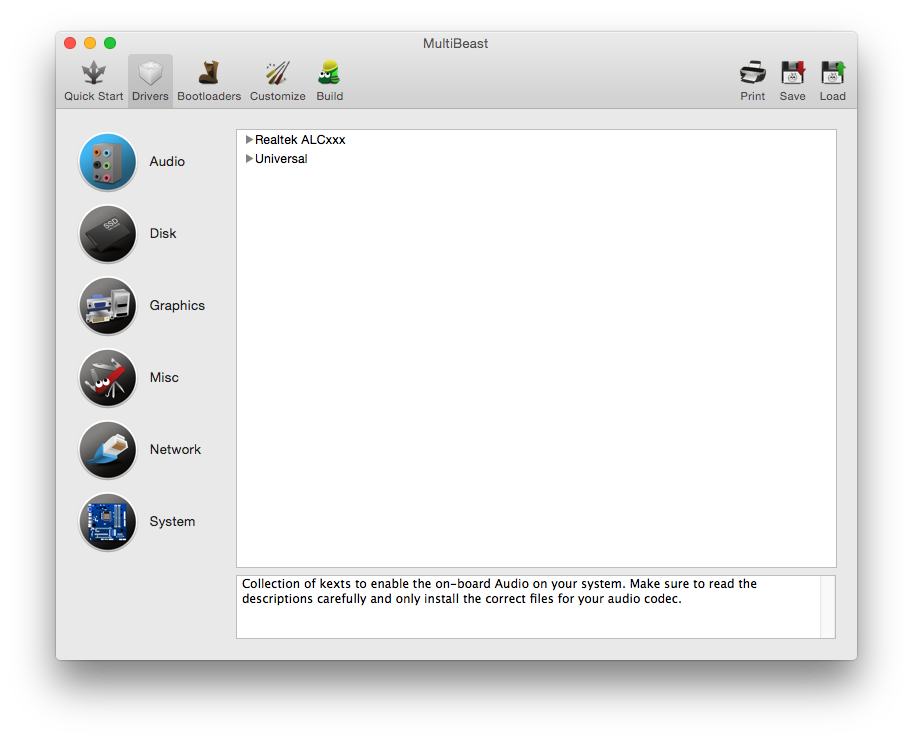
8. Click Drivers for Audio, Graphics, and Network options
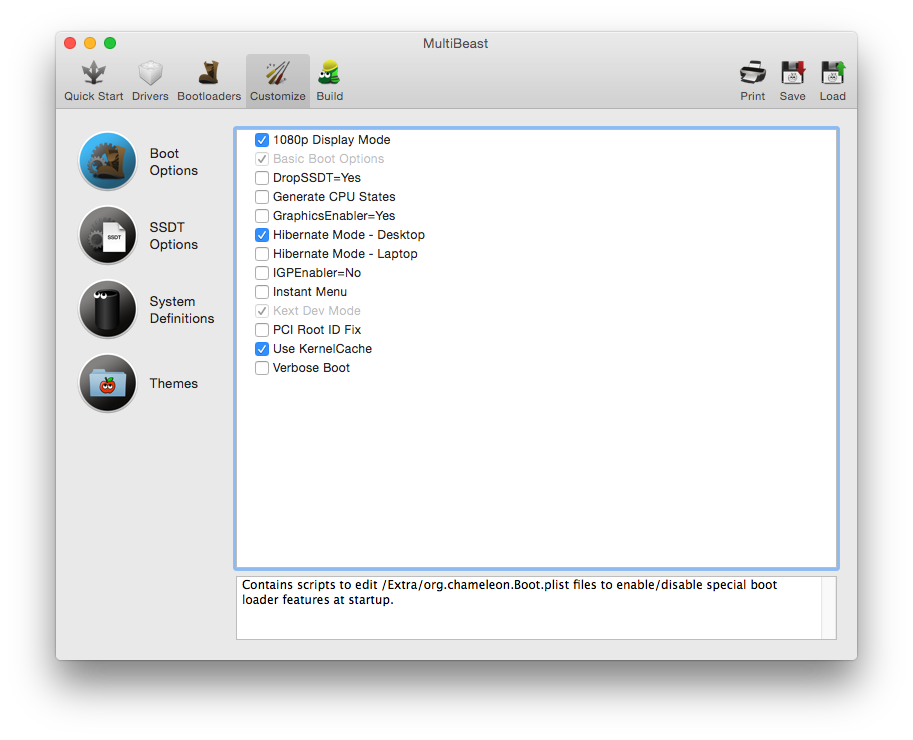
9. Click Customize for further options
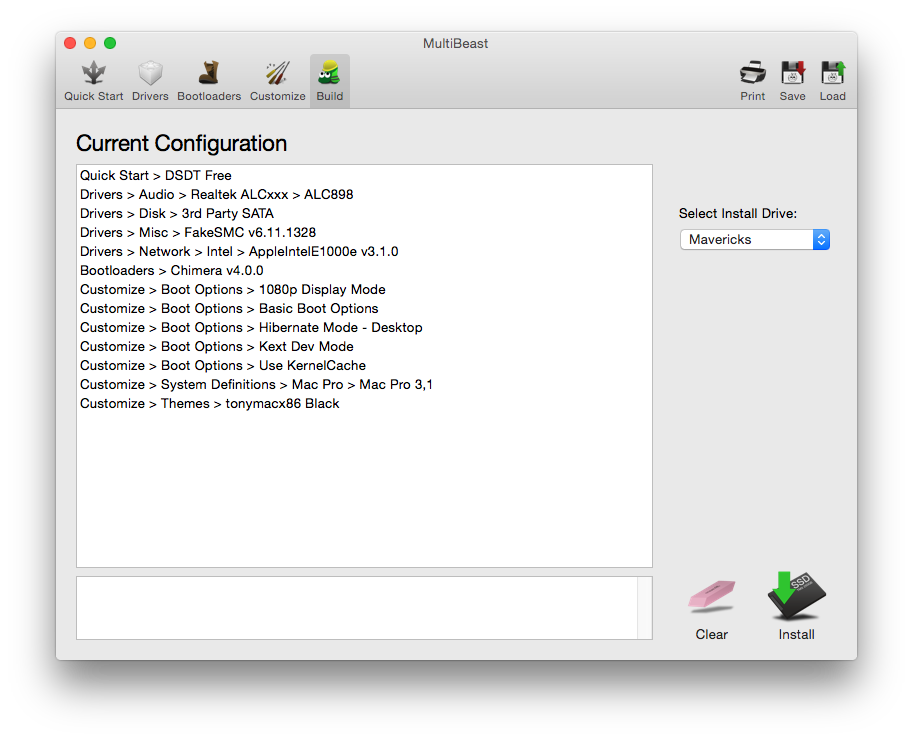
10. Click Print or Save to back up your configuration 11. Click Build then Install
12. Restart computer to complete installation
Yay! You now have a fully updated bootable version of OS X Yosemite on your CustoMac! And a super handy USB rescue drive. It’s easy to get frustrated, but don’t give up! If you get stuck, there are many users with similar hardware in the tonymacx86 Forum to provide support. Special thanks to everyone in the community, and our moderators for testing!
Troubleshooting and Optimizations:
After you’ve completed the guide, things such as HDMI audio and iMessage may not work automatically and universally. The list below should serve to fully optimize your system after initial setup.
Alternate NVIDIA Graphics Drivers NVIDIA releases alternate graphics drivers separately on the web for each OS X build. These are different from the drivers Apple ships as standard, and should be considered experimental. In the past, the drivers have been known to solve OpenCL issues with certain applications, as well as providing better native GPU power management for certain devices. They also will enable the latest ‘Maxwell’ cards to work with full acceleration- NVIDIA GeForce GTX 750, GTX 750 Ti, GTX 970, and GTX 980.
Managing Macs has it ups and downs. While the simplicity of OS X allows for ease of use in most cases, its market share gives preference to Windows, leaving a dearth of management suites in its wake. Sure, Apple-centric deployment suites exist, but many of them are too underpowered compared to the more pricier alternatives or too expensive for basic management needs.
Fortunately, there’s DeployStudio Server, an open-source deployment suite that offers imaging, management for apps and settings, plus support for BootCamp and Linux-based partitions. Did I mention that it’s also free?
DeployStudio can be configured to run as a stand-alone server app from a Mac computer or from OS X Server for greater support and added networking features. It can also be setup in a master/replica hierarchy similar to Open Directory to scale with the needs of your organization.
For the scope of this article, we’ll discuss how to install and configure DeployStudio. Before diving into the installation process, please review the requirements below.
Apple Computer running OS X 10.6.8+ (if running standalone; for multicast network-based deployments, OS X Server 10.6.8+ is required).
Available storage space sufficient to server OS X images for deployment.
After verifying the requirements above are met, it’s time to proceed to the installation.
I. Installing DeployStudio
Follow these steps to install DeployStudio:
Download and open the DeployStudio DMG file. Inside you’ll find the package installer. Execute it to begin the installation process (Figure A). Figure A
Click the Continue button to proceed past the Introduction screen (Figure B). Figure B
Click the Continue button to proceed past the Read Me screen (Figure C). Figure C
Click Continue at the License screen (Figure D). Figure D
Accept the Licensing agreement (Figure E). Figure E
At the Installation Type section, you can choose to modify the install location before clicking Install (Figure F). Figure F
You’ll be prompted to enter admin credentials before continuing on (Figure G). Figure G
A prompt may appear if installing DeployStudio on OS X Server with the NetInstall service running. If previous NetBoot files exist, a message indicating that the .nbi file cannot be updated may appear. This is not an error, just a notification. Click OK to proceed (Figure H). Figure H
Upon completing the installation, the Summary is displayed. You may now click Close as DeployStudio has been installed successfully (Figure I). Figure I
II. Configuring DeployStudio
Follow these steps to configure DeployStudio:
DeployStudio is installed in the Utilities folder, within Applications. Specifically, three applications are installed: a. DeployStudio Admin: The admin console that allows for configurations and workflows to be created and computers to be managed. b. DeployStudio Assistant: A wizard that will guide you through the steps to create different NetBoot images for use with various functions of DeployStudio, such as scripting app deployments. c. DeployStudio Runtime: This is a window that allows one to select the workflows or configurations set in the admin console and execute them on a client machine (Figure J). Figure J
Be default, the DeployStudio Assistant.app is where the configurations are made initially. However, launching that app without first turning on the service will result in a notification that the DeployStudioServer daemon is not active (Figure K). Figure K
Go to System Preferences and find the DeployStudio Server preference pane (Figure L). Figure L
The service is installed in the OFF position. Clicking the ON button will load the service. The status will change from Stopped (Figure M) to a warning that the Repository is not configured (Figure N). Since this is the first time running the service, no repositories exist at the moment. Figure M
Figure N
At this point, click the Launch Assistant button to configure DeployStudio. Select the radio button that corresponds to Set up a DeployStudio Server and click Continue (Figure O). Figure O
In the Server connection section, enter the Static IP that is assigned to the computer and create a username and password that will act as the admin account for DeployStudio (Figure P). Figure P
Next, select the master server role since this is the first DeployStudio server. If setting up multiple DeployStudio servers, each subsequent configuration should be set as Replica for scalability (Figure Q). Figure Q
Repository type is a crucial entry since this selection will affect how DeployStudio is used. If DeployStudio is to be a stand-alone computer with images stored on external HDD, then select Local Folder. However, if DeployStudio is to be networked with images being multicast to clients, then select network sharepoint and click Continue to enter the network settings (Figure R). Figure R
If local folder was selected, proceed to step #10; If network sharepoint was selected, enter the network path to the folder, as well as credentials to access the shared folder on the network (Figure S). Figure S
The following section allows you to configure Email notifications, if desired. This is an optional step that does not impact configuration one way or the other. If you wish to enable email notifications, check the box to enable and enter your organizations email server information. If not, proceed to the next step (Figure T). Figure T
Network security is another important decision, since it will directly affect how DeployStudio is accessed. Communication between the server and client is made via specific ports for both encrypted and unencrypted traffic. Enabling SSL will use a 1st or 3rd-party SSL certificate to encrypt traffic. Additionally, ports may be customized in the event that the defaults are already in use by another app/service (Figure U). Figure U
The User groups section allows sys admins to define access rights to specific applications, functions, and workflows, based on group membership. The defaults allow the admin account created during installation full access to everything. However, if working with multiple IT staffers, it would be a best practice to secure each user’s account by adding them to the specific group(s) they need access to in order to perform their functions (Figure V). Figure V
Again, if running DeployStudio as a stand-alone, jump down to step #15; if running DeployStudio networked, then modify the settings for multicast imaging to meet the needs and demands of your organization’s environment. Bare in mind the impact on production networks when configuring these settings and consult the network admin (Figure W). Figure W
For its computer management abilities, DeployStudio creates a database and creates entries on the fly as clients connect to the service. The default identification method is based on the device’s Serial Number; however, it may be modified based on MAC address. Modify the selection as it pertains to your organization (Figure X). Figure X
The final step is the initial configuration phase. Clicking Continue will save the settings and create the DeployStudio repository (Figure Y). Figure Y
Once the settings have been saved, a confirmation message will appear and subsequently restart the DeployStudio service, bringing it online and ready to communicate with clients (Figure Z). Figure Z
With the installation and configuration of the DeployStudio Server successfully completed, the service is ready, but it must still be configured to communicate with clients over the network.
The next few articles in this series will provide in-depth information for creating images to boot to DeployStudio as well as to be used to capture reference images (which are completed installs of a computer with all settings and applications pre-configured) for automating deployment to multiple computers. Also, I plan to discuss how to build and create workflows that aid in the deployment of said images, software updates, and settings configuration.
خريج تقنية معلومات قسم الشبكات في كلية التقنية العليا بإمتياز مع مرتبة الشرف و موظف تقنية معلومات في مجال التعليم. حضرت عدة دورات لتحسين وتطوير المهارات اللازمة في مجال عملي وفي دراستي وغيرها من الدورات الشخصية لتطوير الذات.
من هواياتي تصميم المواقع الإلكترونية وادارتها و الدعم الفني.