This article is part two in our tutorial series on
how to set up a home hacking and security testing lab. If you followed along in part one,
installing a Kali Linux virtual machine in VirtualBox, you have installed VirtualBox on the primary computer for your home lab and created a Kali Linux virtual guest on this host machine. The Kali system has been fully updated and VirtualBox Guest Additions have been installed on it. Finally, your Kali VM has a single network adapter running in bridged mode and you have set up an administrator account on the Kali instance.
Creating and configuring the virtual network setup outlined in the introduction, which we will do in part three of this series, requires a few more steps: we still have to download and install Metasploitable, set up the virtual network, etc. But if you’re like me, you’re probably already itching to start playing with all the toys Kali has to offer, if you haven’t already!
Home Network Analysis 101
This article will show how some of the tools that come bundled in Kali can be used to explore your existing home computer network, and test whether you can successfully identify all the devices that are connected to it. In particular, we’ll take a look at a set of tools that come bundled in Kali that can be used for network analysis: nmap/Zenmap and dumpcap/Wireshark.
These will come in handy in our eventual testing lab, but they can obviously also be used to explore your home local area network as well. Nmap is a command line network scanner, and Zenmap is a graphical interface to nmap. Dumpcap is a command line network traffic monitor, and Wireshark provides a powerful and versatile graphical interface to monitor network traffic and analyze network packet capture files.
Here’s a simple experiment. Do you happen to know how many devices are currently connected to your home network? Can you identify all of them off the top of your head? Try to do so, and make a list of them. At the very least, we know there will be at least three: the Kali guest, the host machine you are running Kali on, and your router. There may also be more computers or cell phones connected to it, and maybe even your television, refrigerator or coffee maker!
We are first going to use nmap to see if we can identify any such devices on the network, and perhaps detect one or two that we did not think or know were connected to it. We’ll then configure Wireshark and run a packet captures to get a sense for the normal traffic on the network, and then run another capture to analyze just how an nmap network scan works.
Determining Your IP Address
Before we can scan the network with nmap, we need to identify the ip address range we would like to examine. There are a number of different ways to determine your ip address on a Linux distribution such as Kali. You could use, for example, the ip or ifconfig commands in a terminal: ip addr, or sudo ifconfig.
(Note that if you are using an administrator account inside Kali, which is considered a best practice, when a non-root user enters a command such as ifconfig into a terminal, the shell will likely respond by complaining “command not found”. In Kali, sensitive system commands like ifconfig have to be run as root. To access it from your administrator account, all you need to do is add “sudo” to the front of the command: sudo ifconfig.)
These commands will provide you will a wealth of information about your network interfaces. Identify the interface that is connected to the LAN (likely eth0), and make a note of the ip address indicated after “inet” for the ip addr command, or after “int addr:” for the ifconfig command. That is your ip address on your local area network. Here are a couple ifconfig and ip addr outputs posted by the Ubuntu Journeyman:
As you can see here, the ip address for this machine is 192.168.1.4.5. Yours is likely something similar to this: for example, 192.168.1.123 or 10.0.0.56 etc. Notice in the ip addr output above, the ip address is: 192.168.4.5/24. That means 192.168.4.5 is the ip address of that specific machine, while the /24 at the end indicates the address space for the LAN’s subnet, which in this case are all the addresses from 192.168.4.1 to 192.168.4.255.
If we were to scan this local area network with nmap, we would want to scope out all the addresses in the network’s range, which means 192.168.4.1, 192.168.4.2, 192.168.4.3, 192.168.4.4, and so on, all the way to 192.168.4.255. One shorthand way of notating this is: 192.168.4.1-255. Another common shorthand is 192.168.4.0/24. Of course, if your address were 10.0.0.121, then the shorthand would be: 10.0.0.1-255 or 10.0.0.0/24.
Host Discovery
Let’s assume your Kali VM has the ip address 192.168.1.5 on a subnet with possible host addresses from 192.168.1.1 to 192.168.1.255. Now that we know Kali’s ip address and the address range we want to take a look at, open up a terminal and type: nmap. This will provide you with a long list of all the options available within the nmap program. Nmap is a powerful program and there are a lot of options! Perhaps the simplest possible network scan that can be conducted with nmap is a ping scan, for which we use the -sn option.
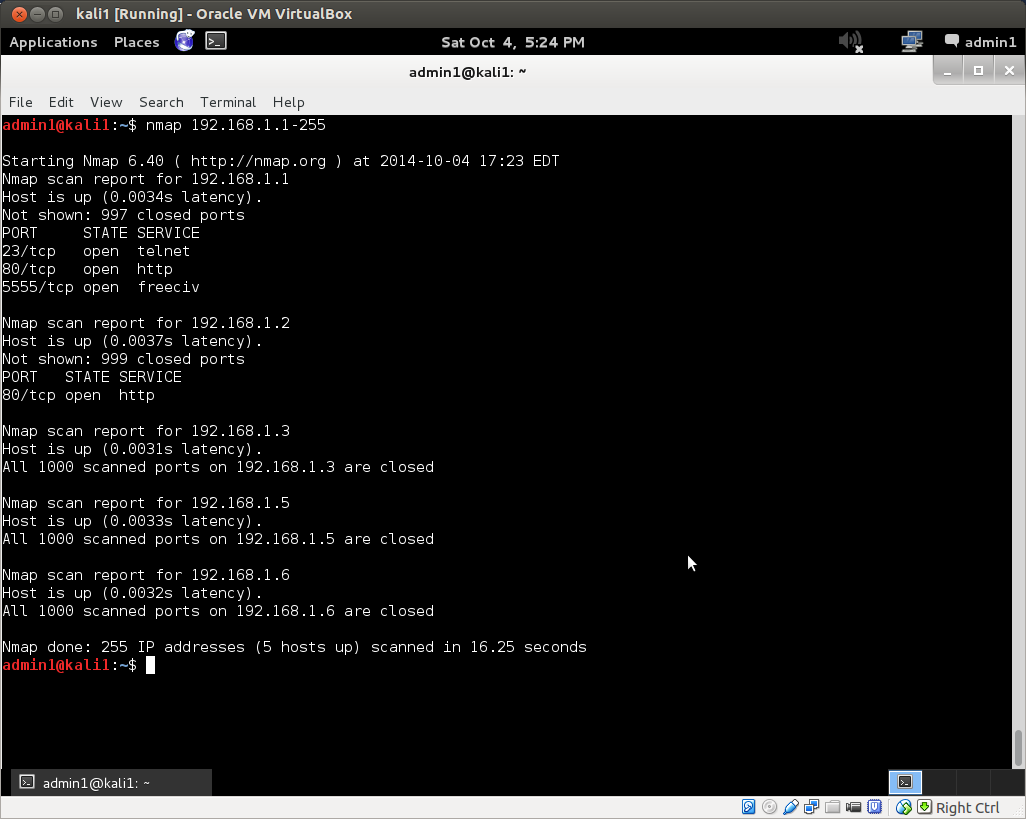
Now type nmap -sn 192.168.1.1-255 into your terminal and hit enter. (Don’t forget to substitute the address range for your network if it is different from this!) This scan will tell you how many hosts nmap discovered by sending a ping echo request to each of the addresses in the range x.x.x.1-255, and provide you with a list of the ip addresses of the hosts that returned a ping reply. This is host discovery 101. Here is the ping scan output from nmap on a simple local area network I set up for the purpose:
The ping scan found 5 hosts up with the addresses: 192.168.1.1, .2, .3, .5 and .6. Note that in the wild, this method of discovery may not work, as it is becoming increasingly common for administrators to configure their systems so that they do not reply to simple ping echo requests, leaving a would-be ping scanner none-the-wiser about their existence.
Did your scan find the same number of hosts that you had presumed were on your network? Were there more or less?
We can use the default nmap scan to further investigate known hosts and any potential ghost hosts the ping scan may or may not have uncovered. For this, simply remove the -sn option from the command above: nmap 192.168.1-255. Here’s the output of the default nmap scan on the same network as above:
Nmap has returned much more information. It found three open ports on the router at 192.168.1.1, as well as an open web server port on host 192.168.1.2. All scanned ports on the remaining hosts were closed.
You can also use nmap to further investigate known hosts. The -A option in nmap enables operating system detection and version detection. Pick out a couple of the hosts discovered by your nmap scans, for which you already know the operating system type and version. Now scan these hosts with nmap for OS and verstion detection by adding them to your host address target list, separated by commas. For example, if I would scan the router and web server discovered above for OS and version detection with the command: nmap -A 192.168.1.1,2. This will return more information, if any is determined, on those hosts.
You can obviously also run an OS and version detection scan over the whole network with the command: nmap -A 192.168.1.1-255. Depending on the number of hosts on your network, this scan could take a couple minutes to complete. If you press <Enter> while the scan is running, it will give you an update on its progress.
If there are more and a handful of hosts on your network, the output can be hard to parse in the terminal. You could send the output to a file with: nmap -A 192.168.1.1-255 > fileName.txt. Or you could use one of nmap’s own built-in file output options.
But this is also where Zenmap comes in quite handy. Open up Zenmap from Applications->Kali Linux->Information Gathering->Network Scanners. If you are running as an administrator and not root, as you should be, you will get a message stating that not all of nmap’s functionality can be accessed without root privileges. Root is not necessary for basic scans. However, you can run Zenmap as root by opening a terminal and typing: sudo zenmap. The Zenmap interface:
The Zenmap interface is pretty straightforward. Enter the target ip address or address range into the target field. Changing the scan profile from the drop down menu changes the scan command. You can also manually enter or edit commands in the command field. After you run a scan, Zenmap also helpfully breaks down the results for you, providing host details, port lists, network topology graphics and more.
Play around with the various built-in scan types. Can you identify all the hosts on your home network with a ping scan? a regular scan? an intense scan? Can you identify all the open ports on those hosts? If you have a laptop or another device that you frequently use to connect to the internet over public wi-fi hotspots, you can also do intensive scans of those devices to determine if there are any open ports that would represent a potential security vulnerability. Identifying open ports is important for vulnerability assessment, because these represent potential reconnaissance or attack vectors.
Network Traffic Capture and Analysis with Wireshark
Nmap scans a network and probes hosts by sending out ip packets to, and inspecting the replies from, its target at a given address. With 255 addresses to scan along with 1000 ports on all discovered hosts in the default scan of the subnet above, that’s a lot of network traffic! What does the packet traffic generated by a scan look like on the network?
To answer this question, we can use Wireshark and dumpcap. Dumpcap, as its name implies, is a command line tool that dumps captured network traffic. Wireshark provides a graphical user interface to analyze these sorts of dump files, which are collections of all the network traffic to which the given network interface was privy.
If run with the proper privileges, Wireshark can capture live network traffic as well. In Kali, you can find Wireshark under: Applications->Kali Linux->Top 10 Security Tools. Unless you have already configured Wireshark with the appropriate settings, when you open it for the first time you will be informed by the “Capture” panel that “No interface can be used for capturing in this system with the current configuration.”
In its documentation, Wireshark recommends appropriate settings to enable capture privileges. This also suggests confirming that Wireshark can also be run as root. To run Wireshark as root, you can log in as root, or run sudo wireshark in a terminal. When you run Wireshark as root, you will first be given a usage warning and provided with sources for how to set up proper privileges. This forum post on AskUbuntu boils the process down to three simple steps.
Now that you’ve enabled live captures in Wireshark, let’s run one! Click “Interface List” in the Capture panel of the default view. Choose the interface that is connected to the network (it will indicate your ip address on that network), and click Start.
This will immediately begin a live capture of all the packets on the network to which the interface has access. At the very least, it will detect: 1) packets it sends out, 2) packets it receives directly, 3) packets it receives indirectly if they are broadcast to all the hosts on the network.
If you have never viewed a network packet capture before, you may be surprised what you can see, and what information is simply being broadcast over the network. You’ll probably find messages from your router, you’ll see internet traffic packets if you are viewing a webpage in a Kali browser, or on Kali’s host computer (depending on whether or not Promiscuous Mode is enabled in the VirtualBox advanced network settings for your Kali machine). You might find that one device is especially chatty for no good reason. There might be devices pathetically sending out calls to other devices that have been removed from the network, such as a laptop searching for a printer that has been turned off, and so on.
The default Wireshark packet capture interface numbers each packet it captures, and then notes the time after the capture began that it received the packet, the ip address of the source of the packet, the ip address of the destination of the packet, the protocol, the packet’s length and some info. You can double click an individual packet to inspect it more closely.
If you ping your router (which you should have been able to identify via nmap analysis) from Kali, you’ll see all the requests and replies, obviously, since the Wireshark capture and the ping are running on the same machine. But the Kali guest shares its interface with the host machine. If you enable promiscuous mode in the advanced network settings inside VirtualBox for your Kali instance, when you ping your router from the host machine itself, the Wireshark capture will similarly allow you to see all requests and replies, they’re going over the same interface! If you disable Promiscuous Mode, on this other hand, this will not be the case. In this case, packets to and from the host computer will not be picked up, as if it were a completely separate physical machine. Similarly, if you ping your router from a different computer, you will not see the request/reply traffic at all, though perhaps you might pick up an ARP if the requester does not already know the (hardware) address of the request’s intended recipient.
After getting a feel for what the base level network traffic looks like on your network, start a new capture, and then run a simple scan from nmap or Zenmap, and watch the result in Wireshark. When the scan is finished, stop the capture and save the file. Capturing the simple nmap ping scan from above on my network resulted in a file with over 800 packets! Now you can analyze the network traffic generated by the scan itself. You’ll probably want to play around with Wireshark for a bit to get a sense of what it offers. There are tons of menus and options in Wireshark that can be tweaked and optimized for your own ends.
Well, that’s it for this article. In part three of our hack lab tutorial series, we’ll install our victim machine, an instance of Metasploitable2, in VirtualBox and set up a completely virtual lab network to explore some more tools that are bundled in Kali. As always, comments, questions, corrections and the like are welcome below.