Jan 21, 2016 | hyper-v, Learn and Teach, Virtualization, windows 10
How To Enable or Disable and Configure Use Hyper-V on Windows 10
Source
Enable Hyper-V on Windows 10
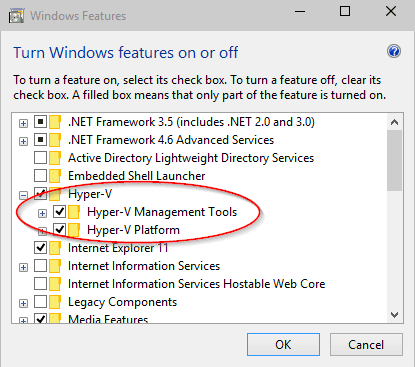
Go to Control Panel → Programs → Turn Windows features on or off, check Hyper-V option, make sure all components are selected, and click OK.

You may reboot your computer once the Hyper-V feature was added.
Open Hyper-V Manager
Click Start button, and then All apps, you will see Hyper-V Manage Tools appears under H section. Expand it to find Hyper-V Manager.

I was having a little difficulties finding Hyper-V Manager when I first tried. It’s not in All apps, nor in Search results. What I ended up doing is to add it as a Snap-in component to a blank MMC console.
Click Start button, type in “MMC”, and press Enter. It will open a blank MMC Console. Then go to File → Add/Remove Snap-in, add Hyper-V Manage component from left, and click OK. Pick local computer as the remote server.

Either way, you will have Hyper-V Manager opened up on your computer without any issue.
First thing to do in Hyper-V
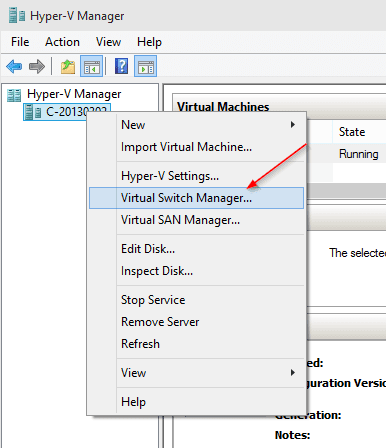
The first thing you need to do after you enabled Hyper-V feature is to create a network switch. You will need one to create and run virtual machines.
Open Hyper-V Manager, right-click the host, and choose Virtual Switch Manager. You can also find it on Actions panel as well.
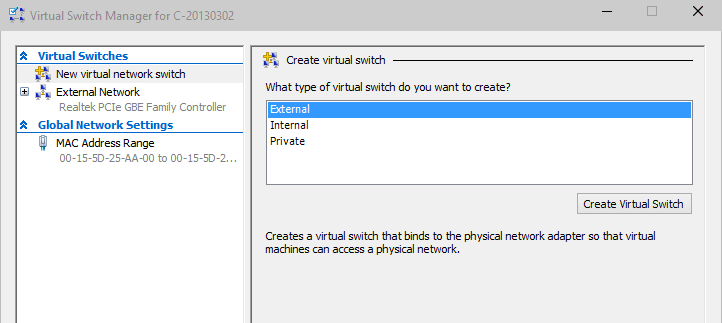
Select one of 3 types of virtual switch, and click Create Virtual Switch button.
- External – if a virtual machine needs to get access to a physical network directly.
- Internal – if no need to get access to the physical network.
- Private – if a virtual machine only runs on this host.
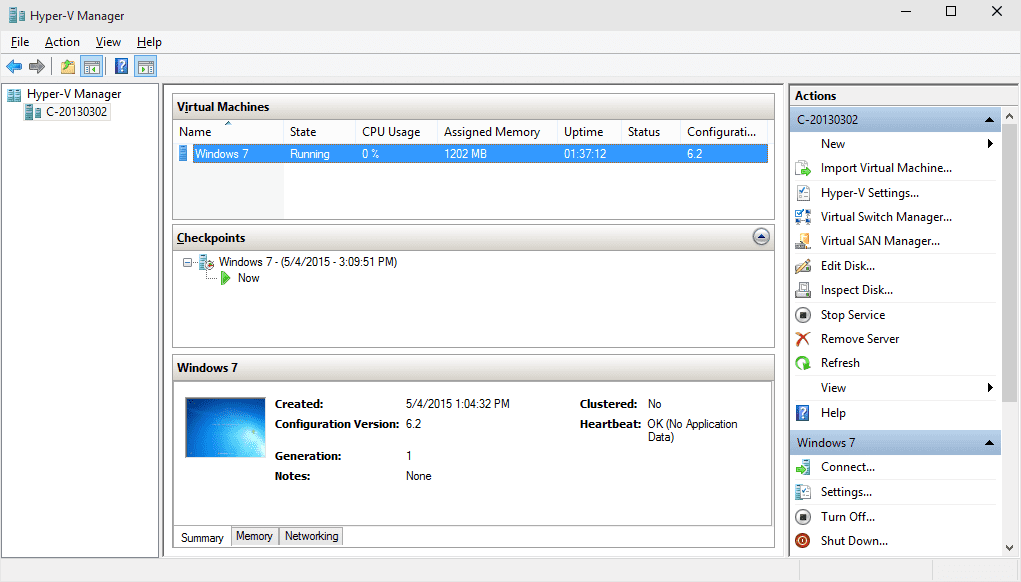
You may as well configure Hyper-V settings on this particular host to specify the default folder to store virtual disks and virtual machine configuration files.
Once that’s all done, you can now import an existing VM or create a brand new one to start enjoying running a second OS in Hyper-V on your Windows 10 computer.
Jan 21, 2016 | cloud storage, General, home cloud storage, Learn and Teach, storage
https://gigaom.com/2014/03/01/how-to-set-up-your-own-personal-home-cloud-storage-system/
set up your own cloud storage at home
Storing documents on file sharing services like Dropbox and Google Drive has become a common practice online in the last five years. In that time, as people create, edit and hoard older data files, they find they are running short of the free space included with an account.
With more and more people opting for either a tablet-only existence or switching from a traditional desktop computer with multiple internal drives to a laptop with a much smaller SSD drive, finding an alternate storage system is important.
At a cost of between $0.05 and $0.10 per gigabyte per month for additional online storage, you can spend anywhere from $500 to $600 per year for just 1 terabyte. As you will see, a more economical solution is to own your own personal cloud hosted on your home network.
Personal cloud considerations
Not every solution to this problem is perfect. The following outlines some of the challenges you may face when managing your own personal cloud.
Upload speed – What is likely to be the biggest deterrent from using a home-based personal-cloud storage system will be your internet provider. When you are away from your home network, the fastest access speed you can expect from a personal cloud will be your internet connection’s upload speed. Looking at data collected by OOKLA, the national average for download speeds is about 21.5Mbps while the upload speed is only 6.8Mbps. For my own home network, those numbers are 18Mbps down and 2Mbps up respectively, which is where they should be according to my provider AT&T U-verse. Before investing in a personal cloud, run an internet speed test to see just how fast, or slow, your upload speeds will be.
Router settings – Your router plays an important part in the equation as well. By design, routers are meant to connect multiple devices on your home network to the internet, and not the other way around. If you happens to have a router that supports Universal Plug and Play (UPnP) you many simply need to ensure that this particular feature is turned on. Otherwise you may find yourself manually configuring the necessary Port Forwarding settings that are unique to each private cloud and router combination. Take a quick look at both products’ support site before you buy. You should find a list of compatible routers that work with the personal cloud product you are most interested in.
Remote access vs syncing – Syncing your files may be just fine when you think of a free Dropbox account. Files are typically accessed from a single user whose account comes with a relatively small amount of storage space. But when you realize that personal cloud based storage can have from 1 to 4 terabytes of space (some four-bay systems with as much as 16 terabytes), syncing is no longer a viable option. Keeping the majority of your files on your personal cloud means that both you and your cloud must be online in order to access your files.
Home Computer as a Personal Cloud
Home computer as a personal cloud
There are of course many different ways to share files between computers and portable devices. With personal cloud software installed on your computer, you can more easily access the files located on your home-bound computer from across the internet.
Polkast is one such service that will allow you to share the files located on just one computer with a free account. Setting up an account and downloading the required software onto your PC or Mac is easy enough and there are apps for both Android and iOS. If you are looking to add more computers to the service, Polkast Pro costs $4.99/month or $49.99/year for an unlimited number of devices.
LogMeIn Pro also has a file-sharing feature in addition to its remote control service. With LogMeIn you not only do you have access to your files, but you can also log in and control your desktop. At $99 per year for the first two computers, it is a little more expensive than Polkast but you may find it a little easier to use.
Spotdox is a unique offering in that it is an add-on application to your Dropbox account. With Spotdox you can access all of the files from your home computer as it uses your Dropbox account to perform a sort of handshake to establish a connection. At $24 per year or $79 for life for an unlimited number of devices, this may be the most economical solution of the three.
Network Device as a Personal Cloud
Network device as a personal cloud
Leaving a computer on all of the time on your home network may not be possible. All you really need to do is attach just the hard drive to your home network. Such a device is called Network Attached Storage (NAS). NAS devices have gotten a whole lot smarter as they can now easily share their files outside of your home network over the internet.
Transporter was among the first such devices that turned a network attached hard drive into a cloud accessible file sharing device. With their own Selective Sync feature, you can decide which folders you sync and which folders you keep on the device. Starting at just $99 for a diskless version that you add your own UBB drive to, you can also get a 1TB version for $249 or a 2TB version for $349. Transporter is by far one of the easiest personal cloud devices to setup.
Zyxel NSA325 may be a lesser known brand, but has a highly adaptable configuration. Using Polkast as one of its cloud sharing options, you can also install a WordPress server and many other network services including a DLNA media server. It is more like a small Linux server than it is just a networked hard drive. Starting at around $75 for a 1-bay drive enclosure and $175 for a 2-bay enclosure (you supply the hard drives), this setup is geared more towards someone whom is comfortable setting up and configuring electronic devices.
Western Digital MyCloud offers easy setup out of the box like Transporter and yet still has some of the advanced features available in the Zyxel like being a fully fledged DLNA media server too. Starting at $150 for 2TB, $170 for 3TB, and $220 for 4TB, you can elect to move up to WD’s EX4 network appliance that has configurations all the way up to 16TB for $999.
Portable WiFi Device as a Pocket Cloud
Portable Wi-Fi device as a pocket cloud
A final solution would be to actually carry your cloud based storage around with you. Lacking the ability to create a sharable link on the internet, these devices will attach themselves to an existing Wi-Fi network or will create their own when none exists. This eliminates the complexities of having to deal with upload speeds and router configurations. Think of them more as like an on-demand personal cloud that you can carry around with you rather than leaving one attached to your home network.
Kingston Wi-Drive does not have the same capacity as some of the other personal cloud options, but makes up for that by being accessible in locations where there is not internet connection. With storage capacities of just 32 GB for $80 and 64 GB for $99, you end up paying a premium for the convenience of being accessible anywhere.
SanDisk Connect Wireless Media Drive takes things one step further by also allow you to connect to an inserted SD memory card. With a price point similar to that of the Kingston at $80 for the 32 GB and $99 for the 64 GB, having the ability to add-on storage makes the SanDisk a better option.
Corsair Voyager Air is a little bit larger than either the Kingston or the SanDisk, but with that increase in size comes an increase in storage capacity. You can also attach the drive to your home network with an Ethernet cable. Priced at $180 for a 1 TB drive, byte for byte it is definitely the most economical solution of the three.
Jan 21, 2016 | Uncategorized
How To Enable or Disable and Configure Use Hyper-V on Windows 10
Source
Enable Hyper-V on Windows 10
Go to Control Panel → Programs → Turn Windows features on or off, check Hyper-V option, make sure all components are selected, and click OK.
You may reboot your computer once the Hyper-V feature was added.
Open Hyper-V Manager
Click Start button, and then All apps, you will see Hyper-V Manage Tools appears under H section. Expand it to find Hyper-V Manager.
I was having a little difficulties finding Hyper-V Manager when I first tried. It’s not in All apps, nor in Search results. What I ended up doing is to add it as a Snap-in component to a blank MMC console.
Click Start button, type in “MMC”, and press Enter. It will open a blank MMC Console. Then go to File → Add/Remove Snap-in, add Hyper-V Manage component from left, and click OK. Pick local computer as the remote server.
Either way, you will have Hyper-V Manager opened up on your computer without any issue.
First thing to do in Hyper-V
The first thing you need to do after you enabled Hyper-V feature is to create a network switch. You will need one to create and run virtual machines.
Open Hyper-V Manager, right-click the host, and choose Virtual Switch Manager. You can also find it on Actions panel as well.
Select one of 3 types of virtual switch, and click Create Virtual Switch button.
- External – if a virtual machine needs to get access to a physical network directly.
- Internal – if no need to get access to the physical network.
- Private – if a virtual machine only runs on this host.
You may as well configure Hyper-V settings on this particular host to specify the default folder to store virtual disks and virtual machine configuration files.
Once that’s all done, you can now import an existing VM or create a brand new one to start enjoying running a second OS in Hyper-V on your Windows 10 computer.
Jan 21, 2016 | Uncategorized
https://gigaom.com/2014/03/01/how-to-set-up-your-own-personal-home-cloud-storage-system/
set up your own cloud storage at home
Storing documents on file sharing services like Dropbox and Google Drive has become a common practice online in the last five years. In that time, as people create, edit and hoard older data files, they find they are running short of the free space included with an account.
With more and more people opting for either a tablet-only existence or switching from a traditional desktop computer with multiple internal drives to a laptop with a much smaller SSD drive, finding an alternate storage system is important.
At a cost of between $0.05 and $0.10 per gigabyte per month for additional online storage, you can spend anywhere from $500 to $600 per year for just 1 terabyte. As you will see, a more economical solution is to own your own personal cloud hosted on your home network.
Personal cloud considerations
Not every solution to this problem is perfect. The following outlines some of the challenges you may face when managing your own personal cloud.
Upload speed – What is likely to be the biggest deterrent from using a home-based personal-cloud storage system will be your internet provider. When you are away from your home network, the fastest access speed you can expect from a personal cloud will be your internet connection’s upload speed. Looking at data collected by OOKLA, the national average for download speeds is about 21.5Mbps while the upload speed is only 6.8Mbps. For my own home network, those numbers are 18Mbps down and 2Mbps up respectively, which is where they should be according to my provider AT&T U-verse. Before investing in a personal cloud, run an internet speed test to see just how fast, or slow, your upload speeds will be.
Router settings – Your router plays an important part in the equation as well. By design, routers are meant to connect multiple devices on your home network to the internet, and not the other way around. If you happens to have a router that supports Universal Plug and Play (UPnP) you many simply need to ensure that this particular feature is turned on. Otherwise you may find yourself manually configuring the necessary Port Forwarding settings that are unique to each private cloud and router combination. Take a quick look at both products’ support site before you buy. You should find a list of compatible routers that work with the personal cloud product you are most interested in.
Remote access vs syncing – Syncing your files may be just fine when you think of a free Dropbox account. Files are typically accessed from a single user whose account comes with a relatively small amount of storage space. But when you realize that personal cloud based storage can have from 1 to 4 terabytes of space (some four-bay systems with as much as 16 terabytes), syncing is no longer a viable option. Keeping the majority of your files on your personal cloud means that both you and your cloud must be online in order to access your files.
Home Computer as a Personal Cloud
Home computer as a personal cloud
There are of course many different ways to share files between computers and portable devices. With personal cloud software installed on your computer, you can more easily access the files located on your home-bound computer from across the internet.
Polkast is one such service that will allow you to share the files located on just one computer with a free account. Setting up an account and downloading the required software onto your PC or Mac is easy enough and there are apps for both Android and iOS. If you are looking to add more computers to the service, Polkast Pro costs $4.99/month or $49.99/year for an unlimited number of devices.
LogMeIn Pro also has a file-sharing feature in addition to its remote control service. With LogMeIn you not only do you have access to your files, but you can also log in and control your desktop. At $99 per year for the first two computers, it is a little more expensive than Polkast but you may find it a little easier to use.
Spotdox is a unique offering in that it is an add-on application to your Dropbox account. With Spotdox you can access all of the files from your home computer as it uses your Dropbox account to perform a sort of handshake to establish a connection. At $24 per year or $79 for life for an unlimited number of devices, this may be the most economical solution of the three.
Network Device as a Personal Cloud
Network device as a personal cloud
Leaving a computer on all of the time on your home network may not be possible. All you really need to do is attach just the hard drive to your home network. Such a device is called Network Attached Storage (NAS). NAS devices have gotten a whole lot smarter as they can now easily share their files outside of your home network over the internet.
Transporter was among the first such devices that turned a network attached hard drive into a cloud accessible file sharing device. With their own Selective Sync feature, you can decide which folders you sync and which folders you keep on the device. Starting at just $99 for a diskless version that you add your own UBB drive to, you can also get a 1TB version for $249 or a 2TB version for $349. Transporter is by far one of the easiest personal cloud devices to setup.
Zyxel NSA325 may be a lesser known brand, but has a highly adaptable configuration. Using Polkast as one of its cloud sharing options, you can also install a WordPress server and many other network services including a DLNA media server. It is more like a small Linux server than it is just a networked hard drive. Starting at around $75 for a 1-bay drive enclosure and $175 for a 2-bay enclosure (you supply the hard drives), this setup is geared more towards someone whom is comfortable setting up and configuring electronic devices.
Western Digital MyCloud offers easy setup out of the box like Transporter and yet still has some of the advanced features available in the Zyxel like being a fully fledged DLNA media server too. Starting at $150 for 2TB, $170 for 3TB, and $220 for 4TB, you can elect to move up to WD’s EX4 network appliance that has configurations all the way up to 16TB for $999.
Portable WiFi Device as a Pocket Cloud
Portable Wi-Fi device as a pocket cloud
A final solution would be to actually carry your cloud based storage around with you. Lacking the ability to create a sharable link on the internet, these devices will attach themselves to an existing Wi-Fi network or will create their own when none exists. This eliminates the complexities of having to deal with upload speeds and router configurations. Think of them more as like an on-demand personal cloud that you can carry around with you rather than leaving one attached to your home network.
Kingston Wi-Drive does not have the same capacity as some of the other personal cloud options, but makes up for that by being accessible in locations where there is not internet connection. With storage capacities of just 32 GB for $80 and 64 GB for $99, you end up paying a premium for the convenience of being accessible anywhere.
SanDisk Connect Wireless Media Drive takes things one step further by also allow you to connect to an inserted SD memory card. With a price point similar to that of the Kingston at $80 for the 32 GB and $99 for the 64 GB, having the ability to add-on storage makes the SanDisk a better option.
Corsair Voyager Air is a little bit larger than either the Kingston or the SanDisk, but with that increase in size comes an increase in storage capacity. You can also attach the drive to your home network with an Ethernet cable. Priced at $180 for a 1 TB drive, byte for byte it is definitely the most economical solution of the three.
